


7
7.6 Setting the alarm time and day(s)
1. If necessary, press the MODE button to switch from default mode to alarm mode.
2. Press the MODE button again to select alarm 1, 2 or 3.
3. Press the UP button to enable the alarm function. The alarm symbol
(13)
will appear on
the display.
4. Press the MODE button for 3 seconds. The hour and minute settings for the alarm will start
to flash. Press the UP or DOWN buttons to set the desired alarm time.
5.
Press the MODE button again. The "Day of the week" setting will start to flash. Press the
UP or DOWN buttons to select the desired days from 3 options:
– Option 1: "MO/TU/WE/TH/FR/SA/SU" means the alarm sounds every day,
– Option 2: "SA/SU" means the alarm sounds at the weekend,
– Option 3: "MO/TU/WE/TH/FR" means the alarm sounds on working days.
6. Press the MODE button again to save the previously entered values.
Snooze function
When the alarm sounds, press the snooze/light button
(18)
to silence the alarm for 5 minutes.
Press any other button to turn the alarm off.
7.7 Setting the outdoor/indoor temperature alert function
Note:
– If you are using more than one outdoor sensor, press CHANNEL to select the desired
sensor.
1. Press the ALERT button to enable the temperature alert function. The alert symbol
(15)
will
appear on the display.
2. Press and hold the ALERT button to access the temperature alert settings. The alert
symbol
(15)
will start to flash.
3. Press the UP button to set the upper limit. Press the ALERT button. Press the DOWN
button to set the lower limit.
4.
Set the indoor limits first, followed by the outdoor limits. Wait approx. 10 seconds for your
settings to be saved.
7.8 Retrieving and deleting maximum and minimum readings
The product saves maximum and minimum readings and resets them at midnight.
1. Press the UP button to display the maximum temperature, minimum temperature and
current temperature.
2.
Press the UP button for 3 seconds to erase the memory. A sound will be played to confirm
that the memory has been erased.
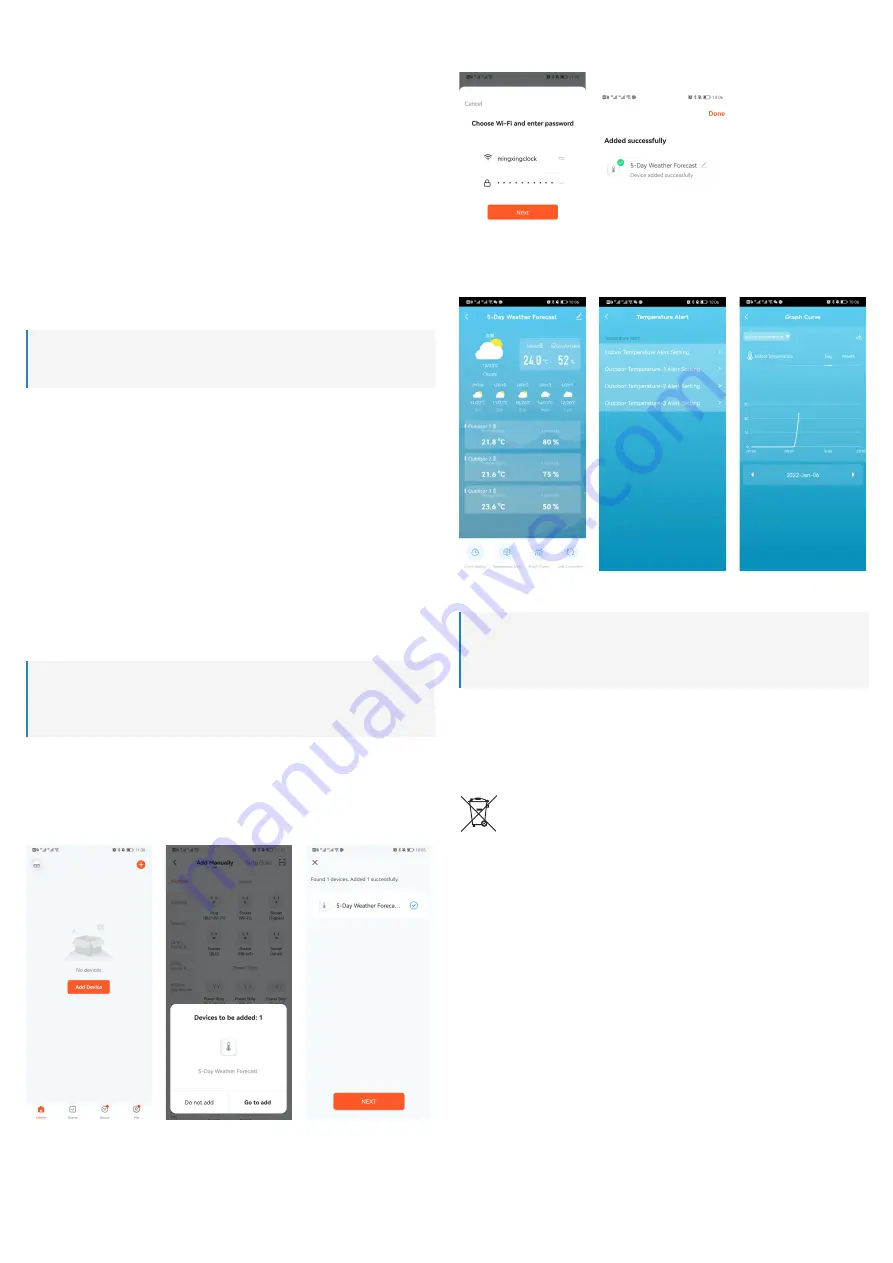
7.9 Operation via mobile device
Important:
– Make sure you are connected to a 2.4 GHz Wi-Fi network.
– If you want to operate the product via a mobile device, connect the supplied power
adapter to the product.
1. Download the Tuya app. The app is available for both iOS and Android
TM
devices.
2. If you have not already done so, connect the supplied power adapter to the product.
3. Enable Bluetooth on your mobile device.
4. Open the Tuya app and log in.
5.
Add your device: Touch "Add Device", select your device and confirm with "Go to add".
Touch "NEXT" to go to the next step.
6. In the next step, connect to your Wi-Fi network: Select your Wi-Fi network from the list and
enter your password. Touch [NEXT] to confirm your entry.
7. When the message "Added successfully" appears, touch "Done".
Æ
Your mobile device is now connected to the product, which you can control via the Tuya
app.
The Tuya app gives you access to all the functions from manual operation, as well as
visualizations for temperature and humidity trends:
8 Cleaning and care
Important:
– Do not use any aggressive cleaning agents, rubbing alcohol or other chemical
solutions. These may damage the housing and can cause the product to malfunction.
– Do not immerse the product in water.
1. Disconnect the product from the power supply.
2. Clean the product with a dry, lint-free cloth.
9 Disposal
9.1 Product
This symbol must appear on any electrical and electronic equipment placed on the
EU market. This symbol indicates that this device should not be disposed of as
unsorted municipal waste at the end of its service life.
Owners of WEEE (Waste from Electrical and Electronic Equipment) shall dispose
of it separately from unsorted municipal waste. Spent batteries and accumulators,
which are not enclosed by the WEEE, as well as lamps that can be removed from
the WEEE in a non-destructive manner, must be removed by end users from the
WEEE in a non-destructive manner before it is handed over to a collection point.
Distributors of electrical and electronic equipment are legally obliged to provide free take-back
of waste. Conrad provides the following return options
free of charge
(more details on our
website):
in our Conrad offices
at the Conrad collection points
at the collection points of public waste management authorities or the collection points set
up by manufacturers or distributors within the meaning of the ElektroG
End users are responsible for deleting personal data from the WEEE to be disposed of.
It should be noted that different obligations about the return or recycling of WEEE may apply in
countries outside of Germany


