7
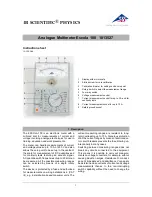
6. DOWN Button
This key is needed in the manual range mode to select the next lower
range.
7. Display Back Light
Press button short and several small LEDs illuminate the display-
background, it is sufficient to read display even in poor lighting conditions.
8. Transistor Socket
This socket is for testing the hfe-parameter of different semiconduc-
tors (except power transistors and FETs, triacs and thyristors).
9. Capacitance and Temperature & Signal Output, Input Socket
This socket is for testing discharged! capacitors or temperatures.
10. Rotary Function Switch to select the different modes (voltage and
current measurement, etc.)
11. 20-A Input Socket
This input socket is designed for measuring DC and AC current to
max. 20 A and is fused with 20 A.
12. mA-input
This socket is for measuring DC and AC current to 400 mA max.
13. COM-Input Socket (COM or Minus Terminal)
14. V-Ohm-(+) Input Socket (Plus Terminal)
15. Liquid Crystal Display (LCD) (3
3
/
4
digit, max. display value 4000)
16. Analogous Bargraph
17. Bargraph-Segments
Figure see folding page
18. Overload “OL“-Indication
“OL“ is displayed and an acoustic signal is emitted when the range is
exceeded = overflow (no acoustic signal during resistance measure-
ment, diode test or temperature measurement).
6
• If there are doubts whether a safe usage is still possible the unit has
to be put out of operation and be secured against unintentional use.
It must be assumed that a safe usage is not possible if
- the unit shows visible damage
- the unit does not work and
- longterm storage under unfavourable conditions
or
- transport strain took place
• Don’t switch on the measuring unit immediately after bringing it in
from a cold to warm room. Condensed water might impair or destroy
your unit. Give the unit time to warm up to room temperature with-
out switching it on.
3. Description of the Operation Elements
Picture see folding page
1. Power ON/OFF
2. Push Button for Function
With this key you can set the different sub-function as, MIN/MAX,
REL, CMP etc.
3. Set/Reset Button “SET/R“
With this key the unit is reset, the selected function mode is exited.
In certain function modes the Reset function does not work!
4. DC OHM
/AC Push Button
Press this button to toggle between DC and AC when function switch
is set to voltage or current, or when function switch is set to resi-
stance to change between resistance measurement to (acoustic) con-
tinuity check.
5. UP Button
The key is needed in the manual range mode to select the next
higher range.