


Mobile Scanner “WLAN Edition”
Version 02/13
Item no. 88 41 50
Intended use
Use the mobile scanner as a portable scanning device. It is also suitable for master copies that cause
problems with a normal flat-bed scanner, such as books or bound documents that have several pages. Just
move the scanner over the document and the scanned image is available in either JPEG or PDF format
on an inserted microSD card (included). You then read out the stored data on the computer via USB (USB
cable included).
The “magicscan” application is available for Apple iOS devices (iPhone, iPod touch, iPad) and allows direct
scanning and transfer of documents to your Apple product via WLAN. The “magicscan” software included
allows direct processing of the scanned documents on a Windows
®
computer. Power is supplied by four AAA
batteries or via a USB power supply.
For safety and approval purposes (CE), you must not rebuild and/or modify this product. If you use the
product for purposes other than those described above, the product may be damaged. In addition, improper
use can cause hazards such as short circuiting, fire, electric shock etc. Read the instructions carefully and
keep them. Make this product available to third parties only together with its operating instructions.
This product complies with the statutory national and European requirements. All company names and
product names are trademarks of their respective owners. All rights reserved.
Delivery content
• Scanner
• microSD card (2 GB)
• Software CD
• USB cable (180 cm)
• Storage pouch
• Operating instructions
Safety instructions
Read the operating instructions carefully and especially observe the safety information.
If you do not follow the safety instructions and information on proper handling in this
manual, we assume no liability for any resulting personal injury or damage to property.
Such cases will invalidate the warranty/guarantee.
a) Persons / Product
• Keep the product and the wiring away from electromagnetic sources of interference.
• The device is not a toy. Keep it out of the reach of children and pets.
• Do not leave packaging material lying around carelessly. These may become dangerous
playing material for children.
• Protect the product from extreme temperatures, direct sunlight, strong jolts, high humidity,
moisture, flammable gases, vapours and solvents.
• Do not place the product under any mechanical stress.
• If it is no longer possible to operate the product safely, take it out of operation and protect it from
any accidental use. Safe operation can no longer be guaranteed if the product:
- is visibly damaged,
- is no longer working properly,
- has been stored for extended periods in poor ambient conditions or
- has been subjected to any serious transport-related stresses.
• Please handle the product carefully. Jolts, impacts or a fall even from a low height can damage
the product.
• Also observe the safety and operating instructions of any other devices which are connected
to the product.
b) (Rechargeable) batteries
• Correct polarity must be observed while inserting the (rechargeable) batteries.
• (Rechargeable) batteries should be removed from the device if it is not used for a long period
of time to avoid damage through leaking. Leaking or damaged (rechargeable) batteries might
cause acid burns when in contact with skin, therefore use suitable protective gloves to handle
corrupted (rechargeable) batteries.
• (Rechargeable) batteries must be kept out of reach of children. Do not leave (rechargeable)
batteries lying around, as there is risk, that children or pets swallow them.
• All (rechargeable) batteries should be replaced at the same time. Mixing old and new
(rechargeable) batteries in the device can lead to (rechargeable) battery leakage and device
damage.
• (Rechargeable) batteries must not be dismantled, short-circuited or thrown into fire. Never
recharge non-rechargeable batteries. There is a risk of explosion!
c) Miscellaneous
• Consult an expert when in doubt about operation, safety or connection of the device.
• Maintenance, modifications and repairs are to be performed exclusively by an expert or at a
qualified shop.
• If you have questions which remain unanswered by these operating instructions, contact our
technical support service or other technical personnel.
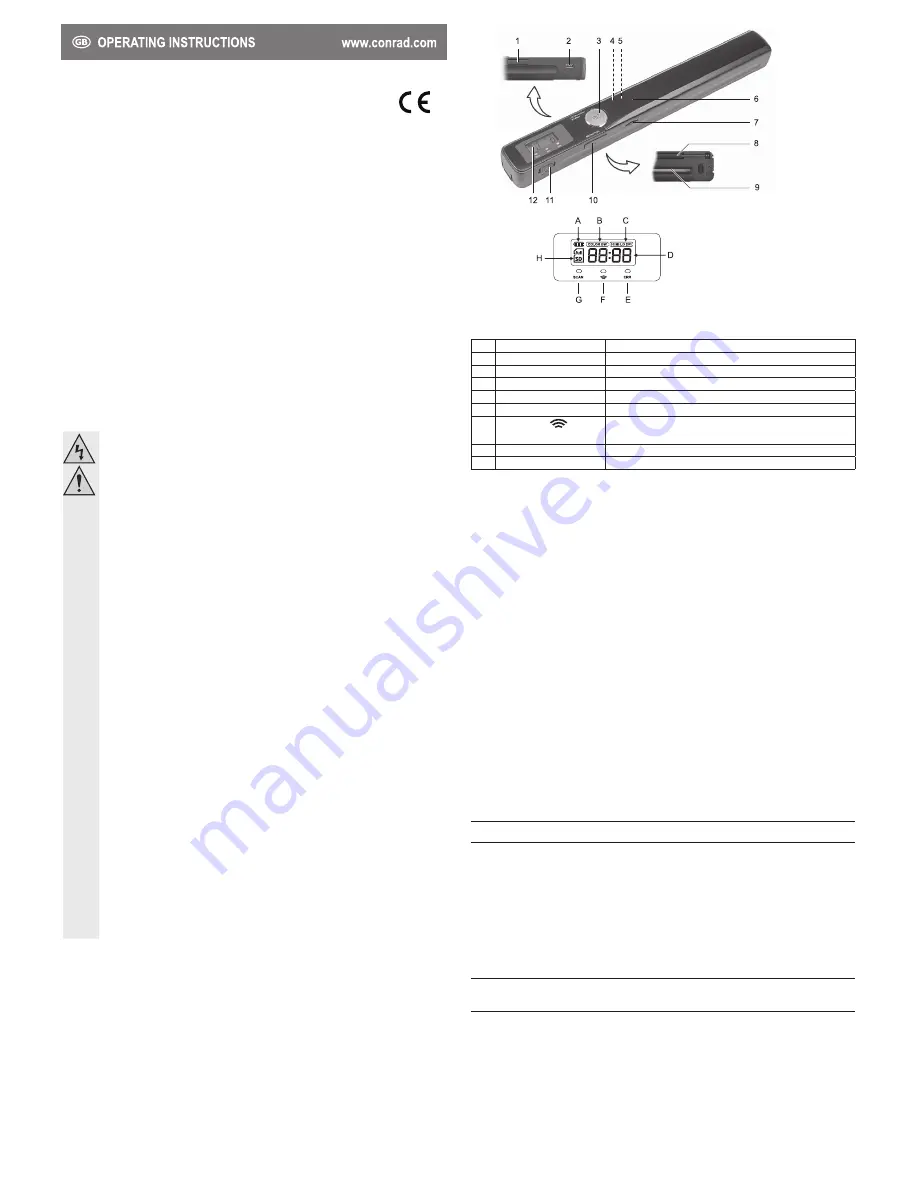
Operating elements
1. COLOR/MONO/JPG/PDF button
2. Mini-USB port
3. SCAN button
4. FORMAT button
5. TIME SET button
6. Battery compartment cover
7. microSD card slot
8. Guide roller
9. Imaging bar
10. RESOLUTION button
11. SET-ON-OFF switch
12. Display
Short overview
Pos Component / display
Display function / action
A Battery display
Replace batteries if display is empty
B
Colour mode
Colour mode, black/white “BW” or colour “COLOR”
C Resolution
“HI” (900 dpi) / “MI” (600 dpi) / “LO” (300 dpi)
D File number / image format File number on microSD card / image format PDF or JPEG
E
Control lamp ERR
[shines] Batteries empty / error while scanning
F
Control lamp
[shines] WLAN transmission taking place
[flashes] WLAN setting taking place
G Control lamp SCAN
[shines] Scan procedure is being carried out
H microSD card display
[shines] microSD card available / “full” with full microSD card
Inserting / replacing batteries
1. Push the battery compartment cover (6) outward and remove it.
2. Insert four type AAA batteries in the battery bays. Note the polarity markings in the battery bays. Slide the
battery compartment cover on until it engages.
Switching on/off
1. Press and hold down the SCAN button (3) for ca. 2 seconds to switch the scanner on. The display (12)
lights up.
2. To switch off, hold the SCAN button down for approximately 3 seconds. The display will go out. If there is
no input during battery operation (and there is no WLAN connection) for ca. 3 minutes, the scanner will
automatically switch off.
Inserting and formatting a microSD card
1. Insert a microSD card (max. 32 GB) in the microSD card slot (7) until it engages. Note the direction as
indicated on the scanner next to the microSD card slot.
2. With the battery compartment cover open, push the FORMAT button (4) with a thin blunt object while the
scanner is switched on. “F” appears in the display (12). Confirm the formatting process with the SCAN
button. The microSD card is being formatted. Caution! All data will be deleted.
3. For later removal, switch the scanner off (prevent data loss) and push the microSD card in until it releases.
Setting the time stamp
A time stamp in the file name is automatically added to the scanned files. Setting the time stamp:
1. Remove the battery compartment cover. Press the TIME SET button (5) with a thin blunt object while the
scanner is switched on. The year flashes in the display.
2. Use the COLOUR/MONO/JPG/PDF (1) (up) and RESOLUTION (10) (down) buttons for navigation.
Confirm the inputs with the SCAN button and jump to the next setting item. Leave the menu with the TIME
SET button. Setting sequence:
Year
month
day
hours (24-hr format)
minutes
year
Note that the time setting will be lost if the batteries are removed.
Setting the resolution
1. Turn the scanner on. Set the desired resolution with the RESOLUTION button (HI = 900 dpi, MI = 600 dpi,
LO = 300 dpi). Note the resolution display (C).
2. Note that a higher resolution lengthens the scanning process and results in a bigger file size.
Choosing the colour mode and file format
Turn the scanner on. Set the colour mode and file format with the COLOUR/MONO/JPG/PDF button. The
settings are shown in the display (B, D) as follows:
“JP 9 / COLOUR” – JPEG image format in colour; “PDF / COLOUR” – PDF image format in colour
“JP 9 / BW” – JPEG image format in black & white; “PDF / BW” – PDF image format in black & white
Scanning a document
1. Turn the scanner on. Prepare the desired document. Make sure that the surface of the document is clean
and free of dust and objects that could scratch or otherwise damage the imaging bar (9).
2. Press the SCAN button. The SCAN control lamp (G) lights up. Guide the scanner carefully and slowly over
the document. Make sure that the guide rollers (8) are touching. When you reach the end of the document,
press the SCAN button to store the image on the inserted microSD card.
3. If an error occurs during scanning (e.g., moving too quickly while scanning), the ERR control lamp (E)
lights up. Repeat the scanning procedure.