


2. Deciding the easiest cabling run for the speakers.
Take advantage of existing features such as any wooden picture rails or perhaps notice
boards (it is much easier to fit cable clips to wood than plaster). If you have a false
ceiling the cable can be run above it. Sometimes using a piece of plastic mini trunking
for any difficult runs is a good solution.
Speaker wiring
Speaker wiring – one cable run down
each side of the classroom wiring 2
(or 3) speakers in parallel. It is
important to maintain the correct
polarity when connecting the cable so
we suggest connecting the black trace
wire to the black terminal(!)
(Each
speaker is 4 Ohms thus for 4 speakers
we now have 2 Ohms on each cable).
The fmGenie Diversity has 4 terminals
– red, black, black, red. Connect the
two cable runs, one to the left pair and
one to the right pair, again maintaining
correct polarity ie black trace wire to
the black terminals.
(The terminals are wired internally to
connect the two cable runs in series
making the load on the amplifier 4
Ohms. The actual amplifier
connections are the 2nd and 4th
terminal as viewed from below, which
you would need to know if you wanted
to test the amplifier with just one
speaker)
The cable is white with a black stripe
along one wire. The white only wire
should always be connected to the red
terminals and the black stripe wire
always to the black terminal.
fmGenie Diversity Soundfield
B44FDIVINS – fmGenie Diversity Soundfield Installation Instructions V1.3
3
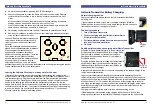
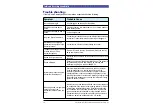
Four speaker wiring
Six speaker wiring
red black
red black black
red black
red black
red black
red black
red black
red
red black
red black black
red black
red black
red black
red
fmGenie Diversity Soundfield
2
B44FDIVINS – fmGenie Diversity Soundfield Installation Instructions V1.3
An overview of the installation steps are:
1) Decide where the speakers are to be fitted
2) Decide the easiest cabling run for the speakers – which may not be the shortest.
3) Decide where to mount the fmGenie Diversity Receiver/amplifier
4) Install the system
5) Setting up and testing the system
6) Demonstrate and set the volume level for the user.
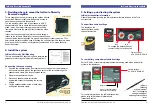
Charge batteries now if possible
Rechargeable batteries require charging before use, so if you have
a standard plug-in AA or fmGenie twin tail charger, we suggest that
you start charging the transmitter batteries now whilst the system is
being fitted.
Even just an hour or so will give enough charge to test the system.
A proper charge can be given when the setting up or demonstration
has finished.
If you don't have a suitable charger you will need to use the inbuilt fmGenie Diversity
charger, but naturally you cannot start charging until the system has been fully installed.
A pair of AA alkaline batteries can be used (or borrowed) for testing if necessary – but
do not try charging them!
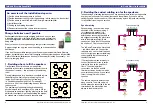
1. Deciding where to fit the speakers
Firstly please do not think home hi-fi and put the
speakers in the corners, at waist level and point them to
the centre of the room – this is the worst possible thing
to do!
Placing loudspeakers for a classroom soundield is more
like deciding how best to light a room using 4 small
lamps. If you think light you will not go far wrong,
i.e. fitted above head height (2 to 2.5 metre high)
each over a 1/4 of the room pointing down on the area
to be covered.
The positioning of speakers is often predecided by
physical objects such as windows. You have to fit 4 (or
6) speakers so adapt your ‘lighting’ plan to give the best
pattern for the students – perhaps avoiding the window,
an unused end of a classroom or a teachers desk.
window
Speaker position allowing for a window


