background image

Clothing Iron Unique Features

This iron has been designed with some new features
not previously available on steam irons. Please take
some time to familiarize yourself with them:

Electronic OneTouch™ Control

This control system provides precision temperature control to greatly

improve fabric-pressing performance. 

Ready Indicator: Displays one, two, or three dots when the iron has reached the

selected temperature. If there are no dots in this area, the iron is not ready. These dots
correspond to international recommendations for safe pressing temperatures and may
be found on the fabric care label of your garment. For example, one dot matches the
setting for synthetics, 2 dots for silk to wool, 3 dots for wool to linen.

Auto Off Indicator: Will blink steadily when iron has not been moved and the

heater has shut down.  This indicator will also blink when iron is in Crafter’s Setting 
(heel rest/auto shutoff bypass).

Message Area: This area of the display will indicate the fabric setting, and will display

alert messages.

Steam Indicator: Will appear when the heater is at the right temperature to pro-

duce steam (recommended for wool, cotton, and linen settings).

Headlamp Indicator: Will appear when headlamp is on.

On/Off Button: Use this to turn the appliance on or off. Also used to activate

Crafter’s Setting.

Up/Down Arrow Selector Buttons: Use to select the fabric setting for the iron.

Headlight On/Off Button: Use this to turn the headlamp on or off.

1

2

3

4

5

1

3

4

5

2

6

7

8

7

6

8

Thanks for your purchase of the Conair Digital Steam Iron. We

have used the highest quality materials in the production of this

clothing iron to ensure long-lasting performance. 

Please be sure to read the following instructions carefully before

you use your Conair Digital Steam Iron for the first time. Once you

have familiarized yourself with this appliance, please save this

instruction manual for future reference.

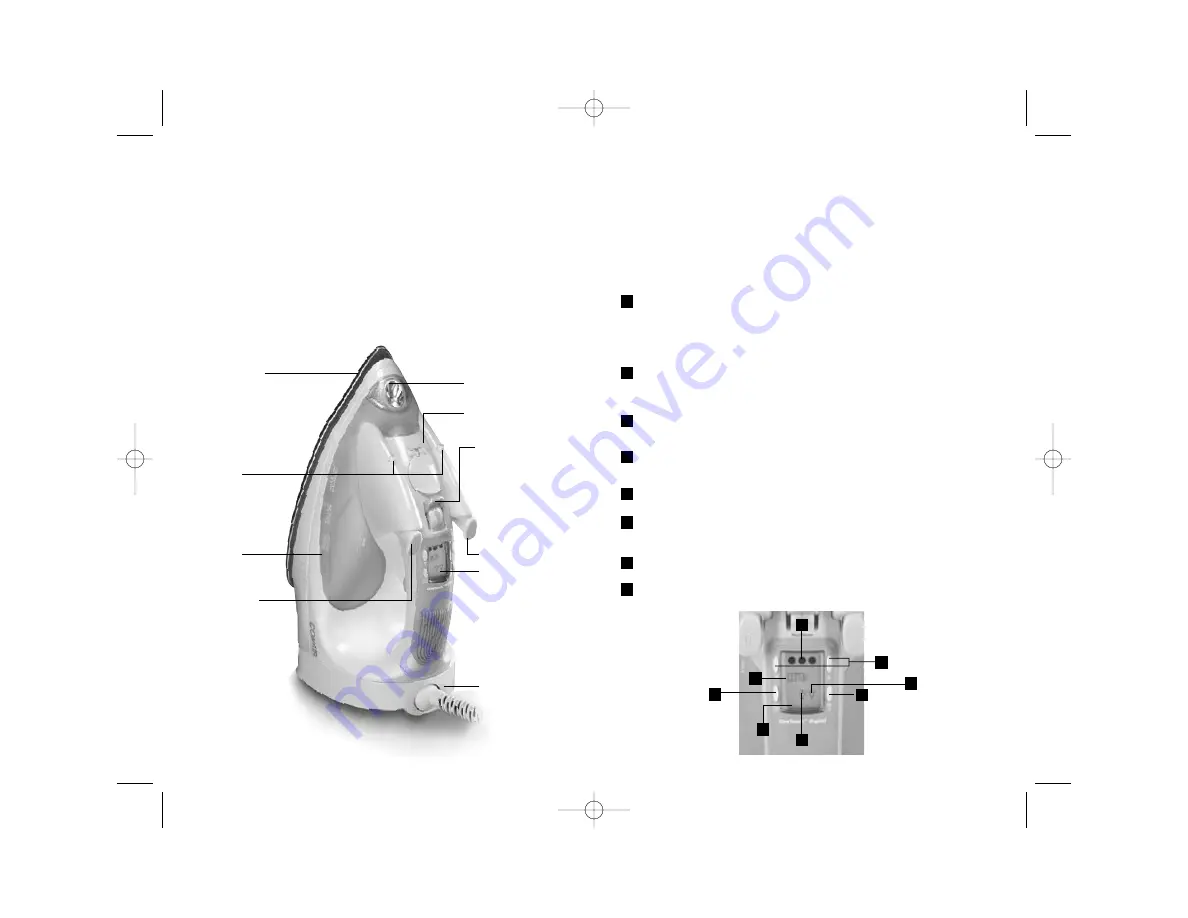
Getting To know your Digital Steam Iron

Oversized soleplate covers
more fabric. Curved nose gets
between buttons

Dual spray 
nozzles for 
wider coverage

Electronic OneTouch™
control panel on top of
handle puts settings at
your fingertips. Easy to
read display indicates 
the fabric setting and
status of the iron.

Front work light 
illuminates wrinkles
(included on some
Conair steam irons)

Extra large 
12 oz/375 ml
water tank

Power Cord

1500 watt heater

Anti-Calcium additives
soften water and
extend the life of 
the iron 

Variable Steam
adjusts steam output
to your ironing needs.

Self Clean setting uses
powerful steam burst
to clean out steam
chamber and improve
performance.

Water fill

Water spray control

Burst of Steam
control

05CN1258 DPP3000C IB  11/17/05  11:52 AM  Page 4

Summary of Contents for DPP3000 Series

Page 1: ... Digital Steam Iron User Guide DPP3000 DPP4000 Series 7 Setting LCD For your safety continued enjoyment of this product always read the instruction booklet carefully before using 05CN1258 DPP3000C IB 11 17 05 11 52 AM Page 1 ...

Page 2: ...ORTANT SAFEGUARDS When using your iron basic precautions should always be fol lowed including the following READ ALL INSTRUCTIONS BEFORE USING Use iron only for its intended use To protect against a risk of electric shock do not immerse the iron in water or other liquid The iron should always be turned Off before unplugging from an outlet Never yank cord to disconnect from outlet instead grasp plu...

Page 3: ... turn the appliance on or off Also used to activate Crafter s Setting Up Down Arrow Selector Buttons Use to select the fabric setting for the iron Headlight On Off Button Use this to turn the headlamp on or off 1 2 3 4 5 1 3 4 5 2 6 7 8 7 6 8 Thanks for your purchase of the Conair Digital Steam Iron We have used the highest quality materials in the production of this clothing iron to ensure long l...

Page 4: ...ll door and wipe off any water that may have spilled on the outside of the iron with a soft clean cloth 2 Set the iron on a stable flat surface when selecting the settings We recommend using a quality ironing board as the pressing surface Be sure to give yourself enough room to maneuver the iron when pressing Soleplate The soleplate on this iron has a curved design at the tip which makes it much e...

Page 5: ...tilt the iron back and forth USE CAUTION IN THE NEXT STEP as the soleplate and flushed water and deposits will be very hot 3 Plug the iron into a 120V electrical receptacle Make sure that no other high wattage appliances are plugged into the same circuit 4 Press the power on off button You will see the following message on the display Hello please select fabric setting by pressing up or down butto...

Page 6: ...he Self Clean control and place iron on its heel rest 9 Unplug iron 10 With a clean soft cloth wipe soleplate clean of water and flushed deposits Before reusing iron after Self Clean Procedure 1 Refill water tank 2 Set iron to maximum When it is ready operate Burst of Steam to flush any remaining deposits out of the soleplate Automatic Shutoff This iron is equipped with an automatic shutoff circui...

Page 7: ...ORTANT SAFEGUARDS When using your iron basic precautions should always be fol lowed including the following READ ALL INSTRUCTIONS BEFORE USING Use iron only for its intended use To protect against a risk of electric shock do not immerse the iron in water or other liquid The iron should always be turned Off before unplugging from an outlet Never yank cord to disconnect from outlet instead grasp plu...

Page 8: ... turn the appliance on or off Also used to activate Crafter s Setting Up Down Arrow Selector Buttons Use to select the fabric setting for the iron Headlight On Off Button Use this to turn the headlamp on or off 1 2 3 4 5 1 3 4 5 2 6 7 8 7 6 8 Thanks for your purchase of the Conair Digital Steam Iron We have used the highest quality materials in the production of this clothing iron to ensure long l...

Page 9: ...ll door and wipe off any water that may have spilled on the outside of the iron with a soft clean cloth 2 Set the iron on a stable flat surface when selecting the settings We recommend using a quality ironing board as the pressing surface Be sure to give yourself enough room to maneuver the iron when pressing Soleplate The soleplate on this iron has a curved design at the tip which makes it much e...

Page 10: ...tilt the iron back and forth USE CAUTION IN THE NEXT STEP as the soleplate and flushed water and deposits will be very hot 3 Plug the iron into a 120V electrical receptacle Make sure that no other high wattage appliances are plugged into the same circuit 4 Press the power on off button You will see the following message on the display Hello please select fabric setting by pressing up or down butto...

Page 11: ...he Self Clean control and place iron on its heel rest 9 Unplug iron 10 With a clean soft cloth wipe soleplate clean of water and flushed deposits Before reusing iron after Self Clean Procedure 1 Refill water tank 2 Set iron to maximum When it is ready operate Burst of Steam to flush any remaining deposits out of the soleplate Automatic Shutoff This iron is equipped with an automatic shutoff circui...

Page 12: ...sence of a purchase receipt the warranty period shall be 12 months from the date of manufacture ANY IMPLIED WARRANTIES OBLIGATIONS OR LIABILITIES INCLUDING BUT NOT LIMITED TO THE IMPLIED WARRANTY OF MERCHANTABILITY AND FITNESS FOR A PARTICULAR PURPOSE SHALL BE LIMITED IN DURATION TO THE 12 MONTH DURATION OF THIS WRITTEN LIMITED WARRANTY IN NO EVENT SHALL CONAIR BE LIABLE FOR ANY SPECIAL INCIDENTAL...

Reviews: