background image

Comtrol IO-Link Master Initial Installation and Configuration


Verifying the Software (Image Versions) 

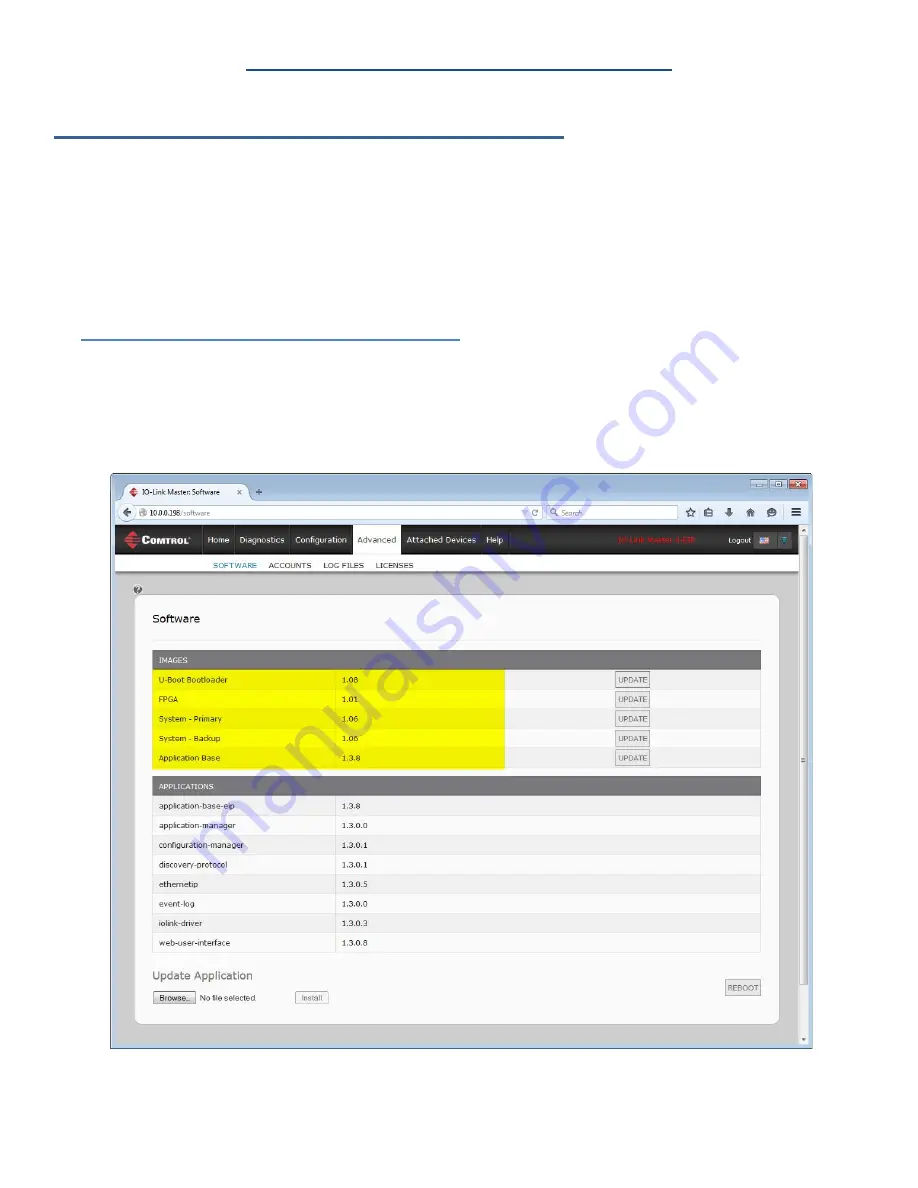
You can use the following information to determine whether the IOLM contains the latest software. 


Checking the versions on the IOLM 


Checking the Comtrol ftp site for the latest version and downloading the files 


Using PortVision DX to update software 

Note:   PortVision DX displays the Application Base image version, for example: EtherNet/IP. The IOLM 

contains four images.


Checking the IOLM Software Versions 

Use this procedure to check the software on the IOLM. 

1.  Open your web browser and enter the IP address of the IOLM or highlight the IOLM in PortVision 

DX and click the 

Webpage

 button. 

2.  Click 

Advanced | Software

3.  Check the version numbers of the IOLM images. 


3/27/2015 

P a g e

 | 

12


Summary of Contents for IO-Link Master 4-EIP

Page 1: ...l Installation and Configuration Application Note This document provides the following information Connecting the IOLM power and network Using PortVision DX to program the IP address Verifying the latest firmware is loaded ...

Page 2: ... Switch 5 Mounting the IOLM 4 EIP 6 Connecting to the Network 6 Connecting the Power 6 Using PortVision DX to Program the IP Address 8 Download and Install PortVision DX 9 Programming the IP Address 9 Verifying the Software Image Versions 12 Checking the IOLM Software Versions 12 Checking the Comtrol ftp Site for the Latest Files 13 Updating Software 13 PortVision DX 13 Using the Web Page to Updat...

Page 3: ...nnect the other end to the network 3 Optionally you can use the other Ethernet port to daisy chain to another Ethernet device Connecting the Power Use either power terminal top or bottom but do not use both to supply power to the DR 8 EIP Signal Description Power Requirements Values V 24VDC Power Supply Return Voltage Input Range 18 to 30VDC V 24VDC Power Supply Return Input Power 24VDC 4A V Prima...

Page 4: ... test mode After the self test depending on whether you set the IP address with the rotary switch one of the following occurs o Off indicates there is no IP address o Steady red indicates a duplicate IP address on the network LINK should be lit green to indicate a valid network connection ACT blinks if there is network traffic between the DR 8 EIP and the network Port LEDs should display in this m...

Page 5: ...rk values are IP address 192 168 1 250 Subnet mask 255 255 255 0 IP gateway 0 0 0 0 001 254 This is the last three digits in the IP address This uses the first three numbers from the configured static address which defaults to 192 168 1 xxx 255 887 Reserved 888 Reset to factory defaults 889 997 Use the network configuration values stored in the flash reserved 998 Use DHCP addressing 999 Use the de...

Page 6: ...net port to daisy chain to another Ethernet device 4 If you did not connect both Ethernet ports make sure that the port is covered with a connector cap which was shipped with the IOLM 4 EIP to keep dust and liquids from getting in the connector Note Ethernet ports must have an approved cable or protective cover attached to the port to guarantee IP67 compliance Connecting the Power The IOLM 4 EIP p...

Page 7: ...ode o The green LED is lit to indicate that the IOLM 4 EIP is operational NET first it flashes green and red indicating that it is in self test mode After the self test depending on whether you set the IP address with the rotary switch one of the following occurs o Off indicates there is no IP address o Steady red indicates a duplicate IP address on the network LINK should be lit green to indicate...

Page 8: ...eature support For example you cannot configure or update firmware on a third party switch PortVision DX also provides these features Telnet SSH interface PuTTY Ability to save and load IOLM configuration files Save Device Diagnostics Data which can be sent to Comtrol in the event you have a support issue LED Tracker feature Use the Advanced Network embedded web page if you want to configure the f...

Page 9: ...s into the IOLM Programming the IP Address Use the following procedure to program the IP address into the IOLM using PortVision DX Note Connect a single IOLM at a time because they all have the same default IP address PortVision DX cannot program an IP address in cases where there are multiple IOLMs with the same IP address 1 4 EIP Optionally you can use the web interface to configure or Rotary sw...

Page 10: ...ration 6 Right click the IOLM that you want to program in the Device List pane lower and then click Properties Optionally you can double click on the IOLM to open the Properties tabs It may take a few moments for the next screen to open 3 27 2015 P a g e 10 ...

Page 11: ...If necessary see your Network Administrator for a valid IP address for this IOLM The default IP address is 192 168 1 250 b Enter a valid subnet mask for your network The default Subnet Mask is 255 255 255 0 c Enter a valid IP gateway address for your network The default Gateway Address is 0 0 0 0 If you select DHCP this field displays the last IP address programmed into the IOLM Note Rotary switch...

Page 12: ...downloading the files Using PortVision DX to update software Note PortVision DX displays the Application Base image version for example EtherNet IP The IOLM contains four images Checking the IOLM Software Versions Use this procedure to check the software on the IOLM 1 Open your web browser and enter the IP address of the IOLM or highlight the IOLM in PortVision DX and click the Webpage button 2 Cl...

Page 13: ...hese methods to update software images or application subassemblies on the IOLM PortVision DX IOLM web interface PortVision DX You can use this procedure to update software on the IOLM using PortVision DX 1 If necessary start PortVision DX 2 Right click the IO Link Master that you want to update and click Advanced and then Upload Firmware 3 Browse to the location you saved the image or images high...

Page 14: ...eb page 1 Open your web browser and enter the IP address of the IOLM or highlight the IOLM in PortVision DX and click the Webpage button 2 Click Advanced Software 3 Click the UPDATE button that corresponds to the image that you want to upload 4 Click the Browse button 5 Locate and highlight the file 6 Click Open 7 Click the Install button 8 Click the CONTINUE button to the Update Image pop up mess...

Reviews: