
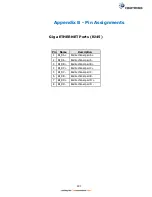


194
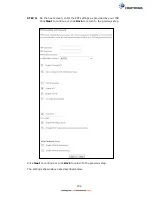
There are many settings here including: VPI/VCI, DSL Link Type, Encapsulation
Mode, Service Category and Queue Weight.
Here are the available encapsulations for each xDSL Link Type:
EoA- LLC/SNAP-BRIDGING, VC/MUX
PPPoA- VC/MUX, LLC/ENCAPSULATION
IPoA- LLC/SNAP-ROUTING, VC MUX
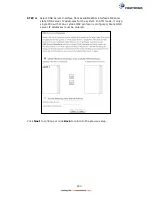
STEP 3:
Click
Apply/Save
to confirm your choices.
On the next screen, check that the ATM interface is added to the list. For example,
an ATM interface on PVC 0/35 in Default Mode with an EoA Link type is shown below.
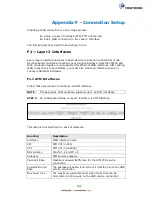
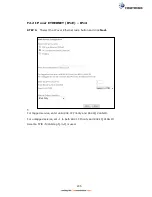
To add a WAN connection go to
Section F2
~
WAN Connections.
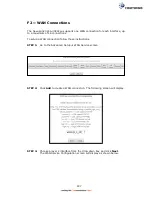
F1.2 PTM Interfaces
Follow these procedures to configure a PTM interface.
STEP 1:
Go to Advanced Setup
Layer2 Interface
PTM Interface.
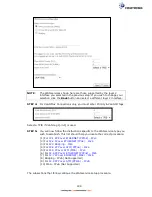
This table is provided here for ease of reference.
Heading
Description
Interface
WAN interface name.
DSL Latency
{Path0}
portID = 0
PTM Priority
Normal or High Priority (Preemption).
Connection Mode
Default Mode – Single service over one interface.
Vlan Mux Mode – Multiple Vlan services over one interface.
IP QoS
Quality of Service (QoS) status.
Remove
Select interfaces to remove.
Summary of Contents for NexusLink 3241eu
Page 1: ...261103 018 NexusLink 3241u 3241eu Bonding IAD User Manual Version A1 0 May 17 2017...
Page 16: ...15 STEP 3 After successfully logging in for the first time you will reach this screen...
Page 63: ...62 A maximum of 100 entries can be added to the URL Filter list...
Page 66: ...65 Click Enable to activate the QoS Queue Click Add to display the following screen...
Page 82: ...81 5 11 DSL Bonding This page displays the bonding status of the connected xDSL line...
Page 83: ...82 5 12 UPnP Select the checkbox provided and click Apply Save to enable UPnP protocol...
Page 103: ...102 Enter a certificate name and click Apply to import the CA certificate...
Page 115: ...114 Enter the MAC address in the box provided and click Apply Save...
Page 118: ...117...
Page 122: ...121 6 7 Site Survey 5GHz The graph displays wireless APs found in your neighborhood by channel...
Page 133: ...132 Enter the MAC address in the box provided and click Apply Save...
Page 141: ...140 6 17 WiFi Passpoint Note This function is not supported on this release...
Page 144: ...143 7 1 SIP Basic Setting...
Page 149: ...148 7 2 SIP Advanced Setting...
Page 150: ...149 7 2 1 Global Parameters This screen contains the advanced SIP configuration settings...
Page 154: ...153 7 3 SIP Debug Setting This screen contains SIP configuration settings used for debugging...
Page 187: ...186 STEP 2 Click the Windows start button Then select Control Panel...
Page 188: ...187 STEP 3 Select Devices and Printers STEP 4 Select Add a printer...
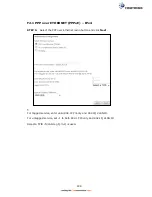
Page 214: ...213 F2 4 PPP over ATM PPPoA IPv4 STEP 1 Click Next to continue...


