7
Chapter 2 Hardware Setup
Follow the instructions below to complete the hardware setup.
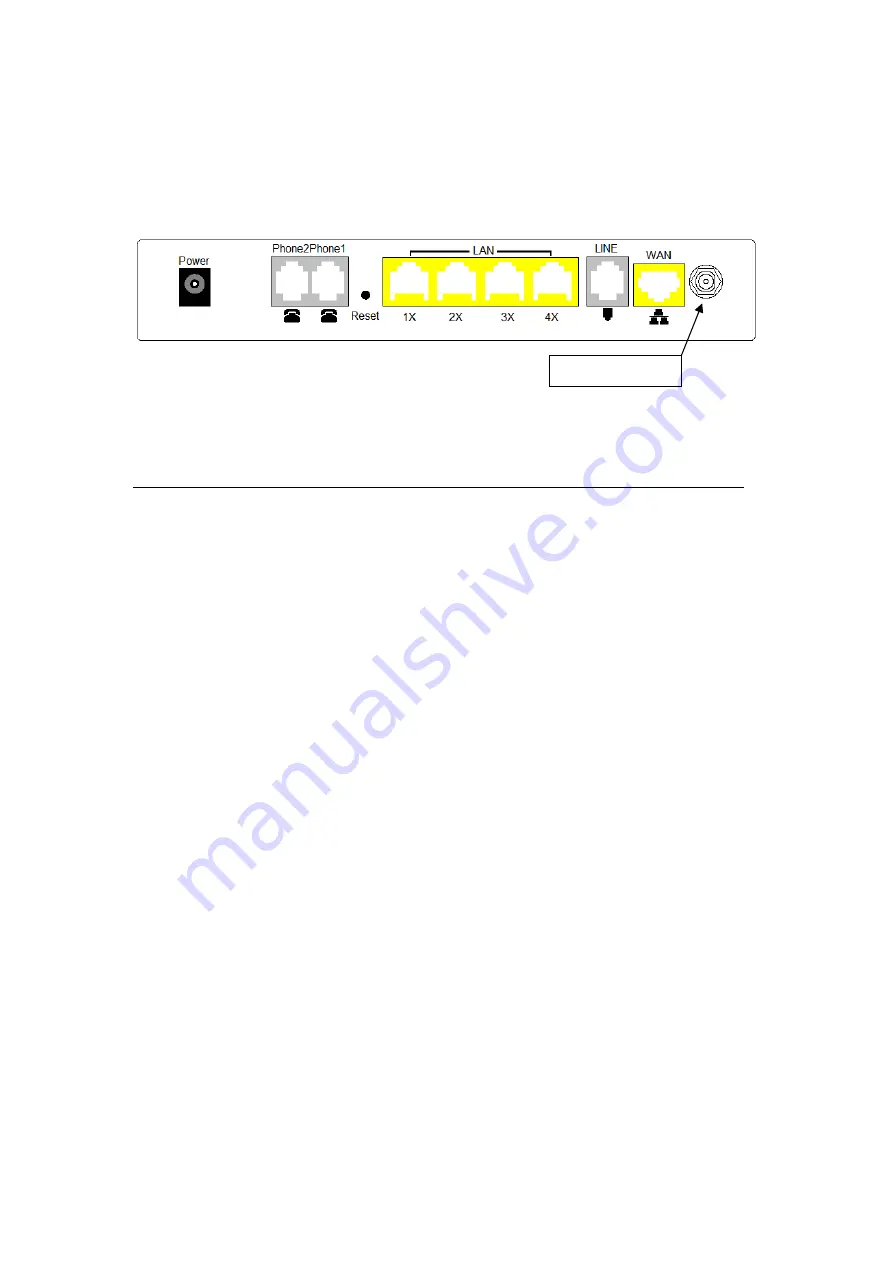
The diagram below shows the back panel of the device.
Connection to Power
Connect the
Power
jack to the power cord. Attach the power adapter to the wall
outlet or other AC source. At startup, the device will perform a self-test. Wait for
a few seconds until the test is finished, then the device will be ready to operate.
Caution 1:
If the device fails to power up, or it malfunctions, first verify that
the power supply is connected correctly. Then power it on again.
If the problem persists, contact our technical support engineers.
Caution 2:
Before servicing or disassembling this equipment always
disconnect all power cords and telephone lines from their outlets.
Connection to Phone1/ Phone2
Connect a telephone to either RJ11 port for VoIP service.
Reset Button
Restore the default parameters of the device by holding down the Reset button
until the front panel LED indicators start blinking simultaneously (~ 5 seconds).
If held down for more than 12 seconds, the device will go into a firmware update
state (CFE boot mode). The user can then update the device from any web
browser using the default IP address (http://192.168.1.1) without login.
Connection to LAN/WAN ports
Use a RJ45 cable to connect to a network hub or PC. You can connect the device
to up to four LAN devices and one WAN device. The ports are auto-sensing
MDI/X and either straight-through cable or crossover cable can be used.
Connection to LINE port
If you wish to connect both the router and a telephone, connect the LINE port to
a POTS splitter with a RJ11 connection cable.
Connection to WLAN
Attach the Wi-Fi antenna to enable this feature.
Wi-Fi antenna
Summary of Contents for CT-820C
Page 1: ...CT 820C VoIP Gateway User s Manual Version A2 0 December 26 2007 261053 034 ...
Page 6: ...5 1 2 Application The following diagram depicts the application of the CT 820C ...
Page 12: ...11 ...
Page 19: ...18 4 4 ARP Click ARP to display the ARP information ...
Page 20: ...19 4 5 DHCP Click DHCP to display the DHCP Leases information ...


