background image

D

ATA

M

AXX

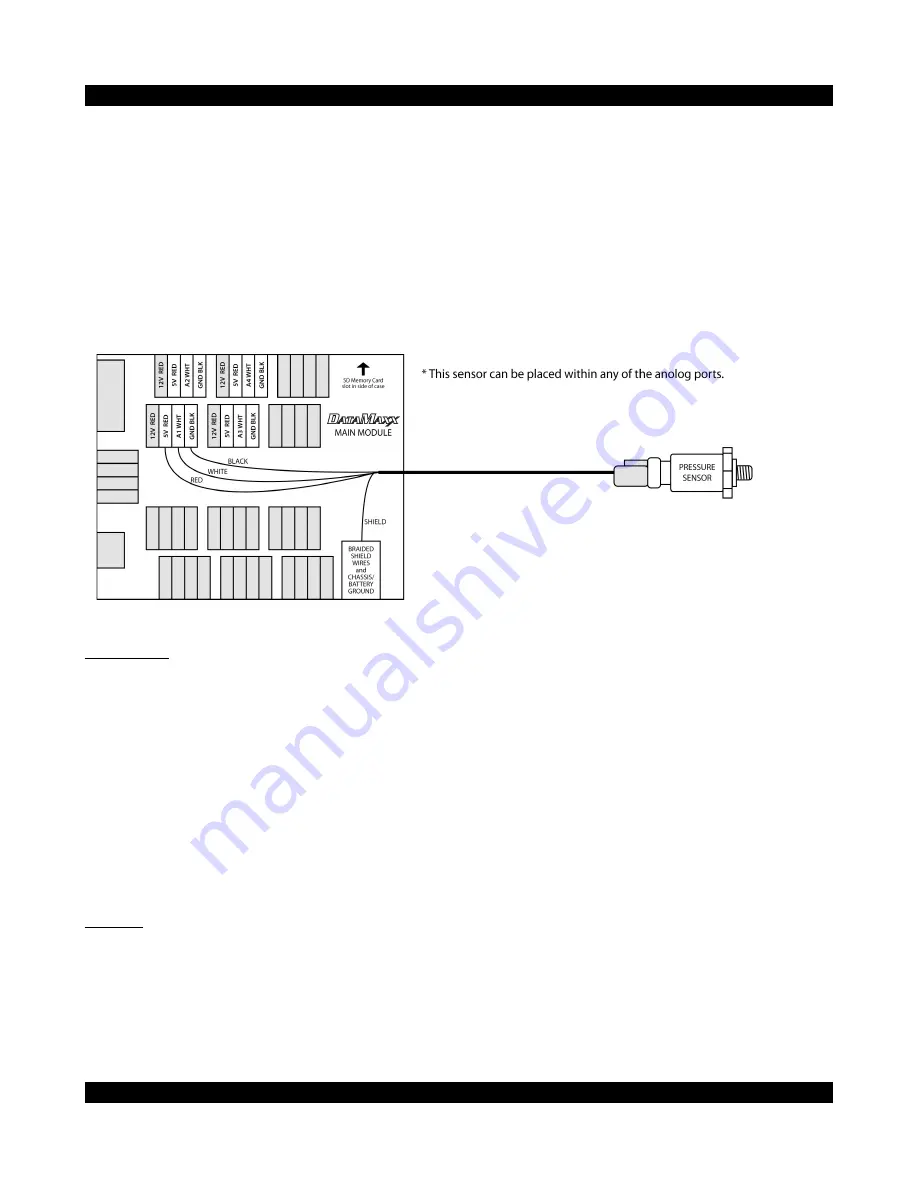
This wire will be plugged into an “A- WHT” terminal and will not need a ground wire connected as the
sensor housing itself acts as the connection to chassis ground.

Note:

 When using the economy sensor, you must make a change to the dip switch settings. Both

the “RTD” and “GND” dip switches must be in the ON position for the specific channel that
you installed the economy sensor on. Failure to do so will result in erratic readings.

If using any different pressure sensor, refer to the sensor’s manufacturer to determine the reference
voltage range. If the range is higher than 5V then the 12V reference voltage needs to be used. Note that
this sensor will also require a custom calibration.

Calibration

After installing your pressure sensor you will need to tell the computer and the 

D

ATA

M

AXX

 what type of

sensor it is. You will also need to know which Module and analog channel that you have plugged it
into. 

To configure, open the Calibration/Configuration window, and click on the “configure” button for the
specific channel that you have plugged the sensor into. You can now change the type of the pressure
sensor by choosing the correct range from “Type of Sensor” drop down menu.

Note:

 If using the economy pressure sensor, the name listed in the type of sensor drop down

menu is “Autometer Oil”

Testing:

All pressure sensors should read approximately zero when there is no pressure applied. The only way
to truly test a pressure sensor is to apply pressure to it and watch for a reaction. 
If for some reason a sensor is consistently reading a value other than zero at rest, you can add a line to
the calibration to get it closer, but this requires slightly more expertise than the standard configuration.
For more information go to “Custom Calibrations” in the Additional Information section.

Copyright c 2008 Computech Systems Inc.                                                                                             22

Summary of Contents for DATAMAXX

Page 1: ...lerometer 26 Oxygen Sensor 27 Suspension Position Sensor 29 Switches 31 Lights 32 SOFTWARE 34 Installing the DataMaxx Viewer 34 Initial Calibration 34 Lights Record 36 Overlaying Runs 36 Customizing Views 36 Shortcut Keys 37 Zones 37 Truncating Logfiles 37 Creating Custom Calibrations 38 Software Upgrades 38 ADDITIONAL INFORMATION 39 How to Wire Correctly 39 Avoiding RFI Noise 39 Dip Switch Settin...

Page 2: ... is blipping but not blinking 45 LCD Display is Blank 45 Engine RPM is Zero Not a Magneto 45 Engine RPM is Zero Using a Magneto 46 Engine RPM is Erratic or Noisy 46 Driveshaft RPM or Inputshaft RPM is Zero 46 Driveshaft RPM is Erratic or Noisy 47 Switch Status is Backwards 48 Switch is Always ON or OFF 48 Record Switch Doesn t Work 48 Cannot Find Your LogFiles 48 Copyright c 2008 Computech Systems...

Page 3: ...in order to avoid ignition components The more time you spend efficiently planning the better off your going to be 2 The next step is to fill out the DATAMAXX configuration page This is extremely important because you need to know exactly where the sensors are physically installed so that we can tell the software and calibrate them appropriately Be sure to list what type of sensor it is and refer ...

Page 4: ...o help identify the channels Refer to the sensors individual instructions and How to wire correctly in the Additional Information section After you are done wiring confirm that your installation matches your DATAMAXX configuration sheet 7 It is now time to tell the software and the hardware what is actually installed on your system You can either read the Initial Calibration in the Software sectio...

Page 5: ...__ Temp 2 __________ Exhaust 5 __________ Exhaust 6 __________ Temp 3 __________ Exhaust 7 __________ Exhaust 8 __________ Temp 4 __________ Analog Module A Analog A1 __________ Sensor Type __________ RTD _____ GND _____ Analog A2 __________ Sensor Type __________ RTD _____ GND _____ Analog A3 __________ Sensor Type __________ RTD _____ GND _____ Analog A4 __________ Sensor Type __________ RTD ___...

Page 6: ...more information on avoiding ignition interference refer to Avoiding RFI Noise in the Additional Information section The Main Module is the only part of the system that receives a power connection The best Main Module power connection is the same place you power the majority of your electronics and tachometers The next best connection is directly to the positive and negative terminals on your batt...

Page 7: ...imposed on top mean that the module is also recording to the Main Module s SD card Note that the Main Module green LED will only pulsate like this when recording to its own card It will not pulsate like this when you re recording to an SD card in the LCD Module Main Module Only Fast blips Recording but Broken The fast blips mean that the module is recording to the SD card However the lack of equal...

Page 8: ... or by a short anywhere on the CAN bus It s OK if this error occurs immediately after recording is stopped but then goes away shortly thereafter Other blip patterns Contact customer support Default Dip Switch Settings Additional Information Recording The Main Module has a dedicated terminal for a record switch Connecting a switch to this terminal id 35 will automatically enable recording without a...

Page 9: ...t as the mounting bolts should not be removed and removal will void your warranty To connect your LCD to your Main module use the supplied CAN cable put appropriate wire colors into the green LCD connector and connect the other end into any CAN Bus section within the Main module After the module has been mounted connect the CAN bus cable to the green connector supplied with your LCD You can then r...

Page 10: ...ation to be displayed Max Recall Hitting the Max button will display the maximum data from the last log file that was recorded to the SD card If there are no runs on the card then a log file not found message will be displayed Run Hitting the Run button allows you to toggle thru all the runs currently on your SD card After finding the run you want you can choose either Max or Playback to view the ...

Page 11: ...ur system capabilities by adding 4 analog channels Capabilities 4 Analog Channels Installation Install the module in a convenient place away from ignition components and connect your Analog CAN Bus to any Main module CAN Bus terminal Copyright c 2008 Computech Systems Inc 11 ...

Page 12: ...at Two blips separated by long pause CAN bus problem This can be caused by an open wire not reaching this module or by a short anywhere on the CAN bus It s OK if this error occurs immediately after recording is stopped but then goes away shortly thereafter Other blip patterns Contact customer support Default Dip Switch Settings Additional Information Multiple Analog Modules If you have chosen to e...

Page 13: ...magneto This creates a magneto antenna that significantly expands your ignition noise radius By using a clean 12V or ground signal to trigger a relay that will cut the magneto off you successfully keep all of your ignition noise centered around the engine Capabilities 1 SD Card Slot Installation Find a mounting location that is conveniently located and as far away from ignition sources as possible...

Page 14: ... are no bolt holes One way that has proven successful is mounting to a flat surface using strong Velcro or securing via wire ties After the module has been mounted you can run the wire from the EGT module to the Main module Cut to length strip back the insulation so the four colored wires can reach a CAN bus port and so the bare shield wire can be wrapped around one of the four ground posts Strip ...

Page 15: ...ower the green LED will at a minimum blip every few seconds Always on This should never happen If it happens repeatedly contact customer support Blinking Pattern for RED LED Meaning Always off Normal everything s great Two blips separated by long pause CAN bus problem This can be caused by an open wire not reaching this module or by a short anywhere on the CAN bus It s OK if this error occurs imme...

Page 16: ...to a chassis ground Calibration The DATAMAXX unit is pre configured to start recording whenever the record terminal is connected to ground which the switch does If for some reason your record switch does not trigger recording you will need to open the Calibration Configuration window click on the configure button for the Record channel In the Basic Settings tab the type of sensor should be Switch ...

Page 17: ...suitable rpm signal If the two wires or terminals are labeled and use the side for your rpm signal Otherwise choose one side arbitrarily It is safe to connect to the wrong one and you ll realize you ve done this if you get a very poor rpm reading In that case try the other terminals Magneto Ignitions We recommend using a mag tach adapter that will accept the noisy magneto signal and condition it i...

Page 18: ...the engine and let it idle If you have an LCD module the display should indicate the correct rpm Your graph should be smooth in general but be aware that most readings will bounce very rapidly within a 25 to 100 rpm range Keep in mind that many race ignition systems generate a great deal of radio frequency interference and that the ignition noise can cause erratic rpm readings If you believe you a...

Page 19: ... toward the center of the rotating shaft The exact position of the sensor in the bracket should be adjusted to achieve a gap of approximately 1 8 If your collar is slightly too large you can shave a small amount off of each end until it fits well Connect the white wire to the Main module DRV WHT terminal id 34 and the black wire to GND BLK terminal id 33 Calibration The DATAMAXX drive shaft rpm ch...

Page 20: ... and should wait until you get to the track INPUT SHAFT RPM Overview The input shaft RPM will tell you how many revolutions per minute your input shaft is spinning Part Numbers 8021 Universal Input Shaft RPM Monitor Kit Installation For the input shaft sensor and trigger installation please get specific details from your transmission supplier The typical sensor gap required for most input shaft in...

Page 21: ...ssure Kit 8030 0 to 150 Pressure Kit 8031 0 to 500 Pressure Kit 8033 0 to 2000 Nitrous Pressure Kit 8026 Economy Oil Pressure Kit Installation You can install the pressure sensor directly to the engine or selected application or use a type of cushioned clamp The cushioned clamp is the better alternative as it helps reduce the amount of vibration and can extend the life of your pressure sensor If u...

Page 22: ...r it is You will also need to know which Module and analog channel that you have plugged it into To configure open the Calibration Configuration window and click on the configure button for the specific channel that you have plugged the sensor into You can now change the type of the pressure sensor by choosing the correct range from Type of Sensor drop down menu Note If using the economy pressure ...

Page 23: ...is important that all probes be located the same distance from the header flange This will allow for comparison from cylinder to cylinder 2 Once the spot has been located drill a 5 16 diameter hole in the header pipe 3 Center the weld in weldment around the hole and weld to the header pipe a full 360 4 Coat the 1 8 pipe threads on the compression fitting liberally with anti seize and install the m...

Page 24: ...associate the correct cylinder with the correct channel Insert the male connector into the appropriate jack It will only go on one way 13 The cable may be shortened if required Cut the cable to the desired length plus some spare and carefully cut the stainless steel overbraid back approximately 1 Shrink tubing should be used over the cable where it exists the connector to make for a neater install...

Page 25: ...ust the calibration setting for that analog channel To configure open the Calibration Configuration window and click on the configure button for the specific channel that you have plugged the thermocouple into You can now change the type of the Type of Sensor to EGT 1800 degree range from the drop down menu Testing If the engine is off and cold the readings should be within 20 degrees Fahrenheit o...

Page 26: ...les work The corresponding RTD dip switch should be OFF and the GND dip switch should be ON If using the cylinder head temp kit place the probe around a cylinder head bolt or spark plug Then connect the supplied extension cable to the probe and run to an analog channel Then connect the yellow wire to the A WHT and the red wire to the A GND yes this may seem backwards but it is the way thermocouple...

Page 27: ...ensor to Datcon 02022 00 Temp Testing If the engine is off and cold the readings should be within 5 to 10 degrees Fahrenheit of room temperature If the engine is warm appropriate readings should be seen If your probes are reading close to 30 degrees then there is very likely an accidental reversal of wires somewhere If your probe is reading a maximum or close to 470 degrees then there is an open c...

Page 28: ...and can be cut off Calibration To configure open the Calibration Configuration window and click on the configure button for the specific channel that you have plugged the sensor into You can now change the type of sensor to Accelerometer Note that if you want the accelerometer to be zero when you launch open the channel properties select the filter for your accelerometer channel and select the che...

Page 29: ...run an 18 x 1 5 mm tap through the threads Failure to clean the threads may result in sensor damage Always use an anti sieze lubricant on the sensor threads 3 Install the Wego IIID unit The unit is fully sealed but should be mounted away from sources of engine or exhaust heat The unit can be secured by means of two 8 screws through the mounting flanges 4 Connect the Bosch sensors to the 6 pin mati...

Page 30: ...r is replaced If you cannot get an LED to flash when its trim pot is turned full clockwise you either have a damaged sensor or very high hydrocarbon levels in your environment To calibrate the DATAMAXX to an oxygen sensor open the Calibration Configuration window and click on the configure button for the specific channel that you have plugged the sensor into You can now change the type of sensor t...

Page 31: ...cross member or floor pan directly above the axle housing Make certain you will be able to mount the transducer for the opposite side of the suspension i e one on the left rear and one on the right rear the same distance from the center line of the vehicle so that the difference in readings between the transducers will truly represent actual suspension movement differences and not skewed readings ...

Page 32: ...may cause the wire rope to be pulled out of the transducer as the suspension reaches its fullest travel length This will not only ruin the transducer but it will probably also ruin your day Always disconnect the wire rope eyelet from the suspension before jacking up the vehicle or performing any maintenance on the vehicle suspension Calibration To configure open the Calibration Configuration windo...

Page 33: ... trans brake besides a delay box Check with your local official before installing any trans brake switch Also connecting a trans brake to an input that is not optically isolated will cause a power surge to your DATAMAXX possibly destroying it and voiding your warranty If you choose to monitor your trans brake connect the trans brake signal wire to the magneto signal terminal id 42 and connect a se...

Page 34: ... lights do not have a separate calibration line in the Channel Properties because the lights are triggered by all of the other sensors To activate a light through a sensor click on the desired sensors calibration button and select the Lights Record tab You can now choose a warn level for both main module lights and LCD lights If you would like a switch to activate the light then choose the below o...

Page 35: ...AXX would not know what type of sensor is in which channel and your data would not be accurate Instructions 1 After all modules and sensors have been installed place the supplied SD card into the slot and turn on power 2 Make a short 10 second recording while the engine is off This allows the software to determine if you have any additional modules such as EGT or LCD 3 Remove the SD card place it ...

Page 36: ... need to send this information back to the DATAMAXX To do so click on the Send Configuration to DATAMAXX and then insert the card into your powered up DATAMAXX 7 After your DATAMAXX has been configured it is wise to confirm that the changes you have made took place To do this simply record another quick test run and download to your PC The sensor names and type should now reflect the changes Figur...

Page 37: ...libration Configuration window and click on the configure button for the channel you would like to change Now click on the Lights Record tab to adjust OVERLAYING RUNS To overlay multiple runs simply open a log file and when that graph is displayed open another log file and they will sit on top of each other You can overlay multiple runs however you cannot remove an individual run from the overlay ...

Page 38: ...om In O Zoom Out W View Whole Run Z Set Zero Time ZONES When viewing your runs on the DATAMAXX viewer software each sensor is displayed in a specific zone To get the most out of your data it is recommended to place channels that have similar ranges in the same zone Ex A 30 psi sensor will look like a flat line in the same zone as a 2000 psi sensor because their ranges are so drastically different ...

Page 39: ...e button to the right of the sensor type You should then clear out the current values in the calibration table Now on the first line we want to put our low voltage reading in milliVolts followed by a semicolon and what that voltage means to use followed by another semicolon Continue to do this for all the data points you have then send the new calibration to the DATAMAXX and test your new sensor E...

Page 40: ...ch wire with solder before screwing it into the terminal will improve reliability As the last step loop the shield wire under one of the shield screws near the cable entry Pull the shield wire so as to drag the sheathed cable right up against the screw terminal Tighten the screw then cut off the excess shield wire It is helpful to connect several cables without connecting the shield wires Then gat...

Page 41: ...s all wires connecting to those cases as well as all thermocouple probe cables One potential problem area is where the thermocouple probe leaves the header pipe in the vicinity of the spark plug wires If the probe has a 90 degree bend in it loosen the bung and turn the probe so that it immediately turns AWAY from the nearest spark plug wire Then run the thermocouple cable away from all of the spar...

Page 42: ... button that will automatically trigger recording To turn off recording it is necessary to press and hold the record button The software is already pre calibrated to trigger recording Software The DATAMAXX software is extremely customizable and allows you to use any sensor and multiple values to trigger an automatic recording Some of the more popular triggers are engine rpm above a certain value o...

Page 43: ...uld like to change the event description you can do so at any point by pressing the button to that looks like a road to the left of the SD button CAN BUS The DATAMAXX modules communicate with each other using a CAN Controller Area Network cable This CAN system works very similar to the way the internet works it sends packets across the line with a packet title so the Main Module can tell which mod...

Page 44: ...ur shield wires are not connected correctly Every sensor should use a shielded cable Every sensor cable has a shield wire that should be connected to one of the ground screws inside of a DATAMAXX module Doing otherwise will increase the chance of radio frequency ignition interference RFI affecting your system and the quality of your data Finally the CAN bus cables connecting each DATAMAXX module s...

Page 45: ...can be ignored if it doesn t persist and if your data looks fine on the PC If you get a red blinking LED frequently or if you get error messages on the PC when you open a log file then contact Computech customer support CAN BUS FAIL MESSAGE ON LCD You may from time to time get a CAN bus fail message on your LCD It s only really a problem if you get this message almost continuously If you see the m...

Page 46: ...hree full seconds and then turn the power back on Things should return back to normal with all the modules having green LEDs blink with equal on and off times and no red LED indications If this hard of hearing situation occurs rarely then don t worry about it If it occurs repeatedly then contact Computech customer support LCD DISPLAY IS BLANK First make sure that the DATAMAXX system is properly po...

Page 47: ... the word circuit in electronics really does come from the idea of a loop or a circle based on the origin of the word circuit Third test the Magneto RPM input by removing the wire that goes to MAG RPM and replacing it with a short test wire Temporarily switch the MAG GND switch C and MAG PuP switch D switches both to the ON position Now short this test wire to ground by repeatedly tapping the wire...

Page 48: ...r on the cable coming from the junction box Short a screwdriver or wire between the two conductors of the connector An LCD display reading should result If it does not call for customer support DRIVE SHAFT RPM IS ERRATIC OR NOISY You may find yourself in the following situation Your in the shop and your car stationary The Drive shaft RPM reads zero on the LCD display with the engine off but regist...

Page 49: ...all Computech for customer support If you can initiate recording with the LCD Module then the problem is with your switch configuration Use the PC software and see the accompanying help for making sure you ve configured the switch correctly CANNOT FIND YOUR LOG FILES When downloading a run using your SD button you may have to point the computer to the correct SD card location If you have a run on ...

Reviews: