background image


7

4.0     CONNECTING THE HARDWARE


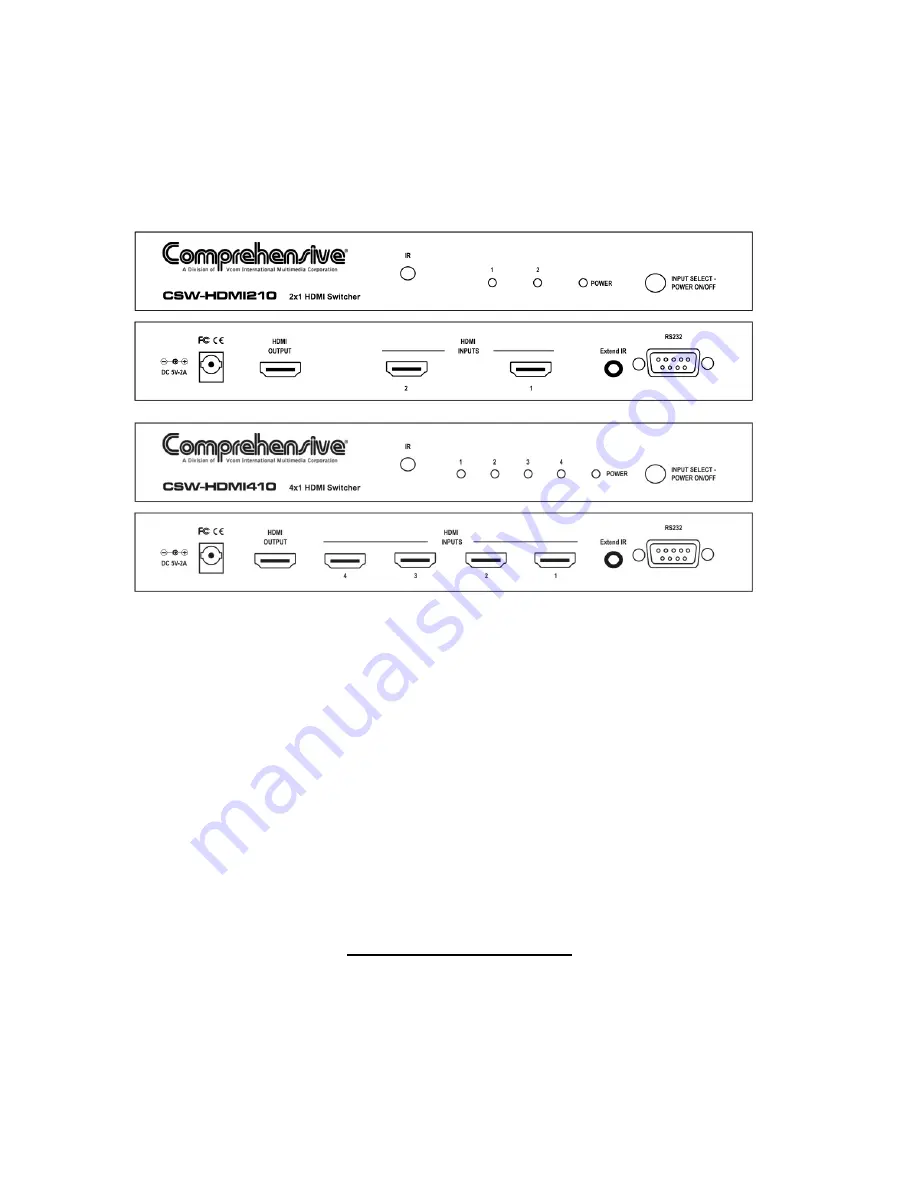
For reference purposes, the units are depicted below in relative scale.  Please 
study the drawings below and become familiar with the location of the controls, 
status LEDs, signal inputs, signal output and the power input. 


Connect an HDMI approved cable, no more than 50 feet in length, from each of 
the HDMI sources to the inputs of the switcher. Next, connect the output of the 
switcher to the destination device using an HDMI approved cable no more than 
50 feet long*. Connect the extended IR remote cable if desired and lastly, 
connect the power adapter, first to the switcher and then to the AC source. 
 

*Note: Proper operation of HDMI switchers depend on the use of the highest 
quality cables available.  A Cable providing low loss, high bandwidth signal 
handling is the recommended cable for use with all Comprehensive HDMI 
products. The distance specification of 50 feet is for HDMI signals up to 1080i 
resolution but cannot be guaranteed unless highest quality cables are used 
throughout the system. 


5.0


OPERATING THE UNIT 

 
Power and input selection are controlled from one multi-purpose switch. To turn 
the switcher on, press the Input Select – Power On/Off switch. Once the unit is in 
the operating state, pressing the switch causes the input selection to advance 
each time it is pressed. (An LED will light to show which input is active.) Once the 
highest input number is reached, pressing the switch again will select input 
number 1.  Pressing and holding the switch for two (2) seconds will cause the 
unit to power off. For greater flexibility, an Infrared remote control is also 

Summary of Contents for CSW-HDMI210

Page 1: ...Instruction Manual CSW HDMI210 CSW HDMI410 HDMI Switchers...

Page 2: ...2...

Page 3: ...ions 5 3 0 Checking Package Contents 6 4 0 Connecting The Hardware 7 5 0 Operating The Unit 7 6 0 Installation of Mounting Components 8 7 0 Troubleshooting 9 8 0 Limited Warranty 9 9 0 Regulatory Comp...

Page 4: ...recording or by any information storage or retrieval system without the written consent of the publisher Comprehensive reserves the right to revise any of its hardware and software following its polic...

Page 5: ...Operating Humidity 10 to 85 Non condensing Storage Temperature 20 to 60 20 to 140 F Storage Humidity 10 to 85 Non condensing Remote Control Serial Interface RS 232 Infrared IR Remote Included Warrant...

Page 6: ...MI Switcher 1 ea 5 VDC Power Adapter 1 ea IR Remote Control 1 ea Remote Mounting Kit 1 ea Instruction Manual Note Please retain the original packing material should the need ever arise to return the u...

Page 7: ...est quality cables available A Cable providing low loss high bandwidth signal handling is the recommended cable for use with all Comprehensive HDMI products The distance specification of 50 feet is fo...

Page 8: ...e in a manner that allows the furnished remote to be pointed at it without any obstructions between the remote and the extended IR module The Module is shipped with a 6 foot interconnect cable Longer...

Page 9: ...contacting Comprehensive Should the dealer s technical personnel be unable to assist you contact Comprehensive at 800 526 0242 or via Fax at 201 814 0510 8 0 LIMITED WARRANTY Comprehensive warrants t...

Page 10: ...UL CE CEC and CSA rules and regulations and are also RoHS compliant 10 0 APPENDIX A RS 232 CODE INFORMATION Transmission Format Baud Rate 57600 BPS Data Byte 8 bits Parity None Stop Bit 1 Modem Cable...

Page 11: ...11 4X1 Commands Command Code Description 0x01 Port 1 On 0x02 Port 2 On 0x03 Port 3 On 0x04 Port 4 On 0x05 Power On Off...

Page 12: ...Comprehensive 55 Ruta Court South Hackensack NJ 07606 Phone 800 526 0242 Fax 201 814 0510...

Reviews: