Compex WPP54 Quick Install Manual Download Page 15

Chapter 2 

Let’s Get Going - Hardware Setup 


13 


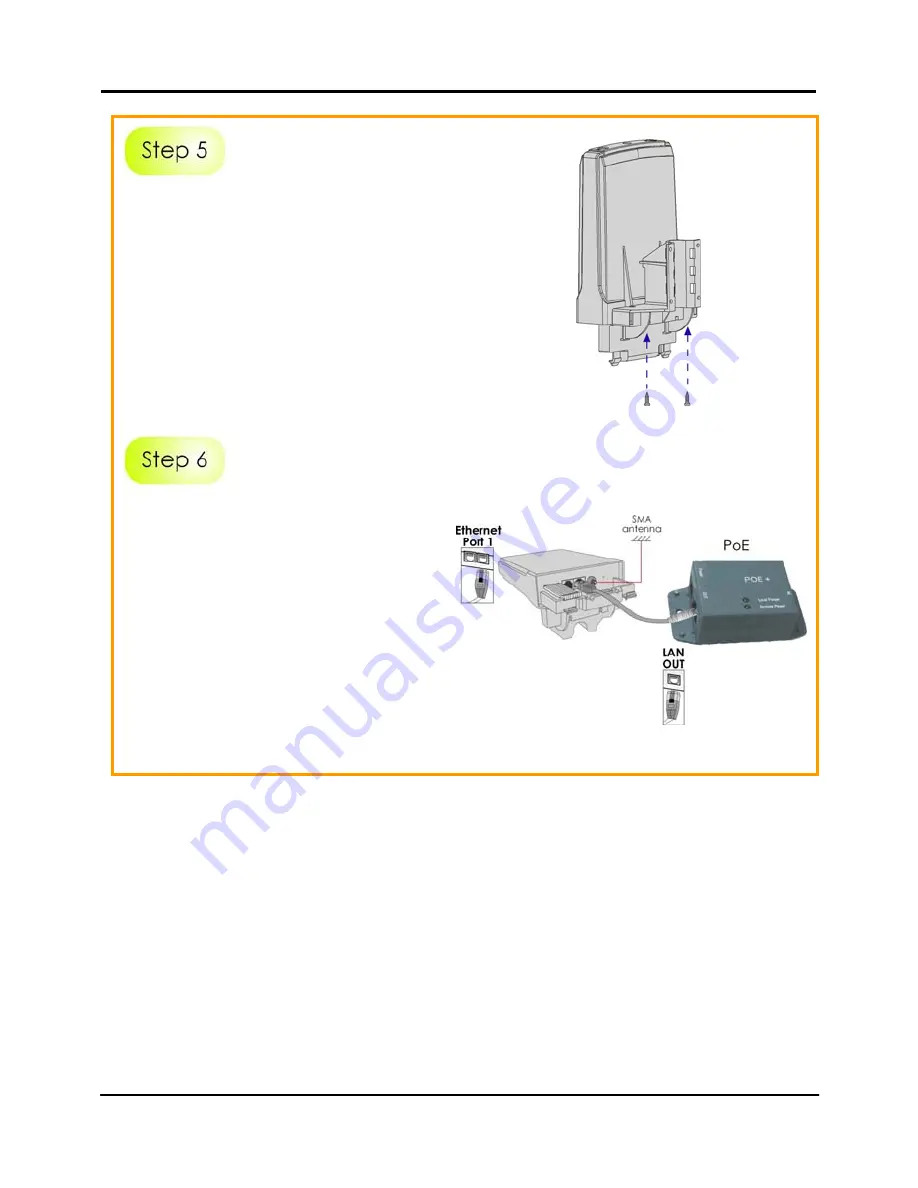
Next, fasten two screws that are 
provided in the packaging to secure 
both the main unit to the bracket. 


Connect one end of an RJ45 
Ethernet cable to the LAN OUT port 
of the Injector and the other end to 
Ethernet Port 1 of Compex WPP54. 
 

Maximum length of the RJ45 
Category 5 cable is 100 metres. 
 
Next, connect your SMA antenna 
(not provided) to the SMA reverse 
connector. 


Summary of Contents for WPP54

Page 1: ...Quick Install Guide Wireless 54Mbps Outdoor Access Point WPP54...

Page 2: ...tent 5 Network Application 6 2 Let s Get Going Hardware Setup 7 Overall Setup of Compex WPP54 8 Method 1 Mounting on the Wall 9 Method 2 Mounting on the Pole 12 3 Access to Web based Interface 15 Meth...

Page 3: ...inking up other access points WPP54AG also includes a DHCP server that automatically assigns IP addresses to wireless clients For the ultimate multimedia experience WPP54AG includes the WMM QOS featur...

Page 4: ...ple operation modes the WPP54AG can be used for a wide variety of wireless applications For the ultimate multimedia experience WPP54AG includes the WMM QOS feature which allows media files to be deliv...

Page 5: ...dia experience WPP54G includes the WMM QOS feature which allows media files to be delivered over the network more efficiently Connecting to a wireless LAN without adequate security measures generally...

Page 6: ...g up other access points WPP54AG also includes a DHCP server that automatically assigns IP addresses to wireless clients For the ultimate multimedia experience WPP54AG includes the WMM QOS feature whi...

Page 7: ...Introduction 5 Packaging Content Actual product appearance may slightly differ depending on the hardware version 1 x WPP54 unit 1 x Mounting Bracket 2 x Self taping Screws 1 x Product CD 1 x Read Me F...

Page 8: ...cation between different buildings It enables you to bridge wireless clients that are kilometres apart e g within 100 metres between two buildings while unifying the networks In this scenario you may...

Page 9: ...location for your wireless AP Place the AP as close as possible to the area where users will require access to the WLAN Choose an elevated location where trees buildings and large steel structures wil...

Page 10: ...the overall setup of Compex WPP54 You may need to install a lightning arrestor to protect your outdoor AP from the lightning Please note that you can power up your PoE Injector ONLY AFTER you had comp...

Page 11: ...ll holding the catches push the Compex WPP54 cover outwards Align the bracket to the wall Use the bracket as a guideline make 4 marks and drill 4 holes into the wall Next secure the brackets to the wa...

Page 12: ...to secure the main unit to the bracket Connect one end of an RJ45 Ethernet cable to the LAN OUT port of the Injector and the other end to Ethernet Port 1 of Compex WPP54 Maximum length of the RJ45 Ca...

Page 13: ...rovided to the main electrical supply and the power plug into the socket of the injector Now turn on your power supply Notice that the POWER LED has lighted up This indicates that the WPP54 is receivi...

Page 14: ...e While still holding the catches push the Compex WPP54 cover outwards Use metal straps not provided to secure the bracket to the pole Place the straps through the slots in the bracket and then around...

Page 15: ...o secure both the main unit to the bracket Connect one end of an RJ45 Ethernet cable to the LAN OUT port of the Injector and the other end to Ethernet Port 1 of Compex WPP54 Maximum length of the RJ45...

Page 16: ...rovided to the main electrical supply and the power plug into the socket of the injector Now turn on your power supply Notice that the POWER LED has lighted up This indicates that the WPP54 is receivi...

Page 17: ...browser First you will need to assign a static IP address to your PC such as 192 168 168 xxx where x can be any value from 2 to 254 so that it is in the same subnet as Compex WPP54 Method 1 Access to...

Page 18: ...Access to Web based Interface 16 The program will prompt you with the following message Click on the Yes button to proceed Select Compex WPP54 in the Compex Products List section and click on Open We...

Page 19: ...ce 17 Next the system will prompt you not to close the uConfig program until you wish to exit your web based interface Click Ok button to proceed At the authentication page click on the Log On Button...

Page 20: ...ss to Web based Interface 18 You will then reach the home page of Compex WPP54 s web based interface Note For full instructions on how to configure WPP54 please refer to the User s Manual provided in...

Page 21: ...the IP address of the unit manually in the address bar of your Internet browser But you will first need to change the IP address of your PC so that it is in the same subnet as your WPP54 Note For ful...

Page 22: ...u need to configure your PC s IP address to 192 168 168 xxx and its subnet mask is 255 255 255 0 where xxx can be any number from 2 to 254 excluding 1 Simply follow the procedures stated below to conf...

Page 23: ...Properties button Select the radio button for Specify an IP address Enter the IP Address and Subnet Mask as 192 168 168 xxx and 255 255 255 0 where xxx can be any number from 2 to 254 except for 1 In...

Page 24: ...C simply go to the Start menu select Run and enter the command winipcfg Select your respective Ethernet Adapter from the drop down list and click OK For Windows XP 2000 Go to your desktop click on My...

Page 25: ...utton Select the radio button for Use the following IP address Enter the IP Address and Subnet Mask as 192 168 168 xxx and 255 255 255 0 where xxx can be any number from 2 to 254 except for 1 In this...

Page 26: ...ccessories select Command Prompt and type the command ipconfig all Further Information References For more details on the WPP54 configuration please refer to the User s Manual in the accompanying Prod...

Page 27: ...vice Steady Red The respective port has successfully connected to Compex WPP54AG Blinking The respective port is transmitting or receiving data 2 10 ACT LED Off No connection is established Steady Red...

Page 28: ...e firmware is corrupted 7 Ethernet Port 2 Connection for computer with NIC Network Interface Card or Ethernet network card 8 Ethernet Port 1 Connection for computer with NIC Network Interface Card or...

Page 29: ...61000 3 2 EN 61000 3 3 CE EN 60950 EN 301 893 Industrial Standards WPP54G IEEE 802 11b IEEE 802 11g Industrial Standards WPP54AG IEEE 802 11a IEEE 802 11b IEEE 802 11g Data Rates Network speeds dynami...

Page 30: ...g Client Gateway Wireless Adapter Security 64 bit 128 bit WEP WPA Enterprise WPA Personal WPA2 Enterprise WPA2 Personal WPA Auto Enterprise WPA Auto Personal Per Node Per Group Tagged VLAN IEEE 802 1x...

Page 31: ...bps indoor Operating Distance WPP54AG IEEE 802 11a IEEE 802 11b IEE 802 11g 85 m 54Mbps outdoor 20 m 54Mbps indoor 300 m 11Mbps outdoor 30 m 11Mbps 80 m 11Mbps outdoor 15 m 11Mbps indoor SNMP SNMP RFC...

Page 32: ...and Port Forwarding De Militarised Zone IP Packet Filtering Time based By TCP Port By Source IP IP Routing Static Dynamic Entry VPN Client Pass Through PPTP IPSec Configuration Interface Web based Co...

Page 33: ...f not installed and used in accordance with the instructions may cause harmful interference to radio communications However there is no guarantee that interference will not occur in a particular insta...

Page 34: ...ective EN 60 950 1992 A1 1993 A2 1993 A3 1995 A4 1996 A11 1997 Therefore this product is in conformity with the following regional standards FCC Class B following the provisions of FCC Part 15 directi...

Page 35: ...mpex within ninety 90 days from the date of purchase Please e mail this warranty card to support compex com sg Product Purchase Date Model Serial No Name E mail Company Address Postal Zip Code Country...

Page 36: ...Manual Number M 0486 V1 1 Version 1 1 October 2006...

Reviews: