background image

Compaq Deskpro EN Series of Personal Computers

4-41

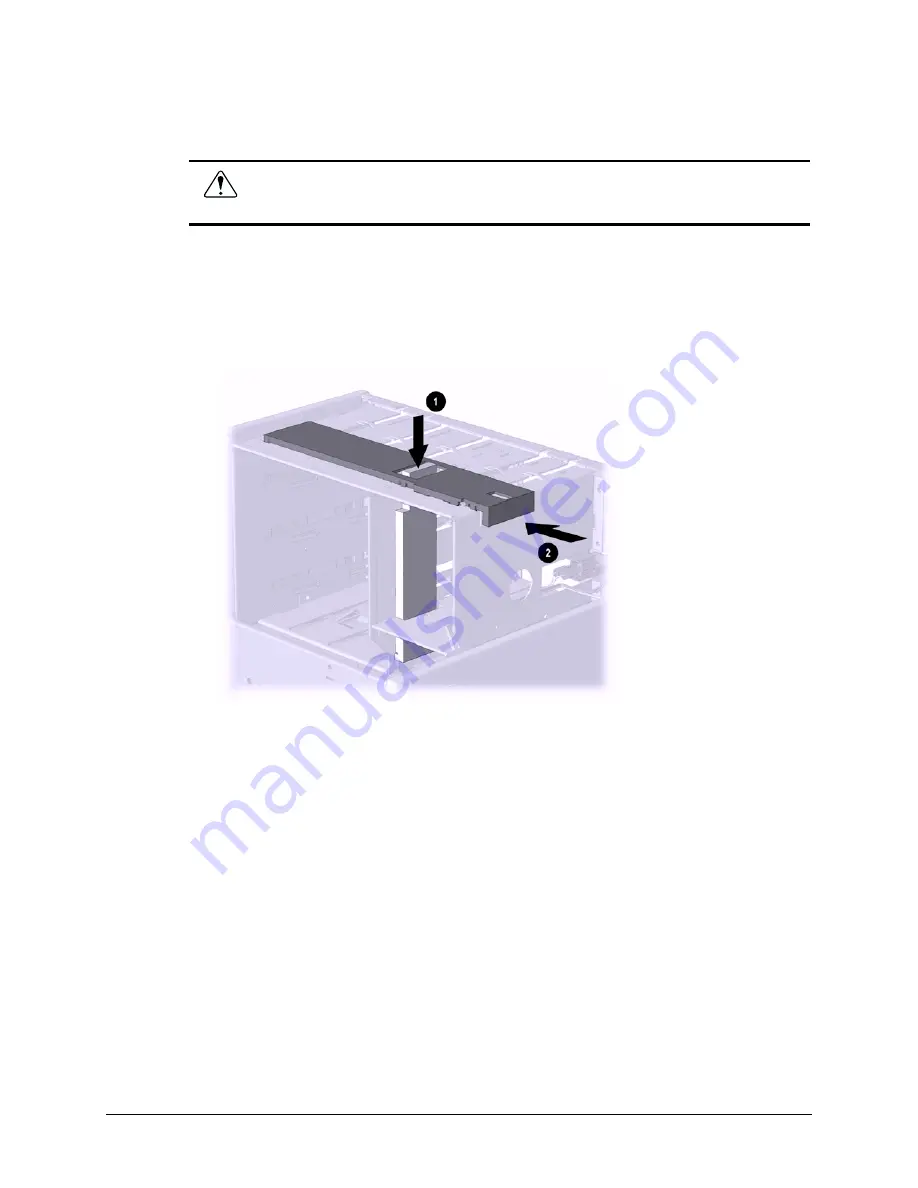
4.23

Converting a Desktop to a Minitower


1.


Prepare the computer for disassembly (Section 4.2).

WARNING:

  Power is continuous to the system board and power supply even when the power

switch is turned off. To prevent damage to the unit, disconnect the power cord from the power
source or the unit before beginning disassembly procedures.


2.


Lay the computer down on its large base (side with feet) for greater stability.


3.


Remove the access panel (Section 4.6).


4.


Remove the front bezel (Section 4.7).


5.


Remove the drives from the 5.25-inch drive bays by pressing drivelock 

1

(Sections 4.11.2 and 4.11.3).

Summary of Contents for 133756-004 - Deskpro EN - 6550 Model 6400

Page 1: ...Compaq Deskpro EN Series of Personal Computers Convertible Minitower Models Maintenance Service Guide ...

Page 2: ...02 Spare part number 201843 001 The complete MSG follows this addendum This addendum contains changes to the original document 2000 Compaq Computer Corporation COMPAQ and the Compaq logo Registered in U S Patent and Trademark Office Product names mentioned herein may be trademarks and or registered trademarks of their respective companies Second Edition September 2000 ...

Page 3: ...O 16 MB SGRAM 179997 001 B System board without onboard graphics or audio 011032 101 217055 001 B 10 GB Ultra ATA hard drive 5400 RPM Quiet Drive 203139 001 B Audio cover 219817 001 D System board 217055 001 does not support front mounted audio Computers with this board installed will not have a speaker mounted in the chassis but will have a piezo speaker mounted on the system board that supports ...

Page 4: ...ontal 640 x 480 800 x 600 1024 x 768 1152 x 864 1280 x 1024 1600 x 1200 1800 x 1440 1920 x 1080 1920 x 1200 256 65K 16 7M 256 65K 16 7M 256 65K 16 7M 256 65K 256 65K 256 65K 256 256 65K 60 200 Hz 60 200 Hz 60 140 Hz 60 120 Hz 60 100 Hz 60 90 Hz 60 70 Hz 60 80 Hz 60 76 Hz 31 102 kHz 38 114 kHz 48 113 kHz 54 110 kHz 64 107 kHz 75 113 kHz 89 1 04 kHz 70 94 kHz 75 95 kHz ...

Page 5: ...l interface pad and all residue from the heatsink surface If any thermal interface remains on the die of the processor scrape it off with your fingernail A Q Tip dipped in alcohol can be used to clean both surfaces Add thermal interface pad to the bottom of the heatsink before reinstalling the original heatsink to insure an efficient thermal interface CAUTION Thermal interface heat transmission is...

Page 6: ...Maintenance Service Guide Compaq Deskpro EN Series of Personal Computers Convertible Minitower Models ...

Page 7: ...ro Registered U S Patent and Trademark Office Microsoft MS DOS and Windows are registered trademarks of Microsoft Corporation Intel and Pentium are registered trademarks of Intel Corporation Celeron is a trademark of Intel Corporation Product names mentioned herein may be trademarks and or registered trademarks of their respective companies The software described in this guide is furnished under a...

Page 8: ...ting Additional Information 1 8 chapter 2 Spare Parts 2 1 System Unit 2 2 2 2 Mass Storage Devices 2 3 2 3 Cables 2 4 2 4 Standard Memory and Expansion Boards 2 5 2 5 Keyboards 2 6 2 6 Miscellaneous Screw Kit 2 7 2 7 Miscellaneous Plastics Kit 2 8 2 8 Miscellaneous Parts 2 9 2 9 Shipping Boxes 2 10 2 10 Documentation and Software 2 10 chapter 3 Removal and Replacement Preliminaries 3 1 Electrostat...

Page 9: ...d Drive 4 12 4 11 2 Removing an External 5 25 Inch Drive 4 14 4 11 3 Removing an External 3 5 Inch Drive 4 16 4 12 Removing the Drivelocks 4 18 4 13 Expansion Boards 4 21 4 13 1 Expansion Board Slots 4 21 4 13 2 Removing a PCI Expansion Board 4 22 4 13 3 Installing a PCI Expansion Board 4 23 4 14 Board Guide 4 25 4 15 Internal Speaker 4 26 4 16 System Memory 4 27 4 16 1 DIMMs 4 27 4 16 2 Memory Mo...

Page 10: ... Western Digital 5 4 5 2 2 Maxtor 5 5 chapter 6 Specifications 6 1 Specifications 6 1 6 1 1 System 6 1 6 1 2 System Interrupts 6 2 6 1 3 System DMA 6 2 6 1 4 ICH Fixed I O Registers 6 3 6 1 5 System Memory Map 6 5 6 2 Drives 6 6 6 2 1 1 44 MB Diskette Drive 6 6 6 2 2 Ultra ATA Hard Drives 6 7 6 2 3 CD ROM Drives 6 8 6 3 Compaq Keyboards 6 9 6 4 2 Button Mouse 6 9 6 5 Supported Graphics Resolutions...

Page 11: ...or specific instructions Technician Notes WARNING Only authorized technicians trained by Compaq should attempt to repair this equipment All troubleshooting and repair procedures are detailed to allow only subassembly module level repair Because of the complexity of the individual boards and subassemblies no one should attempt to make repairs at the component level or to make modifications to any p...

Page 12: ...umentation is available to support these products User Documentation Technical Training Guides Compaq Service Advisories and Bulletins Compaq QuickFind Technical Reference Guide Compaq Quick Reference Guide Compaq Service Reference Guide Compaq Quick Troubleshooting Guide ...

Page 13: ...ompaq Deskpro EN Series of Personal Computers 1 1 chapter 1 PRODUCT DESCRIPTION This chapter describes the model features of the Compaq Deskpro EN Series Convertible Minitower model of Personal Computers ...

Page 14: ... that attaches to the chassis with release latches Attached to the back of the front bezel is a subpanel that holds the bezel blanks The system board may be removed from the chassis after the access panel is removed Details of the disassembly procedure are found in Chapter 4 Removal and Replacement Procedures The drive bays are located in the front of the chassis there are two 3 5 inch drive bays ...

Page 15: ...NT Workstation 3 51 or 4 0 A version of Microsoft Windows 95 that is different from the one included with the computer To order copies of suitable device drivers and utilities Order the Support Software CD for Compaq Desktop Products This compact disc contains the latest device drivers utilities and flashable ROM images needed to run MS DOS Windows 3 1 Windows 95 Windows NT Workstation 3 51 IBM OS...

Page 16: ...s not ship with the computer 1 4 1 Front Panel Controls and LEDs Ref Component Function Ref Component Function 1 Power On Light 6 CD ROM Drive Busy Indicator 2 Diskette Drive Activity Light 7 Headphone Volume Control 3 Diskette Eject Button 8 Stereo Headphone Jack 4 Serial Number 9 Dual State Power Button 5 CD ROM Eject Button Drive Activity Light CD ROM models only Flashes when an ATAPI device su...

Page 17: ...tch geographical requirements 8 RJ 45 Connector 3 Universal Serial Bus USB Connectors 2 connects the computer to any USB peripheral while the computer is operating is a fully functional plug and play connector 9 Microphone Connector 4 Keyboard Connector Headphone Line Out Audio Connector 5 Mouse Connector Line In Audio Connector 6 Monitor Connector Parallel Port Connector Keyboard and mouse ports ...

Page 18: ... 3 5 inch 1 44 MB diskette drive mounted with a drive adapter into a 5 25 inch bay 4 5 4 5 Two standard 3 5 inch drive bays Bay 4 contains the preinstalled hard drive Bay 5 is available for an optional hard drive Drive bay numbers are stamped on the chassis To verify the type and size of the mass storage devices installed in the computer run Compaq Computer Setup ...

Page 19: ...ostics for Windows If the system board is replaced with a spare part from Compaq the invalid serial number condition will be recognized during POST The original serial number must then be reentered through Computer Setup Refer to the Software Reference Guide for more information CAUTION A system board borrowed from another computer is recognized as a valid serial number and will create a mismatch ...

Page 20: ...documentation is available to support these products User Documentation Technical Training Guides Compaq Service Advisories and Bulletins Compaq QuickFind Technical Reference Guide Compaq Quick Reference Guide Compaq Service Reference Guide Compaq Quick Troubleshooting Guide ...

Page 21: ...Compaq Deskpro EN Series of Personal Computers 2 1 chapter 2 SPARE PARTS The Compaq Deskpro EN Series Intel 815e chipset models will be referred to in this MSG as 815e ...

Page 22: ...rt Number Warranty Tier 1 Access panel Not spared 2 Front bezel 166868 001 B 3 Chassis basepan Not spared 4 Logo Kit Deskpro EN 1 ea DT and MT 210004 001 B 5 Power switch with cable LED and switch holder Not spared 6 Feet Misc Plastics Kit B 7 Power supply 200 Watt 103748 001 B ...

Page 23: ... Max tray load IDE CD ROM drive 187263 001 B 3 10 0 GB Ultra ATA hard drive 66 7200 135364 001 B 15 0 GB Ultra ATA hard drive 66 7200 192060 001 B 20 0 GB Ultra ATA hard drive 100 7200 180475 001 B Not shown nn nnnn hard drive transfer rate MBytes sec RPM Ultra ATA 100 hard drives are backwards compatible with Ultra ATA 66 devices however the data transfer rate is reduced to 66MB sec ...

Page 24: ...tab center polarization 108950 007 Dual LED power cable 1 ea 387727 001 Switch mounting bracket 3 ea 166777 001 Diskette drive tape cable MEJD twist no key 34 356107 001 Diskette drive cable MEJD twist 11 without pull tab 387795 001 Cable Kit includes 192264 001 B 3 IDE Ultra ATA dual device hard drive CD ROM cable 18 108950 019 5 Audio cable 21 288489 002 40 position IDE data cable 105876 001 Aud...

Page 25: ...heatsink and clip 600 66 MHz 192011 001 B Intel Pentium III Processor 3 667 133 MHz with heatsink and clip 192007 001 B 3 733 133 MHz with heatsink and clip 192008 001 B 800 133 MHz with fansink 191845 002 Fansink includes fan heatsink and clip 192009 001 B 866 133 MHz with fansink 191845 002 Fansink includes fan heatsink and clip 192006 001 B 933 133 MHz with fansink 191845 002 Fansink includes f...

Page 26: ...9513 xxx D Arabic 171 Belgian 181 Brazilian 201 BHCSY Bosnia Herzegovina Croatia Slovenia and Yugoslavia B41 Czech 221 Danish 081 Dutch Netherlands B31 Finnish 351 French 051 French Canadian 121 German 041 Greek 151 Hungarian 211 Italian 061 Japanese 191 Korean Hanguel AD1 International B31 Latin American Spanish 161 Norwegian 091 Polish B31 Portuguese 131 Russian 251 Slovakian 231 Spanish 071 Swe...

Page 27: ... 16 panhead plastite screw 5 ea 101346 068 6 19 x 5 16 hi top taptite screw with captive washer 4 ea 114399 069 6 32 x 3 16 hi top thread forming screw with serrations 5 ea 192308 003 M3 x 5mm hi top taptite screw with serrations 3 ea 247348 001 6 32 x 3 16 buttonhead tamper resistant taptite screw with serrations 4 ea 296769 002 6 32 x 5 16 hi top taptite screw 5 ea 109834 568 6 19 x 1 2 Panhead ...

Page 28: ... includes 166878 001 B 1 Panel sub 166835 001 2 Bezel blank 166775 001 3 Diskette bezel 166776 001 4 Card guide 166778 001 5 Foot rubber 4 ea 166939 002 6 Button power 166774 001 7 Drivelock DT 166779 001 8 Spring power button 166837 001 9 Springs drivelock 2 ea 166837 002 10 Drivelock MT 166780 001 Retention mechanism 2 ea 350767 001 Not shown ...

Page 29: ... Battery 153099 001 D 2 Active fansink for use with 800MHz processors 191845 002 B 3 Mouse scroll opal 334689 002 D 4 Speaker with screws 40mm x 70mm 12 inch 192518 001 D 5 Fan assembly for use on Pentium III units 933 133 and above 207609 001 D Logo Kit EN EX includes 210004 001 D Logo plate DT 166806 005 Logo plate MT 166806 006 Not shown ...

Page 30: ... U S 166990 001 Return Kit international 166990 002 2 10 Documentation and Software Documentation and Software not illustrated Description Spare Part Number Maintenance Service Guide desktop minitower 201843 001 Illustrated Parts Map 203722 001 Service Reference Guide 152611 001 Quick Troubleshooting Guide 153837 001 ...

Page 31: ...ice may function normally for a while then degrade in the internal layers reducing its life expectancy Networks built into many integrated circuits provide some protection but in many cases the discharge contains enough power to alter device parameters or melt silicon junctions 3 1 1 Generating Static The following table shows that Different activities generate different amounts of static electric...

Page 32: ... or assembly Avoid contact with pins leads or circuitry Place reusable electrostatic sensitive parts from assemblies in protective packaging or conductive foam 3 1 3 Personal Grounding Methods and Equipment Use the following equipment to prevent static electricity damage to equipment Wrist straps are flexible straps with a minimum of one megohm 10 resistance in the ground cords To provide proper g...

Page 33: ...ipative surfaces Keep work area free of nonconductive materials such as ordinary plastic assembly aids and Styrofoam Use field service tools such as cutters screwdrivers and vacuums that are conductive 3 1 5 Recommended Materials and Equipment Materials and equipment that are recommended for use in preventing static electricity include Antistatic tape Antistatic smocks aprons or sleeve protectors ...

Page 34: ...when cleaning the keyboard 3 2 2 Cleaning the Computer Case Follow all safety precautions in Section 3 2 1 before cleaning the computer To clean the computer case follow the procedures described below To remove light stains or dirt use plain water with a clean lint free cloth or swab For stronger stains use a mild dishwashing liquid diluted with water Rinse well by wiping it with a cloth or swab d...

Page 35: ...ke the space bar from the keyboard If these keys are improperly removed or installed the keyboard may not function properly Cleaning under a key may be done with a swab moistened with isopropyl alcohol and squeezed out Be careful not to wipe away lubricants necessary for proper key functions Use tweezers to remove any fibers or dirt in confined areas Allow the parts to air dry before reassembly 3 ...

Page 36: ...and Software Requirements To service the computer you need the following Torx T 15 screwdriver Compaq screwdriver with bits PN 161946 001 Flat bladed screwdriver may sometimes be used in place of the Torx screwdriver Diagnostics software Compaq tamper resistant T 15 wrench Smart Cover FailSafe Key PN 166527 001 or Compaq tamper resistant bits Smart Cover FailSafe Key PN 166527 002 3 3 3 Screws The...

Page 37: ...n their protective packaging until they are actually mounted in the CPU Avoid dropping drives from any height onto any surface If you are inserting or removing a hard drive turn off the computer Do not remove a hard drive while the computer is on or in standby mode Before handling a drive ensure that you are discharged of static electricity While handling a drive avoid touching the connector For m...

Page 38: ...e for removing components from the computer 4 3 Computer Feet 4 4 Logo Plate 4 5 Cable Lock 4 6 Access Panel 4 7 Front Bezel 4 8 Power Button 4 9 Subpanel and Bezel Blanks 4 10 Power Switch 4 11 1 Removing an Internal 3 5 Inch Hard Drive 4 11 2 Removing an External 5 25 Inch Drive 4 11 3 Removing an External 3 5 Inch Drive 4 12 Removing the Drivelocks 4 13 2 Removing an Expansion Board 4 14 Board ...

Page 39: ...Disconnect all peripheral device cables from the computer During disassembly label each cable as you remove it noting its position and routing Keep all screws with the components removed CAUTION The screws used in the computer are of different thread sizes and lengths using the wrong screw in an application may damage the unit WARNING To reduce the risk of personal injury from hot surfaces allow t...

Page 40: ...emove the backing from the feet before installation If necessary remove the old feet and remove any adhesive residue from the chassis 4 4 Logo Plate Grasp the open side of the logo plate left side if a desktop bottom if a minitower and pull outward 2 To install a new logo plate align the guide pins in the slots 1 then press into place When replacing the logo plate ensure that the alignment pins ar...

Page 41: ...et by bending the metal where the three pieces join 2 Slide the tab on the narrow piece of the bracket into the notch on the back of the computer and rotate this piece toward the screw hole then slide the U shaped piece of the bracket between the narrow piece and the computer 3 Position both pieces of the bracket over the screw hole and secure the bracket to the computer with the screw provided 4 ...

Page 42: ...mage to the unit disconnect the power cord from the power source or the unit before beginning disassembly procedures 2 Lay the computer down on its large base side with feet for greater stability 3 Loosen the two thumbscrews that secure the access panel to the back of the computer chassis 4 Slide the access panel backward approximately 1 inch 2 5 cm then lift it up and off the unit To replace the ...

Page 43: ...er source or the unit before beginning disassembly procedures 2 Lay the computer down on its large base side with feet for greater stability 3 Remove the access panel Section 4 6 4 Press the two release tabs 1 at the top of the front bezel 5 Rotate the front bezel away from the chassis 2 to remove it from the unit When replacing the front bezel ensure that the bottom hinge points are properly plac...

Page 44: ... disconnect the power cord from the power source or the unit before beginning disassembly procedures 2 Lay the computer down on its large base side with feet for greater stability 3 Remove the access panel Section 4 6 4 Remove the front bezel Section 4 7 5 Pinch the two tabs of the power button together and pull the button out of the front bezel The spring will follow the button out of the housing...

Page 45: ...y procedures 1 Prepare the computer for disassembly Section 4 2 2 Lay the computer down on its large base side with feet for greater stability 3 Remove the access panel Section 4 6 4 Remove the front bezel Section 4 7 5 Pull on the subpanel to remove it from the inside of the front bezel CAUTION Hold the subpanel straight when you pull it away from the front bezel Pulling at an angle could damage ...

Page 46: ... the power cord from the power source or the unit before beginning disassembly procedures 2 Lay the computer down on its large base side with feet for greater stability 3 Remove the access panel Section 4 6 4 Remove the front bezel Section 4 7 5 Disconnect the power LED cable from the system board 1 6 Push the release tab 2 toward the drive bays then remove the power switch assembly from the chass...

Page 47: ... standard 5 25 inch half height bays for optional drives 3 3 One standard 3 5 inch 1 44 MB diskette drive mounted with a drive adapter into a 5 25 inch bay 45 4 5 Two standard 3 5 inch drive bays bay 4 contains the preinstalled hard drive bay 5 is available for an optional hard drive Drive bay numbers are stamped on the chassis To verify the type and size of the mass storage devices installed in t...

Page 48: ...es Optional drives are available from Compaq in kits that include a special drive cable The configuration of the drives employs a cable select feature that identifies the drives as device 0 primary drive or device 1 secondary drive The system board determines which drive is device 0 or device 1 based on the way the drives are connected to the special drive cable The device 0 drive is the drive con...

Page 49: ... or the unit before beginning disassembly procedures 2 Lay the computer down on its large base side with feet for greater stability 3 Remove the access panel Section 4 6 4 Remove the front bezel Section 4 7 5 Disconnect the power 1 and data 2 cables from the back of the hard drive 6 Press the drivelock mechanism to unlock the hard drives Drivelock 1 secures the external drives in the desktop confi...

Page 50: ...e that cables are placed in their proper locations during the reassembly process Improper cable placement can damage the computer CAUTION Use only 3 16 inch or 5 mm long screws as guide screws Longer screws can damage the internal components of the drive When installing a second ATA hard drive on the primary controller you must use an 80 conductor ATA cable for optimal performance The system autom...

Page 51: ...tch is turned off To prevent damage to the unit disconnect the power cord from the power source or the unit before beginning disassembly procedures 2 Lay the computer down on its large base side with feet for greater stability 3 Remove the access panel Section 4 6 4 Remove the front bezel Section 4 7 5 If this is a desktop push down on drivelock 1 to release the drive if a minitower press driveloc...

Page 52: ...slots 2 then slide the drive into the drive bay until it snaps into place 3 Connect the power and signal cables to the back of the drive 4 Remove the bezel blank from the subpanel if necessary Section 4 9 5 Reinstall the subpanel and the front bezel The system automatically recognizes hard drives sold by Compaq or any other plug and play hard drive and will automatically reconfigure the computer I...

Page 53: ...le for optimal performance 1 Prepare the computer for disassembly Section 4 2 WARNING Power is continuous to the system board and power supply even when the power switch is turned off To prevent damage to the unit disconnect the power cord from the power source or the unit before beginning disassembly procedures 2 Lay the computer down on its large base side with feet for greater stability 3 Remov...

Page 54: ... by squeezing inward on both sides 2 then rotating the brace up and out 8 Remove the drive bezel 3 9 Remove the two screws that secure the drive to the left side of the drive adapter 10 Slide the drive to the rear of the drive adapter until the diskette drive eject button is free of the button protector then lift the drive out of the drive adapter 11 Remove the guide screw from the right side of t...

Page 55: ... a silver finish CAUTION When servicing the computer ensure that cables are placed in their proper locations during the reassembly process Improper cable placement can damage the computer CAUTION Use only 3 16 inch or 5 mm long screws as guide screws Longer screws can damage the internal components of the drive 4 12 Removing the Drivelocks The computer chassis contains two drivelock mechanisms Dri...

Page 56: ...e with feet for greater stability 3 Remove the access panel Section 4 6 4 Remove the front bezel Section 4 7 5 Remove all of the drives from the computer Sections 4 11 1 4 11 2 and 4 11 3 6 While standing at the rear of the unit push the top drivelock assembly toward the front of the drive cage 7 Lift up on the side of the drivelock mechanism nearest you snapping the tabs out of the holes in the d...

Page 57: ... the bottom of the drivelock 11 Remove the spring from the post see inset To reinstall the vertical drivelock reverse the previous procedure To reinstall the horizontal drivelock 1 Insert the left side of the drivelock with the rounded tabs into the slots on the drive cage 2 Place the washer on the middle tab on the underside of the drivelock 3 Compress the spring then lower the drivelock onto the...

Page 58: ...Compaq Deskpro EN Series of Personal Computers 4 21 4 13 Expansion Boards 4 13 1 Expansion Board Slots 1 AGP graphics slot 2 PCI expansion slots ...

Page 59: ...ct the power cord from the power source or the unit before beginning disassembly procedures 2 Lay the computer down on its large base side with feet for greater stability 3 Remove the access panel Section 4 6 4 Disconnect any cables from the expansion board noting their location for reinstallation 5 Remove the expansion board retaining screw 6 Hold the board at each end and carefully rock it back ...

Page 60: ... power supply even when the power switch is turned off To prevent damage to the unit disconnect the power cord from the power source or the unit before beginning disassembly procedures 2 Lay the computer down on its large base side with feet for greater stability 3 Remove the access panel Section 4 6 4 If you are installing an expansion board for the first time remove the expansion slot cover ...

Page 61: ...tors fit completely and firmly into the expansion slot 6 Secure the board to the chassis with the retaining screw 7 Attach any cables that came with the board If installing a NIC board attach the WOL power cable to connector P9 on the system board 8 Reassemble the computer The computer should automatically recognize the added plug and play board ...

Page 62: ...it disconnect the power cord from the power source or the unit before beginning disassembly procedures 2 Lay the computer down on its large base side with feet for greater stability 3 Remove the access panel Section 4 6 4 Remove any full length expansion boards Section 4 13 2 5 Push down on the two tabs on the side of the board guide 6 While holding the tabs down remove the guide from the chassis ...

Page 63: ...power cord from the power source or the unit before beginning disassembly procedures 2 Lay the computer down on its large base side with feet for greater stability 3 Remove the access panel Section 4 6 4 Remove the board guide Section 4 14 5 Disconnect the speaker cable from the system board 1 6 Remove the four screws 2 that secure the speaker to the front of the chassis 7 Lift the speaker out of ...

Page 64: ...Ms are installed in a computer the system memory will run at the lower 100Mhz speed Some configurations of PC133 SDRAMs may run at 100Mhz instead of 133Mhz 4 16 2 Memory Module Installation CAUTION Your memory module sockets have gold metal contacts When upgrading your memory it is important to use memory modules with gold metal contacts to prevent corrosion and or oxidation resulting from having ...

Page 65: ...stalling a module into the socket nearest the preinstalled module and install the modules following the numerical order of the sockets A memory module can be installed in only one way Match the notch on the module with the tab on the memory socket Push the module down into the socket ensuring that the module is fully inserted and properly seated 3 ...

Page 66: ...ng a GPA AIMM Card 1 Prepare the computer for disassembly Section 4 2 WARNING Power is continuous to the system board and power supply even when the power switch is turned off To prevent damage to the unit disconnect the power cord from the power source or the unit before beginning disassembly procedures 2 Lay the computer down on its large base side with feet for greater stability 3 Remove the ac...

Page 67: ...m the power source or the unit before beginning disassembly procedures 1 Prepare the computer for disassembly Section 4 2 2 Lay the computer down on its large base side with feet for greater stability 3 Remove the access panel Section 4 6 4 Insert the hook 1 on the left side of the GPA AIMM card under the loop 2 on the left side of the retention mechanism 5 Rotate the right side of the card down u...

Page 68: ...the card line up properly with the connectors in the expansion slot CAUTION The fingers on the bottom of the GPA AIMM card must be properly aligned with the expansion slot during installation Misalignment may result in damage to the card or the AGP connector 7 While pulling the arm on the right side of the retention mechanism 5 rotate the card down into the expansion slot until seated 6 ...

Page 69: ...n 4 2 2 Lay the computer down on its large base side with feet for greater stability 3 Remove the access panel Section 4 6 4 Remove the screw at the top of the expansion slot 5 Pull the arm on the right side of the retention mechanism 6 Pull the card straight up to remove it from the expansion slot To install the graphics card reverse the above procedures ...

Page 70: ...e the computer for disassembly Section 4 2 2 Lay the computer down on its large base side with feet for greater stability 3 Remove the access panel Section 4 6 4 Pull the arm on the right side of the retention mechanism 5 Pull the card straight up to remove it from the expansion slot To install the graphics card reverse the above procedures ...

Page 71: ...n 4 2 2 Lay the computer down on its large base side with feet for greater stability 3 Remove the access panel Section 4 6 4 Remove the screw at the top of the expansion slot 5 Pull the arm on the right side of the retention mechanism 6 Pull the card straight up to remove it from the expansion slot To install the graphics card reverse the above procedures ...

Page 72: ...rd 1 Prepare the computer for disassembly Section 4 2 2 Lay the computer down on its large base side with feet for greater stability 3 Remove the access panel Section 4 6 4 Remove the screw at the top of the expansion slot 5 Remove the AGP graphics board as you would any PCI expansion board Section 4 13 2 ...

Page 73: ...essor 3 from the socket by pulling the handle on the ZIF socket out and upward 4 7 Lift the processor out of the socket To install a new processor reverse this procedure If the heatsink has a thermal interface attached to its bottom peel off the protective paper before installing the heatsink All units with 800 MHz and faster processors require an active fansink When installing the fan make sure i...

Page 74: ... source or the unit before beginning disassembly procedures 2 Lay the computer down on its large base side with feet for greater stability 3 Remove the access panel Section 4 6 4 Remove all PCI expansion boards Section 4 13 2 5 Disconnect any cables that are attached to the system board noting their location for reinstallation 6 Remove the DIMMs optional Section 4 16 7 Remove the graphics card Sec...

Page 75: ...omputer access panel 9 Reassemble the computer 10 Reconnect the AC power cord and turn on the computer 11 Reset the date and time your passwords and any special system setups using Compaq Computer Setup WARNING This computer contains a lithium ion battery pack There is a risk of fire and chemical burn if the battery pack is handled improperly Do not disassemble crush puncture short external contac...

Page 76: ... to the system board and power supply even when the power switch is turned off To prevent damage to the unit disconnect the power cord from the power source or the unit before beginning disassembly procedures 2 Lay the computer down on its large base side with feet for greater stability 3 Remove the access panel Section 4 6 4 Disconnect the fan power cable from the system board 1 5 Remove the four...

Page 77: ...own on its large base side with feet for greater stability 3 Remove the access panel Section 4 6 4 Disconnect all power cables from the mass storage devices and the system board Power connectors are keyed for correct installation Note the orientation of each cable connector and the routing of the cables to facilitate reassembly 5 Remove the four screws that secure the power supply to the back of t...

Page 78: ...en the power switch is turned off To prevent damage to the unit disconnect the power cord from the power source or the unit before beginning disassembly procedures 2 Lay the computer down on its large base side with feet for greater stability 3 Remove the access panel Section 4 6 4 Remove the front bezel Section 4 7 5 Remove the drives from the 5 25 inch drive bays by pressing drivelock 1 Sections...

Page 79: ... The use of unnecessary force may result in damage to the drives 7 Reconnect the power signal and audio cables to the drives 8 Remove the subpanel and rotate the bezel blanks 90 degrees Section 4 9 CAUTION Hold the subpanel straight when you pull it away from the front bezel Pulling the subpanel away at an angle could damage the pins that align it within the front bezel 9 Replace the subpanel fron...

Page 80: ...nt damage to the unit disconnect the power cord from the power source or the unit before beginning disassembly procedures 2 Lay the computer down on its large base side with feet for greater stability 3 Remove the access panel Section 4 6 4 Remove the front bezel Section 4 7 5 Disconnect all power and data cables from the drives in the 5 25 inch drive bays 6 Remove the drives from the 5 25 inch dr...

Page 81: ...rees then reinstall them into the drive bays The diskette drive should always be placed in the bay nearest the top of the chassis in the desktop configuration for proper drive clearance and access CAUTION The use of unnecessary force may result in damage to the drives ...

Page 82: ... subpanel and rotate the bezel blanks 90 degrees Section 4 9 CAUTION Hold the subpanel straight when you pull it away from the front bezel Pulling the subpanel away at an angle could damage the pins that align it within the front bezel 10 Replace the subpanel front bezel and the computer access panel Reassemble the computer ...

Page 83: ...wer Button LED ON when pushed P215 Hood Lock Solenoid Connector CR32 5V Aux ON PS_ON_LED OFF P10 Diskette Drive Connector E49 Clear Password Header Installed Enabled Removed Cleared P20 Primary IDE Connector SW50 Clear CMOS P21 Secondary IDE Connector P1 Power Supply Connector P70 CPU Fan P5 pins 1 9 Power Button Pwr LED and HD LED Connector P100 ITP Connector P5 pins 10 11 SCSI LED Connector J20 ...

Page 84: ...omputer for disassembly Section 4 2 CAUTION The power cord must be disconnected from the power source before pushing the Clear CMOS Button NOTE All LEDs on the board should be OFF Failure to do so may damage the system board 2 Remove the access panel Section 4 6 3 Press the CMOS button located on the system board and keep it depressed for 5 seconds 4 Replace the access panel 5 Turn the computer on...

Page 85: ... F10 Setup instructions to establish new passwords 5 1 4 CMOS Archive and Restore Power Switch Override Each time the system starts the system ROM saves a copy of NVRAM including CMOS passwords and other system variables in the flash ROM Should the system become unstable the last known good copy of NVRAM can be restored using a feature called power button override To restore NVRAM do the following...

Page 86: ...es below apply to a number of different size drives in the following paragraphs Seagate Quantum and Western Digital Ultra ATA Hard Drive Jumper Settings Definition Seagate Quantum Western Digital Single 7 8 1 2 and 3 5 3 5 Primary 5 6 and 7 8 1 2 and 3 5 5 6 Secondary No connection 3 5 3 4 Cable Select 5 6 2 4 and 3 5 1 2 ...

Page 87: ...tra ATA Hard Drive Jumper Settings Definition J50 J48 J46 J44 J42 Single J Primary in a dual drive system J Secondary O Cable Select Disabled Enabled O J 4092 Cylinder Limitation Disabled Enabled O J Factory Reserved O Factory Reserved O Default setting J Jumper O No jumper ...

Page 88: ...ower Supply 200 Watt Operating Voltage Range Rated Voltage Range Rated Line Frequency Rated Input Current Maximum Rated Power 200 VAC Switched 115 230 V 50 60 Hz 2A 4A 115V 230V 200W Environmental Requirements Temperature Operating Shipping Humidity noncondensing Operating Nonoperating Maximum Altitude unpressurized Operating Nonoperating 50 to 95 F 4 to 140 F 20 to 80 10 to 90 10 000 ft 30 000 ft...

Page 89: ... 6 Diskette Drive 7 Parallel Port LPT 1 8 Real Time Clock 9 Available for PCI 10 Available for PCI 11 Available for PCI 12 Mouse 13 Coprocessor 14 Primary IDE Controller 15 Secondary IDE Controller 6 1 3 System DMA Hardware DMA System Function 0 Unused 1 Unused 2 Diskette Drive 3 ECP Parallel Port LPT1 Default Alternate DMA 0 4 DMA Controller Cascading 5 Unused 6 Unused 7 Unused ...

Page 90: ...21h 40h Counter 0 Interval Time Status Byte Format Counter 0 Counter Access Port Register 41h Counter 1 Interval Time Status Byte Format Counter 1 Counter Access Port Register 42h Counter 2 Interval Time Status Byte Format Counter 2 Counter Access Port Register 43h Timer Control Word Register Timer Control Word Register Read Back Counter Latch Command 50h 53h Aliased at 40h 43h 61h NMI Status and ...

Page 91: ...rent Address Register C1h Aliased at C0h C5h Aliased at C4h C9h Aliased at C8h CDh Aliased at CCh C2h C6h CAh CEh Channel 4 5 6 7 DMA Base and Current Count Register C3h Aliased at C2h C7h Aliased at C6h CBh Aliased at CAh CFh Aliased at Ceh D0h Channel 4 7 DMA Command Register Channel 4 7 DMA Status Register D1h Aliased at D0h D4h Channel 4 7 DMA Write Single Mask Register D5h Aliased at D4h D6h ...

Page 92: ...ed Register 400 47F Super I O F800 F87F Reserved power management FA00 FA3F Reserved GPIO management FC00 FC0F Reserved SMBUS controller NOTE When the POS_DEC_EN bit is set additional I O ports get positively decoded by the ICH 6 1 5 System Memory Map Size Memory Address System Function 512 KB FFFFFFFFh to FFF80000 System ROM 3839 MB FFFBFFFFh to 10000000h PCI Memory Expansion 511 MB 0FFFFFFFh to ...

Page 93: ... Number 191714 001 Light Green Drive Rotation rpm 300 Height One third 1 inch Bytes per Sector 512 Sectors per Track high low density 18 9 Tracks per Side high low density 80 80 Read Write Heads 2 Cylinders high low density 80 80 Average Seek Time ms Track to Track high low Average high low Settling Seek Time Latency Average ms 3 6 94 173 15 100 ...

Page 94: ...es 34 18 bytes ON THE FLY 33 bytes FIRMWARE 18 Recording Method EPR4 PRML 48 51 PRML 16 17 EPRML Spin Up Time maximum TYP MAX 18 sec 31 sec 9 seconds 7 92 seconds Spin Down Time maximum Not available 10 seconds 6 96 seconds Seek Times Logical Busy to Seek Complete Track to Track Average Read Full Stroke TYP MAX 1 7ms 2 4ms 8 5 ms 9 5ms 15ms 18ms MAX TYP 5 0ms 2 0ms 15 0ms 9 5ms 25 0ms 21 0ms MAX T...

Page 95: ... TEXT Audio CD CD I CD RW CD R CD EXTRA CD ROM XA Disk Capacity Block Size Diameter Thickness Track Pitch CD 650 MB Mode 1 2048 bytes Mode 2 2340 2336 bytes CD DA 2353 bytes CD XA 2328 bytes 12 cm 8 cm 1 2 mm 1 6 um Audio Output Level Line Out Headphone 0 7 V 47 K ohm 0 6 V 32 ohm Startup Time 7 sec typical 30 sec with multisession Operating Conditions Temperature Humidity 5 45 C 10 80 relative hu...

Page 96: ...n 4 45 in 2 36 in 3 4 cm 11 3 cm 6 0 cm Weight 4 59 oz 130 g Base Resolution 400 dpi 400 dpi Tracking Speed maximum 10 in sec 25 cm sec Temperature Operating Non operating 50 F to 104 F 22 F to 140 F 10 C to 50 C 30 C to 60 C Lifetime Mechanical Switch 300 miles 1 million operations 483 km 1 million operations Relative Humidity Operating Non operating 10 to 90 noncondensing 20 to 80 noncondensing ...

Page 97: ... Hz 85 Hz 1024 x 768 85 Hz 85 Hz 85 Hz 1152 x 864 85 Hz 85 Hz 85 Hz 1280 x 1024 85 Hz 85 Hz 85 Hz 1600 x 1200 85 Hz 85 Hz 85 Hz 6 5 2 nVIDIA TNT 3D AGP Colors 256 65K 16 7M 640 x 480 120 Hz 120 Hz 120 Hz 800 x 600 120 Hz 120 Hz 120 Hz 1024 x 768 120 Hz 120 Hz 120 Hz 1280 x 1024 120 Hz 120 Hz 120 Hz 1600 x 1200 85 Hz 85 Hz 85 Hz 1800 x 1440 72 Hz ...

Page 98: ...to run faster to cool it down The processor is protected from thermal damage in two ways First a hardware circuit monitors the temperature of the processor and causes it to throttle back run much slower if it exceeds a much higher than normal operating temperature Second the processor will shut down when it reaches 135 degrees C to prevent damage If Compaq s DMI software is installed the user rece...

Page 99: ... SMART failure support adjustment of configurable device parameters including translation mode options bit shift default LBA assisted user must specify desired geometry and none hard disk defaults used Two industry standard translations inhibits connect and go access to hard disk data Emulation type option which allows users to force the BIOS to treat the device as the specified device type For an...

Page 100: ...t number 2 5 DIMMs 4 27 disassembly chart 4 1 diskette bezel See miscellaneous plastics kit diskette drive specifications 6 6 DMA settings and specifications 6 2 documentation spare part number 2 10 drive configurations 4 10 drive positions 1 6 drivelock DT See miscellaneous plastics kit drivelock MT See miscellaneous plastics kit drivelocks removal and replacement 4 18 E electrostatic discharge E...

Page 101: ... Panel Connectors 1 5 removal and replacement access panel 4 5 battery 4 38 board guide 4 25 cable lock 4 4 drivelocks 4 18 expansion boards 4 21 external 3 5 inch drive 4 16 external 5 25 inch drive 4 14 fan assembly 4 39 feet 4 3 front bezel 4 6 graphics cards 4 29 hard drive 4 12 logo plate 4 3 memory 4 27 power button 4 7 power supply 4 40 power switch 4 9 processor 4 36 speaker 4 26 subpanel ...

Page 102: ...d bezel blanks removal and replacement 4 8 system design 1 2 specifications 6 1 system board connector locations 5 1 connectors and jumpers 5 1 spare part number 2 5 system specifications DMA 6 2 I O 6 3 memory map 6 5 T tools required 3 6 U Ultra ATA devices 4 11 ...

Page 103: ...200803 002 201843 001 ...

Reviews: