Page 6
INSTALLATION GUIDE
1. Unpack your water dispenser by removing all packaging materials like
carton, base, foams, adhesive tape, etc.
2. Remove all accessories, internal packaging material used to hold shelves,
ice tray, etc. in place.
3. Clean the remains of all adhesive tap used and remove all printed
material supplied.
4. Install the water dispenser in a convenient location away from extreme
heat and cold. Allow sufficient clearance between the water dispenser
and side wall so the door(s) will open without obstruction. Water
dispenser is not designed for recessed installation.
5. The floor on which the water dispenser should be placed must be flat,
hard, solid, and even. The water dispenser should not be placed on any
soft material such as foam, plastic, etc.
6. It is recommended that there be 4” minimum clearances around
the back of the water dispenser for proper air circulation. Proper air
circulation will help your water dispenser work at maximum efficiency.
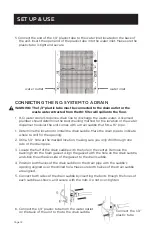
7. R.O. water coolers require a drain line to discharge waste water. A
licensed plumber should determine a location accessible to both a
cold water connection and drain line. The 1/4” plastic tube must be
connected to the drain outlet or the waste water extracted from the RO
filter will spill onto the floor.
NOTE:
The appliance must be correctly connected to the power supply.
SET UP & USE


