


8
C
C
C
h
h
h
a
a
a
p
p
p
t
t
t
e
e
e
r
r
r
2
2
2
H
H
H
a
a
a
r
r
r
d
d
d
w
w
w
a
a
a
r
r
r
e
e
e
I
I
I
n
n
n
s
s
s
t
t
t
a
a
a
l
l
l
l
l
l
a
a
a
t
t
t
i
i
i
o
o
o
n
n
n
2.1 Panel Layout
2.1.1. Front Panel
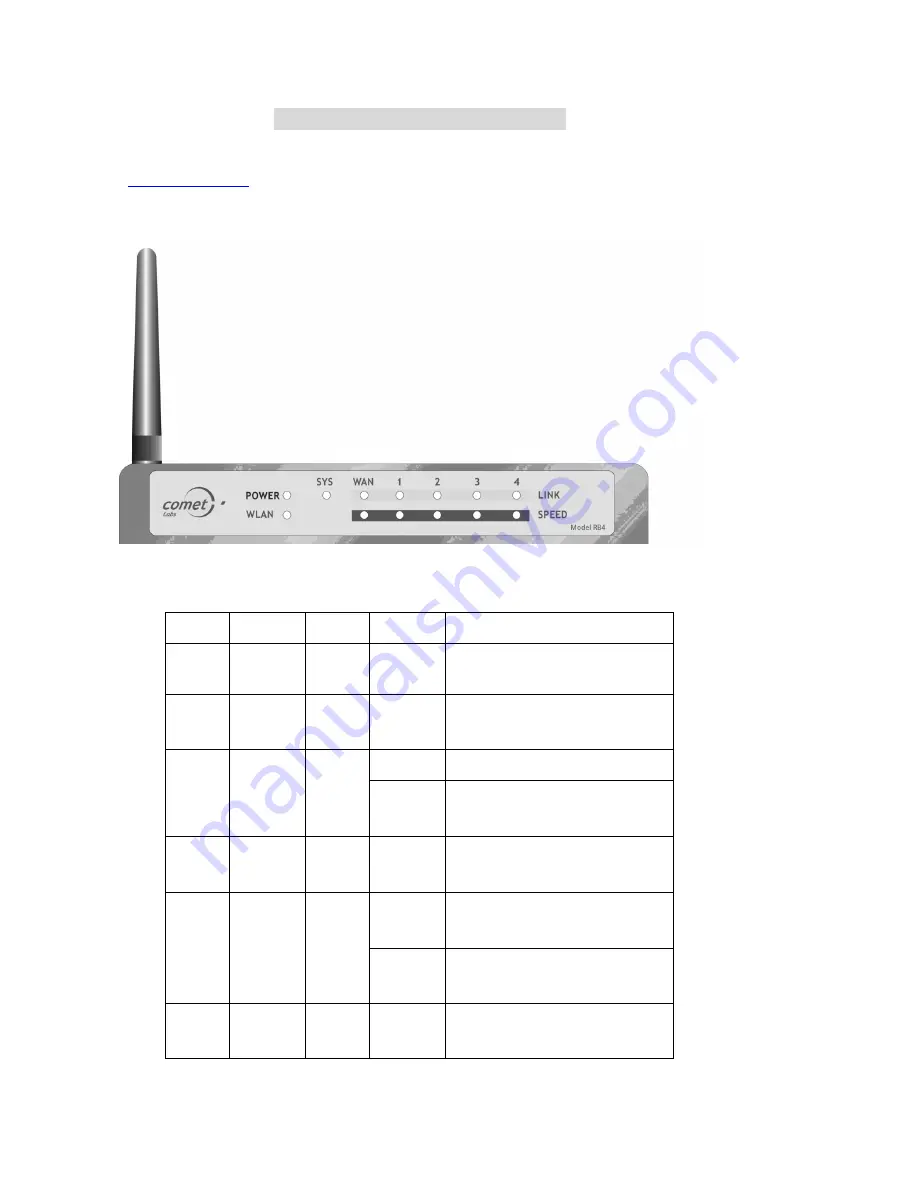
Figure 2-1 Front Panel
LED:
LED
Function
Color
Status
Description
POWER
Power
indication
Green
On
Power is being applied to this product.
SYS
System
status 1
Green
Blinking
This product is functioning properly.
On
The WAN port is linked.
WAN
WAN port
activity
Green
Blinking
The WAN port is sending or receiving
data.
WLAN
Wireless
activity
Green
Blinking
Sending or receiving data via wireless
On
An active station is connected to the
corresponding LAN port.
Link/Act.
1~4
Link status Green
Blinking
The corresponding LAN port is
sending or receiving data.
10/100
Data Rate
Green
On
Data is transmitting in 100Mbps on
the corresponding LAN port.
?
For details, please refer to Appendix D FAQ and Troubleshooting.
Summary of Contents for WRB54+
Page 1: ...1 User s Manual Wireless Internet Broadband Router Model Nr WRB54 English version...
Page 17: ...17 3 4 1 Primary Setup WAN Type Virtual Computers Press Change...
Page 25: ...25 3 5 Forwarding Rules 4 5 1 Virtual Server...
Page 29: ...29 3 6 Security Settings...
Page 52: ...52 3 7 Advanced Settings...
Page 57: ...57 Example After Dynamic DNS setting is configured click the save button...
Page 66: ...66 3 8 Toolbox...
Page 67: ...67 3 8 1 System Log You can View system log by clicking the View Log button...
Page 68: ...68 3 8 2 Firmware Upgrade You can upgrade firmware by clicking Firmware Upgrade button...
Page 73: ...73 b Don t input any value in the Gateway tab...
Page 78: ...78 Double click Administrative Tools...
Page 79: ...79 Local Security Policy Settings Double click Local Security Policy...
Page 82: ...82 click Add button...
Page 83: ...83 Enter a name for example xp router and dis select Use Add Wizard check box Click Add button...
Page 85: ...85 Click OK button Then click OK button on the IP Filter List page...
Page 86: ...86 select Filter Action select Require Security then click Edit button...
Page 87: ...87 select Negotiate security Select Session key Perfect Forward Secrecy PFS click Edit button...
Page 88: ...88 select Custom button...
Page 90: ...90 select Authentication Methods page click Add button...
Page 94: ...94 click Add button...
Page 95: ...95 Enter a name such as router xp and dis select Use Add Wizard check box Click Add button...
Page 97: ...97 Click OK button Then click OK button on IP Filter List window...
Page 98: ...98 select Filter Action tab select Require Security then click Edit button...
Page 99: ...99 select Negotiate security Select Session key Perfect Forward Secrecy PFS click Edit button...
Page 100: ...100 select Custom button...
Page 102: ...102 select Authentication Methods page click Add button...
Page 105: ...105 select All network connections...
Page 106: ...106 Configure IKE properties Select General Click Advanced...
Page 109: ...109 VPN Settings VPN Enable Max number of tunnels 2 ID 1 Tunnel Name 1 Method IKE Press More...
Page 115: ...115 3 Choose Virtual Private Network 4 Do not dial to initial connection...
Page 117: ...117 7 Select the type of VPN...
Page 119: ...119 Then the steps refer to pptp settings...
Page 122: ...122 Figure 2 Enable IEEE 802 1X access control...
Page 124: ...124 Figure 4 Certificate information on PC1 Figure 5 Authenticating...


