


60
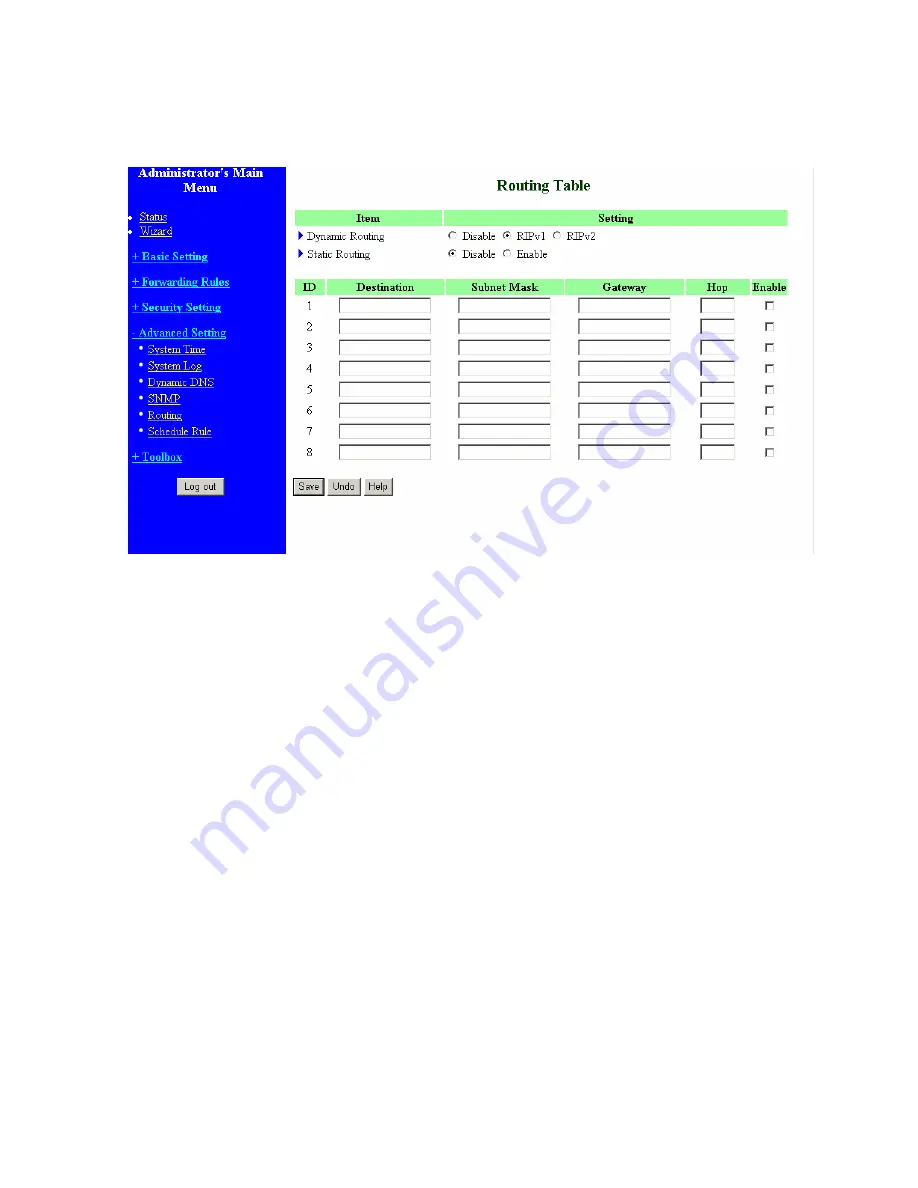
3.7.5 Routing Table
Routing Tables
allow you to determine which physical interface address to use for outgoing IP data
grams. If you have more than one routers and subnets, you will need to enable routing table to allow
packets to find proper routing path and allow different subnets to communicate with each other.
Routing Table settings are settings used to setup the functions of static and dynamic routing.
Dynamic Routing
Routing Information Protocol (RIP) will exchange information about destinations for computing routes
throughout the network. Please select RIPv2 only if you have different subnet in your network.
Otherwise, please select RIPv1 if you need this protocol.
Static Routing
: For static routing, you can specify up to 8 routing rules. You can enter the destination
IP address, subnet mask, gateway, hop for each routing rule, and then enable or disable the rule by
checking or unchecking the Enable checkbox.
Summary of Contents for WRB54+
Page 1: ...1 User s Manual Wireless Internet Broadband Router Model Nr WRB54 English version...
Page 17: ...17 3 4 1 Primary Setup WAN Type Virtual Computers Press Change...
Page 25: ...25 3 5 Forwarding Rules 4 5 1 Virtual Server...
Page 29: ...29 3 6 Security Settings...
Page 52: ...52 3 7 Advanced Settings...
Page 57: ...57 Example After Dynamic DNS setting is configured click the save button...
Page 66: ...66 3 8 Toolbox...
Page 67: ...67 3 8 1 System Log You can View system log by clicking the View Log button...
Page 68: ...68 3 8 2 Firmware Upgrade You can upgrade firmware by clicking Firmware Upgrade button...
Page 73: ...73 b Don t input any value in the Gateway tab...
Page 78: ...78 Double click Administrative Tools...
Page 79: ...79 Local Security Policy Settings Double click Local Security Policy...
Page 82: ...82 click Add button...
Page 83: ...83 Enter a name for example xp router and dis select Use Add Wizard check box Click Add button...
Page 85: ...85 Click OK button Then click OK button on the IP Filter List page...
Page 86: ...86 select Filter Action select Require Security then click Edit button...
Page 87: ...87 select Negotiate security Select Session key Perfect Forward Secrecy PFS click Edit button...
Page 88: ...88 select Custom button...
Page 90: ...90 select Authentication Methods page click Add button...
Page 94: ...94 click Add button...
Page 95: ...95 Enter a name such as router xp and dis select Use Add Wizard check box Click Add button...
Page 97: ...97 Click OK button Then click OK button on IP Filter List window...
Page 98: ...98 select Filter Action tab select Require Security then click Edit button...
Page 99: ...99 select Negotiate security Select Session key Perfect Forward Secrecy PFS click Edit button...
Page 100: ...100 select Custom button...
Page 102: ...102 select Authentication Methods page click Add button...
Page 105: ...105 select All network connections...
Page 106: ...106 Configure IKE properties Select General Click Advanced...
Page 109: ...109 VPN Settings VPN Enable Max number of tunnels 2 ID 1 Tunnel Name 1 Method IKE Press More...
Page 115: ...115 3 Choose Virtual Private Network 4 Do not dial to initial connection...
Page 117: ...117 7 Select the type of VPN...
Page 119: ...119 Then the steps refer to pptp settings...
Page 122: ...122 Figure 2 Enable IEEE 802 1X access control...
Page 124: ...124 Figure 4 Certificate information on PC1 Figure 5 Authenticating...


