background image


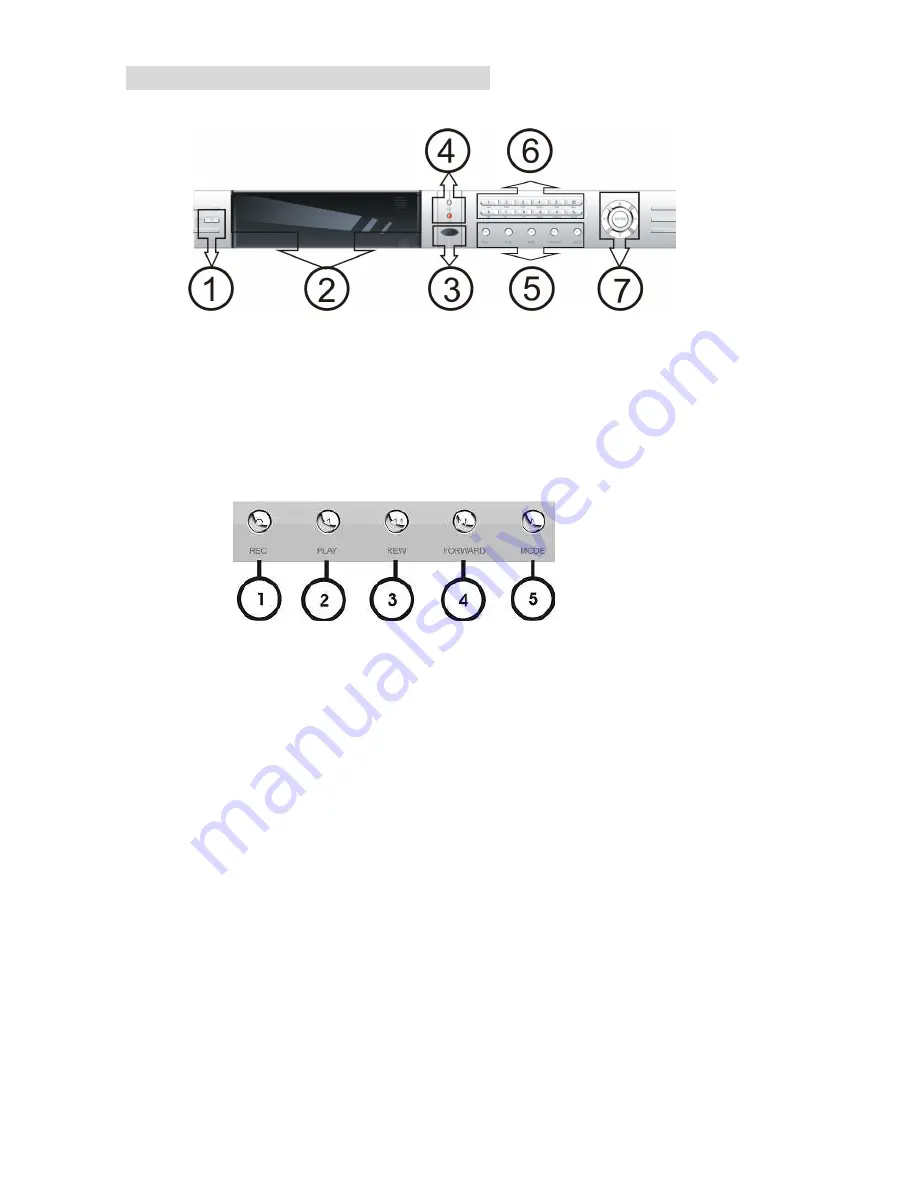
2.  UNIT DESCRIPTION OF FRONT PANEL 


1 - ON/OFF, DVR Power Switch. 

2 - CD-RW OR HDD Window 

3 - IR Window 

4 - HDD LED and Power LED. 

5 - Recording/Playing Control Buttons Area 


1. REC: It is manual recording button. Push this button to record video to hard disk. Re-push this button, it 

will stop recording. So, this button is the switch button of manual recording and stopping recording operation, 

recording and stop will work simultaneously on 16 channels. This button doesn’t work in schedule mode. 

2.  PLAY:  Push  this  button  to  start  playing  the  video  stored  in  hard  disk.  Re-push  this  button,  it  will  stop 

playing. So, this button is the switch button of playing video and stopping playing operations. Play and stop will 

work simultaneously on 16 channels. This button doesn’t work while time recording and alarming recording. 

3.  REW:  fast  backward  button.  Push  this  button  to  start  fast  backward  playing  till  push  play  button  to  start 

normal playing. 

4. FORWARD: fast forward button. Push this button to start fast forward playing till push play button to start 

normal playing. The fast forward has five speeds, each time you push the button will change the speed from 

slow to fast and then back to slow. 

5. 

MODE: mode change key, push this key to change to shift mode. Re-push to change to normal mode. 


Summary of Contents for 19147

Page 1: ...IGITAL VIDEO RECORDER ART 49146 49148 Please read this manual thoroughly before use and keep it for future reference Via Don Arrigoni 5 24020 Rovetta S Lorenzo Bergamo http www comelit it E mail expor...

Page 2: ...within the product s enclosure that may be of sufficient magnitude to constitute a risk of electric shock to person The exclamation point within an equilateral triangle is intended to alert the user...

Page 3: ...for your safety If the provided plug does not fit into your outlet consult an electrician for replacement of the obsolete outlet 9 POWER AND CONNECTION CABLES PROTECTION Protect the cables from being...

Page 4: ...5 5 3 D I S P L AY S E T U P 1 6 5 3 1 CAMERA NAME SET 16 5 3 2 COLOR SET 17 5 3 3 AUTO SEQUENCE SET 17 5 4 RECORD SETUP 18 5 4 1 AUDIO CH SET 19 5 4 2 REC CH SET 19 5 5 NETW ORK SETUP 20 5 5 1 N W EN...

Page 5: ...playback frame rate changeable for recording Support alarm recording time recording Support loss and motion detection functions Multi function searches be able to distinguish different alarm records...

Page 6: ...ored in hard disk Re push this button it will stop playing So this button is the switch button of playing video and stopping playing operations Play and stop will work simultaneously on 16 channels Th...

Page 7: ...not in shift mode push this button to see big picture of channel 2 While inputting numbers this button is used as number key of 2 3 USB 3 USB key In shift mode push this button the DVR will start USB...

Page 8: ...on to see big picture of channel 9 While inputting numbers this button is used as number key of 9 In 8CH DVR this button is Add 11 SF 0 Single frame forward button In shift mode while in playback stat...

Page 9: ...are all carried out through the terminals and sockets on the back panel The back view of the machine is illustrated as below Each part of the back panel is illustrated as below 1 Video input 1 16 or 1...

Page 10: ...one audio input which means if you connect an audio to CH1 you cannot connect any CH2 to CH4 3 3 Alarm Connection The DVR can support up to 16 alarm input and 1 alarm output Alarm input there are two...

Page 11: ...t 49146 49148 User s Manual 11 Alarm output There are three alarm output pin the status of these pin are illustrated as below N O COM N C N C COM N O There is an example for alarm output connection Al...

Page 12: ...nect the power and digit cable 1 Push out the hard drive rack from the DVR side panel 2 Open the top cover of the drawer 3 Jump HDD to Master Jump to Master 4 Connect the ribbon IDE cable the power ca...

Page 13: ...l move among the settable items continuous pushing will make the cursor move among the options one by one and it can recur The selected one will display in yellow color While choosing digital fields e...

Page 14: ...er the correct password the main menu will display ad below 5 2 SYSTEM SETUP Push ENTER button to enter sub menu PLAY REPEAT Set the Playback Repeat VIDEO SYSTEM Set the NTSC PAL BUZZER SOUND Set the...

Page 15: ...et the time display format DISPLAY Set the time display on off 5 2 2 HDD FORMAT SET Format the hard disk Select YES to format the hard disk All video on the HDD will loss If you have two HDD chose mas...

Page 16: ...8 60Hz 1024 768 75Hz 1280 1024 60Hz 5 3 1 CAMERA NAME SET When the cursor moves to camera name please push enter button the camera name setup window will appear which is illustrated as below Each chan...

Page 17: ...which is illustrated as below CON picture contrast BRI picture brightness HUE picture hue SAT picture saturation 5 3 3 AUTO SEQUENCE SET Set the Display Time of Auto Sequence Please push enter button...

Page 18: ...rate the more natural look will be displayed on the screen when you playback The lower the record frame rate the more you can save the space on the hard disk The highest frame rate is 120f sec PAL is...

Page 19: ...audio set you have to select one channel in these four channels in the Record Setup menu 5 4 2 REC CH SET When the cursor moves to REC CH Set please push enter button The REC CH setup window will app...

Page 20: ...ightward button to select each bit of the digit and then push rightward or leftward button to modify the bit of this digit push enter to save your change NETWORK ENV the DVR has three types of differe...

Page 21: ...f you have more than one DVR in a local area network you have to set each DVR to have an exclusive MAC address but remember that you have only one chance to modify the MAC address once you have change...

Page 22: ...ule button after setting up the parameters so to activate the settings 5 6 1 MOTION AREA SET Turn the Motion Block ON OFF When the cursor moves to Alarm set then push enter button the alarm setup wind...

Page 23: ...ht picture There are two types of backup mode STILL and MOVIE in STILL mode you can backup picture in MOVIE mode you can backup video 5 8 2 CD_RW BACKUP If the DVR is connected to a CD_RW you can use...

Page 24: ...ol Set then push enter button the protocol set window will appear which is illustrated as below Push up or down button to move the cursor and push right or left to change the value CHANNEL SEL select...

Page 25: ...rding Connect the power to all related equipments and ensure that there is video input Push display button to check spare space of the hard disk if there is no much space please think whether to chang...

Page 26: ...input signal is effective the alarm recoding continues when the alarm input signal loses efficacy the time set up by REC TIME becomes effective and when the time goes out the alarm recording automatic...

Page 27: ...select push search button to quit from search menu 6 8 Time search When the cursor moves to Time Search then push enter button the time search window will appear Their red block means there has video...

Page 28: ...he Backup Set menu push the USB button in shift mode it begin to backup the main out video to the USB device from the moment push USB button again to select the end of the backup video there will be a...

Page 29: ...will be displayed after PTZ You can press upward downward leftward rightward button to move the speed dome and press the button again or press enter to stop If you press the IRIS button the character...

Page 30: ...you will see the window below enter the IP address and click OK button IP Address Set the IP of the board Port Set the communication port and AV port 7 2 Viewer connect Press button you can show logi...

Page 31: ...utton 7 4 Playback Click Playback search window will display First you have to select the HDD of the DVR then click the Get record list or Get event list If the DVR has record list you can see the win...

Page 32: ...FilePlay Press FilePlay button you can see the below picture press the open button play the video file on the computer Fileplay Menu 7 7 Save to AVI Save the video played on the current viewer to AVI...

Page 33: ...lick the Save to AVI once more will stop saving 8 Troubles Shooting Q What kind of camera should I buy for this DVR A Any BNC or RCA interface indoor outdoor infrared camera will work with the DVR It...

Page 34: ...ting were in blue or gray Q I push record button but the DVR does not start recording why A Push display button to see if there is a hard disk detected also if the DVR is in schedule mode there is a S...

Page 35: ...event search start stop search Playback Playback speed 100 fps PAL max 120 fps NTSC max Network 1 RJ45 port live playback remote monitoring Internet Explorer support Backup CD RW optional USB network...

Page 36: ...36 Via Don Arrigoni 5 24020 Rovetta S Lorenzo Bergamo http www comelit it E mail export department comelit it...

Reviews: