background image

13

www.colormetrics.info

Colormetrics  P1300

15 


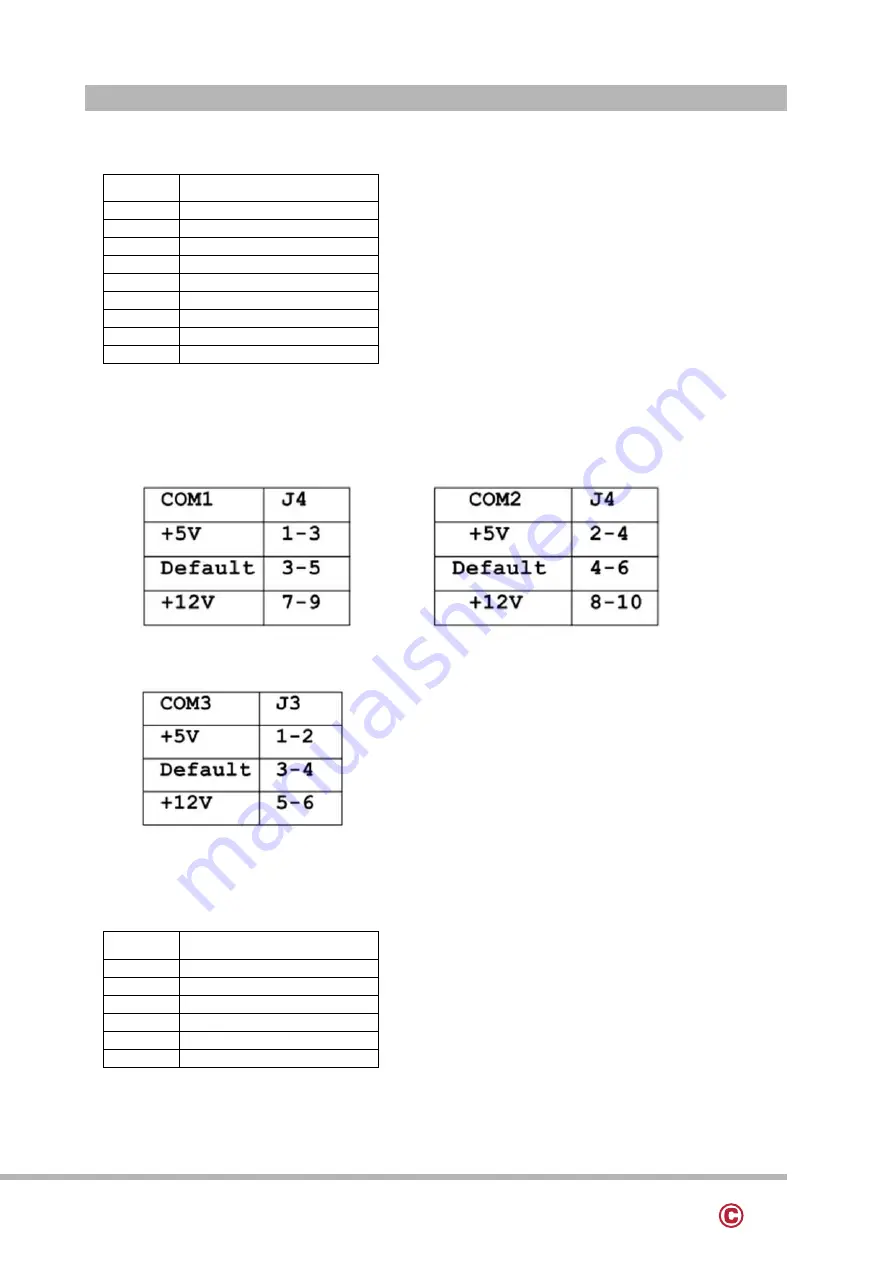
5.    COM connector Pin Definition


No.


Definition


1


DCD1#


2


RxD


3


TxD


4


DTR#


5


GND


6


DSR#


7


RTS#


8


CTS#


9


5V/12V/Ring#


Powered COM 5V/ 12V selected by jumper


6.  RJ11 (Cash Drawer) connector Pin Definition


No.


Definition


1


GND


2


SOUT6_RJ11


3


RI#6


4


+24V


5


N/C


6


GND


Summary of Contents for P1300

Page 1: ...1 www colormetrics info Colormetrics P1300 Errors excepted subject to change www colormetrics info P1300 User Manual Version 1 0...

Page 2: ...permission of the publisher All products and trade names described within are mentioned for identification purpose only No affiliation with or endorsement of the manufacturer is made or implied Produc...

Page 3: ...s could cause fire or electrical shock 9 If one of the following situations happens get the device checked by a service personnel a The power cord or plug is damaged b Liquid has penetrated into the d...

Page 4: ...ment WEEE The Directive determines the framework for the return and recycling of used appliances as applicable throughout the European Union This label is applied to various products to indicate that...

Page 5: ...M 16 5 3 MSR i Button RFID 17 5 4 VFD 8 9 7 2nd Display 18 5 5 1D 2D Barcode Scanner 19 6 DEVICE DRIVER INSTALLATION 20 6 1 MagSwipe Card Reader i Button reader Configuration utility 20 6 2 Install fr...

Page 6: ...essories a b c d a Single MSR b VFD c 8 or 10 4 2nd Display d i button Packing List 1 PACKING LIST VFD 8 or 10 4 2nd Display MSR i button Barcode Scanner 1D 2D 7 1 1 Standard Accessories a b a System...

Page 7: ...ics P1300 8 2 1 Rear View 2 2 Back View Please make sure 19V DC plug in the right direction before plugging in DC jack System View 2 Please make sure the 19V DC is plugged in the right direction befor...

Page 8: ...3 DB9 Power COM RI 5V 12V selected by jumper Cash Drawer Port x 1 24V RJ11 Audio Port Internal Speaker 1 x 2W LAN x 1 RJ45 10 100 1000 Base T VGA X 1 DB15 DC In Lockable 3 pin DC input OS Support Linu...

Page 9: ...fo Colormetrics P1300 11 2 5 Internal Layout M B PCBA DC in 19V RJ45 USB 2 0 USB3 0 RJ11 VGA COM1 COM2 COM3 USB 3 0 MSR iButton MSR iButton Speaker Power button Power LED SATA III M 2 E Key DDR4 Socke...

Page 10: ...nable 8 GND 23 BL PWM DIM 9 SOC_EDP1_AUX_P 24 NC 10 SOC_EDP1_AUX_N 25 NC 11 U3Rxp1 26 12V 12 V3 3V 27 12V 13 V3 3V 28 12V 14 NC 29 12V 15 GND 30 NC 2 SATA1 SATA Pin Definition No Definition No Definit...

Page 11: ...l connector Pin Definition No Definition 1 5V 2 USB D 3 USB D 4 GND 5 USB1 USB2 Sideward MSR connector Pin Definition No Definition 1 5V 2 D 3 D 4 GND 6 CN1 VFD connector Pin Definition No Definition...

Page 12: ...tion No Definition No Definition 1 5V 5 5V 2 D 6 D 3 D 7 D 4 GND 8 GND 3 2 Layer USB3 0 2 0 connector Pin Definition No Definition No Definition 1 5V 10 5V 2 D 11 D 3 D 12 D 4 GND 13 GND 5 RX 14 RX 6...

Page 13: ...5 COM connector Pin Definition No Definition 1 DCD1 2 RxD 3 TxD 4 DTR 5 GND 6 DSR 7 RTS 8 CTS 9 5V 12V Ring Powered COM 5V 12V selected by jumper 6 RJ11 Cash Drawer connector Pin Definition No Definit...

Page 14: ...s P1300 16 7 LED1 Power Button Pin Definition No Definition 1 5V standby 2 GPIO 8 SPK1 Int Speaker Pin Definition No Definition 1 Out 2 Out 9 Cash Drawer connector Pin Definition No Definition 1 GND 2...

Page 15: ...BLY DISASSEMBLY 17 5 1 HDD SSD 1 Dis fasten 2 screws 2 Pull out the hard drive case in an outward direction to remove it from the system 3 Install the hard drive in the hard drive case and fasten 4 ha...

Page 16: ...16 www colormetrics info Colormetrics P1300 18 5 2 RAM 1 Dis fasten 13 screws and remove the back cover 2 Insert the RAM into the RAM slot 1 2...

Page 17: ...19 5 3 MSR i Button RFID 1 The MSR i Button easily install on the side of the LCD Touch Screen s USB 2 0 connector 2 Insert the USB connector on the MSR i Button into the side USB port 3 Secure the m...

Page 18: ...able into the VFD connector or plug the 8 or 9 7 2nd display cable into the 2nd display s connector note display connector can only be connected to one device at a time 3 Install VFD with 2 screws Ins...

Page 19: ...ormetrics info Colormetrics P1300 21 5 5 1D 2D Barcode Scanner 1 Install the barcode scanner with bracket attached by tightening the 2 screws 2 Plug the barcode scanner Type A Male USB cable into a US...

Page 20: ...lect the USB HID device which has been plug into the PC USB port enter the correct Vendor ID 0E6A and Device ID then press OK different device has its own Device ID e g DID 0x030F for keyboard and HID...

Page 21: ...he device connected 2 Configuration Setup Device functions e g MSR i Button RFID Chip card behavior can be defined and stored by this tool Four operation buttons define as below Load From File Load th...

Page 22: ...are used for four functions each function related area should be setup correctly and press Set Configure Word button before operation MSR function areas 1 2 5 6 9 11 12 13 i Button function areas 2 3...

Page 23: ...en tracks data or after the last track data Track Error Report Enable If enabled the character F will response when track data read fail Track Sentinel Enable Replaceable If enabled the reader will se...

Page 24: ...emoved Area 9 Tracks Sequence Request Select the order of three tracks data returned Area 10 i Button ID Range Request Define the i Button data range returned Area 11 Language Option Select one of sup...

Page 25: ...Button key ID response port right after key attached or removed Head Tail Message Message prefix and suffix to key data returned Each Head Tail accepts10 bytes max long Invisible code Enter keyboard c...

Page 26: ...26 www colormetrics info Colormetrics P1300 28 6 2 Install framework 4 0 1 Double click to install 2 Select I have read and accept the license terms And click Install...

Page 27: ...27 www colormetrics info Colormetrics P1300 29 3 Click Finish...

Page 28: ...www colormetrics info Colormetrics P1300 30 6 3 VFD 1 Power on VFD and waiting test page of EEPROM test Baud rate and Command page Set up the customer display by VFDset exe 2 Setup VFDset exe softwar...

Page 29: ...the steps as shown in the above figure the baud rate will show on states page of VFD module Note You may check it when power on VFD module then click Open COM button 4 Get Setting from VFD button to g...

Page 30: ...ine1 VFD DISPLAY Welcome msg line2 HAVE A NICE DAY AND THANK YOU 7 Welcome Message Welcome Message line1 maximum 20 characters line 2 maximum 20 characters total of 40 characters a ASCII mode You can...

Page 31: ...setting to VFD button This button is to download the setting from VFDset exe to VFD module After success dialog Download O K Please restart message popped up Please restart display for enable new sett...

Page 32: ...32 www colormetrics info Colormetrics P1300 34 10 Click Load button After saving you must restart the utility here Then load your setting rename GOODLUCK vfd...

Page 33: ...33 www colormetrics info Colormetrics P1300 TOUCH UTILITY SETUP 35 6 4 Touch Utility setup 1 Double click to install 2 Select Next than install 3 Reset your system...

Page 34: ...34 www colormetrics info Colormetrics P1300 36 4 Double click to icon 5 Open touch utility at tag of setting can chose Digitizer or Mouse mode...

Page 35: ...ormetrics info Colormetrics P1300 BIOS UTILITY SETUP 37 BIOS Utility setup 1 Press DEL key to enter SETUP CMOS UTILITY when system boot up 2 Press ENTER over SCU button to enter the utility BIOS Utili...

Page 36: ...rrent date and time on the computer If you are running a Windows OS these items are automatically updated whenever you make changes to the Windows Date and Time Properties utility WARNING Setting the...

Page 37: ...37 www colormetrics info Colormetrics P1300 39 7 1 Advanced Use the Advanced menu to configure the system for basic operation through the following sub menus...

Page 38: ...38 www colormetrics info Colormetrics P1300 40 7 1 1 Boot Configuration Use the Boot Configuration menu to select power on state for Numlock...

Page 39: ...39 www colormetrics info Colormetrics P1300 41 7 1 2 Audio Configuration Use the Audio Configuration menu to read Audio configuration information and configure the Audio settings...

Page 40: ...40 www colormetrics info Colormetrics P1300 42 7 1 3 Video Configuration Use the Video Configuration menu to read Video configuration information and configure the Video settings...

Page 41: ...41 www colormetrics info Colormetrics P1300 43 7 1 4 SATA Configuration Use the SATA Configuration menu to read SATA configuration information and configure the SATA settings...

Page 42: ...42 www colormetrics info Colormetrics P1300 44 7 2 Security Use the Security menu to install or change the password...

Page 43: ...o install or change the power settings AC Loss Auto Restart Enable or disable system power on automatically after AC power restored Wake on LAN Enable or disable system wake by onboard LAN chip LVDS F...

Page 44: ...44 www colormetrics info Colormetrics P1300 46 7 4 Boot Use the Boot menu to select type to Dual type Legacy type or UEFI type...

Page 45: ...45 www colormetrics info Colormetrics P1300 47 7 5 Exit Use the Save Exit menu to load default BIOS values optimal failsafe values or to save configuration changes...

Page 46: ...creen A soft cotton cloth When cleaning the LCD screen it is important to use a soft cotton cloth rather than an old rag Some materials such as paper towels could cause scratches and damage the LCD sc...

Reviews: