background image

3

PRINTER COMMUNICATIONS

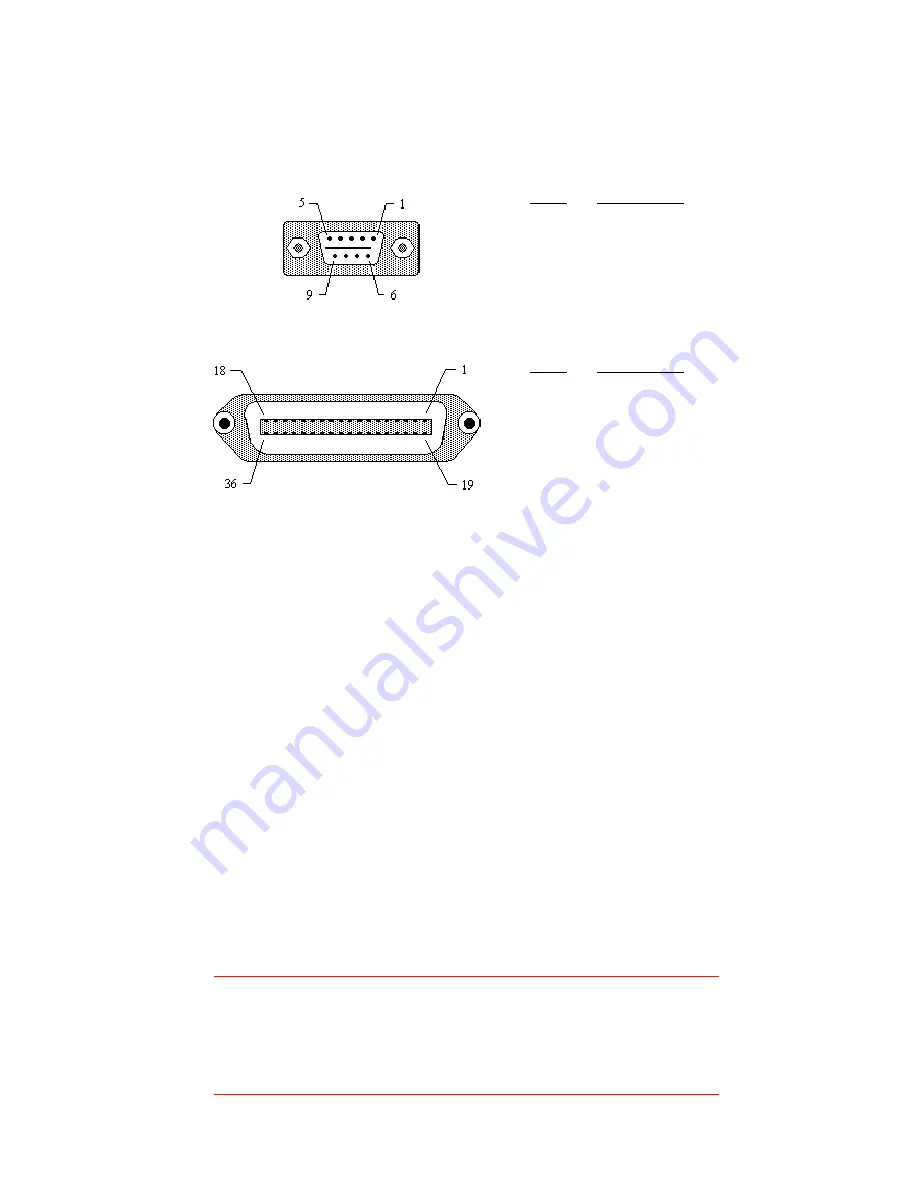
Advantage printers may be equipped with Centronics parallel, RS232
serial, and/or Ethernet communication ports, wired as shown below.

Serial input connector (DB9S)

Standard printer cables

The following standard cables available for Advantage printers:

Centronics parallel cable:

Order CSI P/N 61-00-0002

RS-232 cable, DB9 to DB9:

Order CSI P/N 90-88-0079

RS-232 cable, DB9 to DB25:

Order CSI P/N 90-88-0078

Serial port communication parameters

Advantage printers are configured as 

DTE

 equipment, and use 

RTS

/

CTS

handshaking or 

XON

/

XOFF

 protocol (control characters are 

DC

1 and 

DC

3).

The serial port supports the following parameters:

Speed:

600, 1200, 2400, 4800, 9600, 19200

Parity:

Odd, Even, or None

Word length:

7 or 8 bits

Stop bits:

1 or 2 bits

Default parameters:

9600 baud, no parity, 8 data bits, 1 stop bit

Note:

Advantage printers require a “null modem” when connected
to another 

DTE

 device (i.e., a personal computer). Our serial

cables are wired in a null modem configuration. Other cables
may require an external null modem adapter.

Pin #

Description

1

Strobe

2 - 9

Data bits 0 - 7

10

Acknowledge

11

Busy

12

Out of paper

13

+5VDC

17

Chassis ground

31

Reset

32

+5VDC

16, 33, 19-30  Signal ground

Parallel input connector (Centronics 36 pin)

Pin #

Description

2

RXD (printer data input)

3

TXD (printer data output)

5

Ground (-)

7

RTS (printer busy)

8

CTS

Summary of Contents for Blaster ADVANTAGE

Page 1: ...User s Guide Desktop bar code printer Blaster ADVANTAGE CSIPN 10 00 0219 REV D February 18 1999 Cognitive An Axiohm Company TM ...

Page 2: ...nvironment This equipment generates uses and can radiate radio frequency energy and if not installed and used in accordance with the instruction manual may cause harmful interference to radio communications Operation of this equipment in a residential area is likely to cause harmful interference in which case the user will be required to correct the interference at his own expense CE Notice Warnin...

Page 3: ...nk labels 9 Sending data to the printer 9 Printing labels 10 Controlling the printer using direct commands 10 PRINTER MAINTENANCE 11 WHAT TO DO IF 12 Printer POWER indicator is not lit 12 Printer READY light is not lit 12 Printer READY light is red 13 Printer will not print a self test label 13 Printer will not feed a label 13 Host stops responding or displays printer not ready message 13 Printer ...

Page 4: ... and or Centronics parallel and or Ethernet interface Max media roll diameter 4 7 119mm Indexing methods Black bar Gap Min form length 0 25 6 35mm Min label repeat distance 0 375 9 5mm Text fonts 3X5 5X7 8X8 9X12 12X16 18X23 24X31 UltraFont A B C CGI Triumvirate in 7 sizes Text rotation 0 90 180 270 deg CW Graphics PCX BMP file support plus CSI raster format Bar codes UPCA E E1 ADD2 5 EAN8 13 128 ...

Page 5: ...rol characters are DC1 and DC3 The serial port supports the following parameters Speed 600 1200 2400 4800 9600 19200 Parity Odd Even or None Word length 7 or 8 bits Stop bits 1 or 2 bits Default parameters 9600 baud no parity 8 data bits 1 stop bit Note Advantage printers require a null modem when connected to another DTE device i e a personal computer Our serial cables are wired in a null modem c...

Page 6: ...ver Printhead release ON OFF switch on printer side ON OFF switch on printer side Parallel port Serial port Power input POWER indicator READY indicator FEED button Note These figures show the 4 25 TT printer Other models are similar Media cover Media cover Ethernet port Ethernet link light ...

Page 7: ...printer turned off Power input Connects to power supply Connect to transformer provided with printer Serial port Data input DB9 female connector for connection to host RS 232 protocol Parallel port Data input Centronics compatible connector for connection to host Ethernet port Data input RJ45 connector for Ethernet connection to host Printhead release Unlocks printhead Push toward rear of printer ...

Page 8: ...oom for the media 8 While lowering the media roll into the paper tray slip the free end of the media under the printhead 9 Adjust the paper guide until the media is snug between the paper guide and the left side of the paper tray 10 Lower the printhead and press it down firmly until it locks closed 11 Optional close the media cover 12 Confirm that the printer is ON and the READY indicator glows gr...

Page 9: ...ll Figure 3 Loading labels Drive roller Figure 4 Thermal transfer mechanism Take up driver Ribbon take up core mounts here Ribbon supply core mounts here Flexible arm Flexible arm hidden 1 2 3 ON OFF switch Note printer is shown with media cover removed for clarity ...

Page 10: ...nter is ON Press FEED to confirm that the ribbon feeds smoothly and does not roll off to the left or right If the ribbon moves toward one side remove it and carefully reinstall it 9 Lower the printhead and press it down firmly until it locks closed 10 Confirm that the READY indicator is glowing green then press the FEED button to index the first label Note Thermal transfer printers can operate in ...

Page 11: ...hex dump mode The printer will return to normal operation after you turn it off and on once Feeding blank labels To feed labels 1 Confirm that the printer is ON and the READY indicator is glowing green 2 Press FEED to feed a label Hold in the FEED button to feed multiple labels Sending data to the printer To print labels using data sent from a host computer or terminal 1 Connect the host and print...

Page 12: ...g commands directly to the printer Simple ASCII commands control the printer You can write command files using any word processor that can output ASCII text Since printer programming is potentially complex programming information is not provided here A printer command reference and basic programming procedures are provided on the floppy disk packed with the printer The file PROGGDE HLP on the disk...

Page 13: ...s the thin black line near the front edge of the printhead Caution Do not clean the printhead or drive roller using abrasive or metallic objects or ammonia based cleaners or other harsh chemicals These practices can cause serious damage 4 If you removed the ribbon take up core reinstall it now 5 Wipe the drive roller with the cleaning cloth Confirm that the printer is ON then press the FEED button...

Page 14: ... that the printer will feed a label 8 Review the common problems described in the following section 9 If these steps do not correct the problem contact your Cognitive Solutions dealer or our Technical Services Department You will find Technical support contact information on page 15 Note The information here assumes you are using label printing software If you are programming the printer please re...

Page 15: ...reen Press the FEED button 3 If the printer still does not feed disconnect the communications cable and repeat step 2 If the printer feeds with the cable disconnected suspect a problem with the host computer or cable Host stops responding or displays printer not ready message 1 Review your software setup following the instructions provided with the software 2 Confirm that the host to printer commu...

Page 16: ...ior quality media will degrade print quality 4 If using a thermal transfer printer A Confirm that the ribbon is correctly loaded Check that the ribbon cores are firmly seated on the support arms B Press and hold in the FEED button to feed several labels Confirm that the ribbon is not wrinkling Occasional wrinkling is normal but frequent wrinkling may indicate a defective ribbon Ethernet link light...

Page 17: ...which department you need contact us by mail or through one of our general numbers Mailing address Cognitive 691 Corporate Circle Golden CO 80401 USA Telephone 303 273 1400 Toll free 800 525 2785 Fax 303 273 1414 E mail Info cogsol com You can get immediate information on Axiohm Cognitive Solutions products via the Internet Internet URL www axiohm com Sales Department Toll free 800 525 2785 Fax 30...

Page 18: ...indows application To print bar codes enter bar code data using any text font then highlight the information you want to print as a bar code and select the desired bar code font from your application s font menu The driver will convert the text to an on screen representation of a generic bar code On line help for the Intellidriver is available from the printer setup window which is accessible from...

Page 19: ...or 500 000 inches of printing whichever comes first Physical damage scratches or abrasion is not covered under this warranty A return merchandise authorization number RMA must be ob tained from Cognitive before any merchandise can be accepted for repair AnRMA mustbevisiblydisplayedonallmerchandisereturned Cognitive always maintains the right to repair or replace any compo nent at its option The pr...

Page 20: ...999 FAX 61 0 2 9477 1453 USA 691 Corporate Circle Golden CO 80401 USA TEL 303 273 1400 or 800 525 2785 FAX 303 273 1414 United Kingdom Atlantic Street Altrincham Cheshire WA14 5QJ England TEL 44 0 161 929 9933 FAX 44 0 161 927 7664 France 1 9 rue d Arcueil BP 675 92542 Montrouge Cedex TEL 33 1 47 46 78 11 FAX 33 1 47 46 78 76 ...

Reviews: