background image

Connecting to an IV Pole
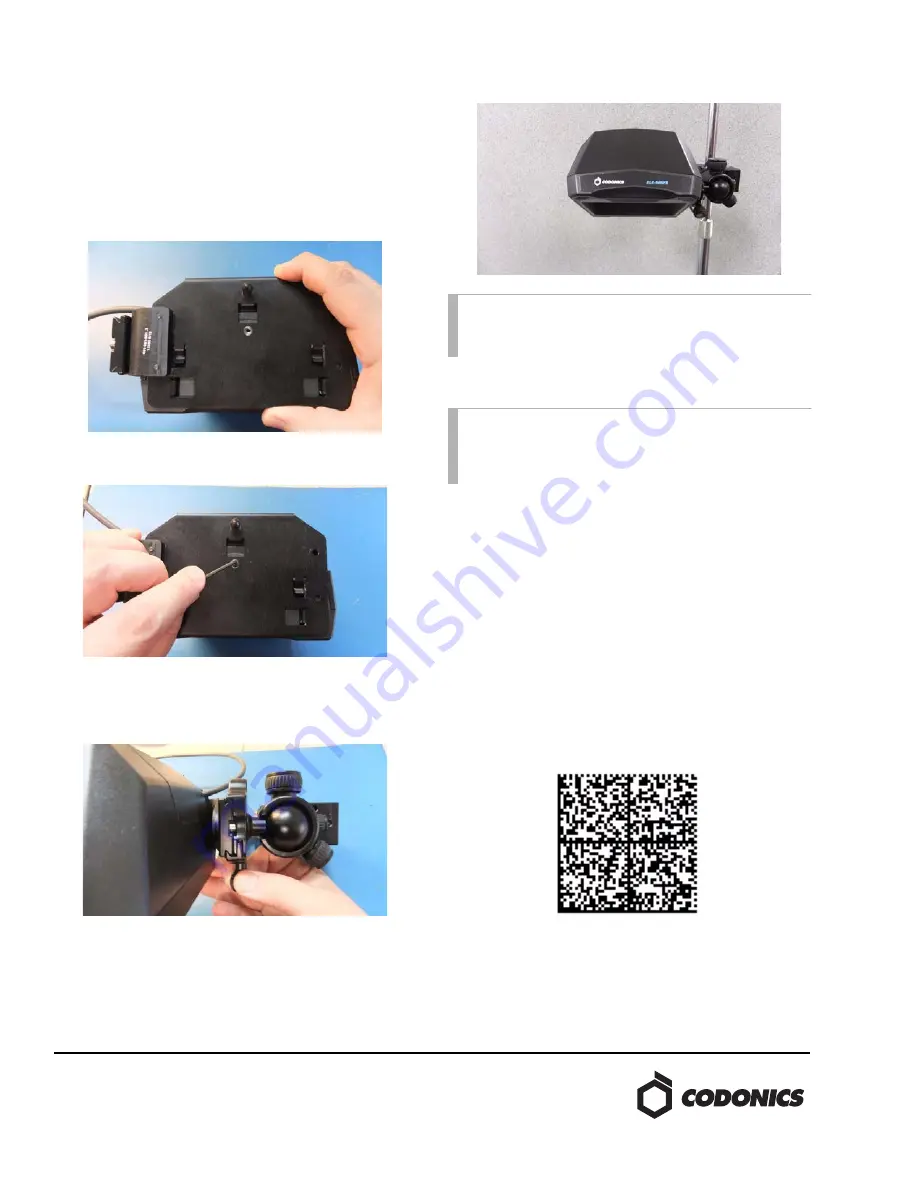
1. Rotate the ratchet handle on the clamp to open up the 

jaws. Connect the clamp mount assembly to the IV pole 

and secure the clamp tightly by turning the ratchet 

handle.

2. Next, connect the back mounting plate to the scanner by 

pressing and sliding down the tabs into the back of the 

SLS-WAVE. Make sure that the USB cable is routed over 

the bracket as shown below. 

3. Insert the screw through the mounting bracket and 

tighten to the SLS-WAVE scanner with the L-key.

4. Next, remove the protective film liner from the SLS-

WAVE. Attach the SLS-WAVE assembly to the clamp 

mount assembly, already attached to the IV pole, by 

rotating the platform thumbwheel as shown below.

5. The SLS-WAVE is now mounted to the IV pole.

6. Insert the SLS-WAVE USB into the AIMS computer.

Configuring SLS-WAVE with Cerner

1. Work with your Cerner representative to ensure 

SurgiNet system is configured for scanning and that the 

minimum software installed is January 2018 or newer. 

2. SLS-WAVE is delivered configured to support scanning 

of 1-D barcodes. If at some point the SLS-WAVE needs to 

be configured again, then scan the following barcode.

WARNING: The scanner should be pointing down and 

positioned to keep the scanner light from shining in the 

patient’s or user’s eyes.

Note: USB extension cords are available if required to 

reach from the SLS-WAVE to the AIMS computer. They 

can be ordered using Codonics Part Number SLS-

WAVE-USB-EXT.

Summary of Contents for SLS-WAVE

Page 1: ...f preparation and administration Hardware Setup SLS WAVE AIMS 1 Determine the location where the SLS WAVE will be installed For example below an AIMS monitor or connected to an IV pole 2 By default th...

Page 2: ...IV pole then go to section Connecting to an IV pole below If connecting to the right side of the AIMS monitor then go to the section Connecting to the right side of an AIMS monitor Connecting to the l...

Page 3: ...r by rotating the platform thumbwheel as shown below 5 SLS WAVE mounted to the left side of the monitor 6 Insert the SLS WAVE USB into the AIMS computer WARNING The scanner should be pointing down and...

Page 4: ...unting plate using a T 15 driver not included as shown below and move it to the other side of the mounting plate Using the T 15 driver screw the thick bracket back into the mounting plate 3 Remove the...

Page 5: ...as shown below 8 The SLS WAVE is now mounted to the right side of the monitor 9 Insert the SLS WAVE USB into the AIMS computer WARNING The scanner should be pointing down and positioned to keep the sc...

Page 6: ...tached to the IV pole by rotating the platform thumbwheel as shown below 5 The SLS WAVE is now mounted to the IV pole 6 Insert the SLS WAVE USB into the AIMS computer Configuring SLS WAVE with Cerner...

Page 7: ...19 Fax Codonics Limited KK AQUACITY 9F 4 16 23 Shibaura Minato ku Tokyo 108 0023 JAPAN 81 3 5730 2297 81 3 5730 2295 Fax 3 To configure SLS WAVE for Cerner scan the following barcode below It will con...

Reviews: