background image

Advanced Operation

To exit Tri-Watch mode:

1. Press the Tri-Watch button. The radio will return to

Standby mode.

During Tri-Watch (while receiving an incoming

transmission), you can choose from the following:

a. Press the Talk button to remain on that tri-watch

location and return to Standby mode.

b. Press the Up/Down buttons to resume scanning 

tri-watch locations.

If you do not press any buttons, your radio will

automatically resume scanning tri-watch locations 

when the incoming transmission is complete.

During Tri-Watch (while not receiving a transmission):

a. Press the Talk button to communicate on the last 

tri-watch location scanned and return to Standby mode.
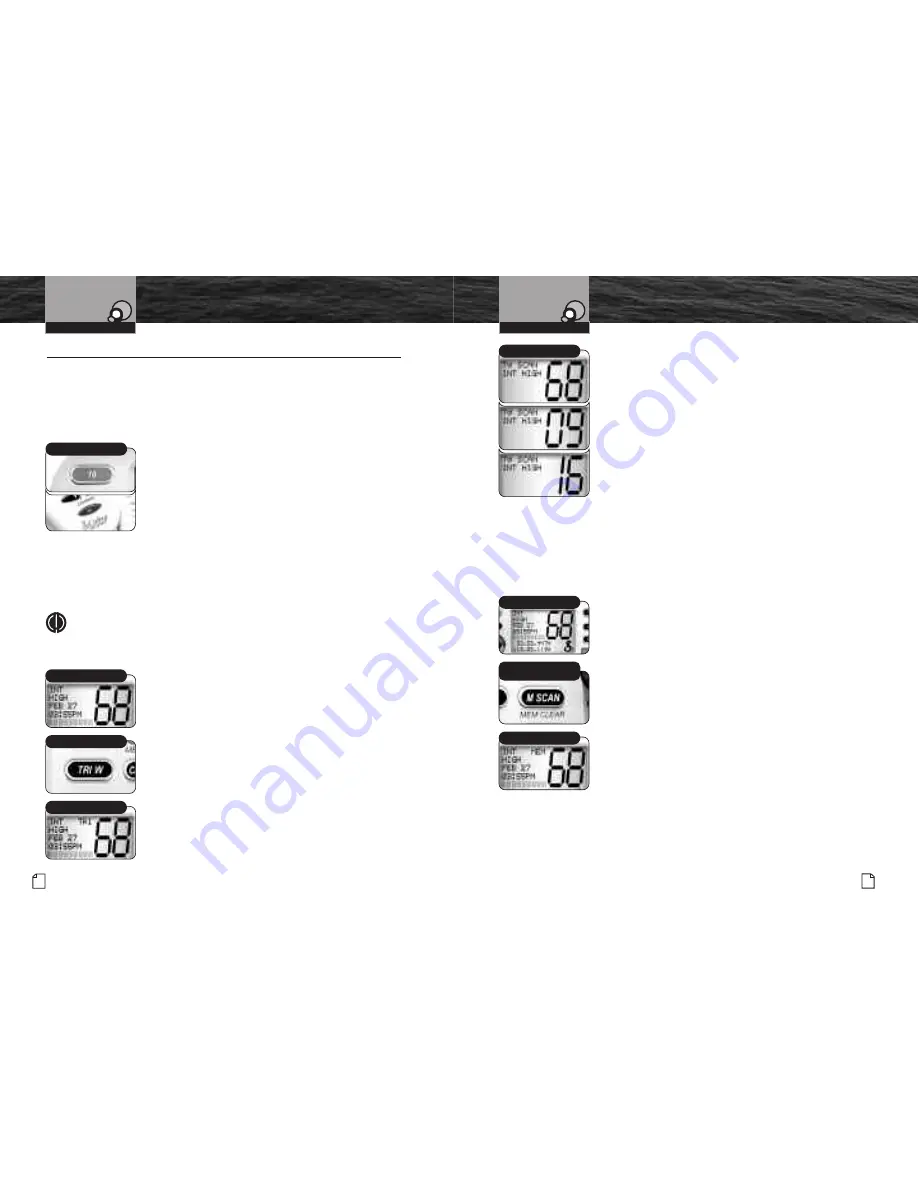
Memory Channels

You can program (or tag) any or all channels to be scanned in the Memory Scan mode.

To program memory channels:

1. From Standby mode, select a channel to be 

tagged using the Up/Down buttons. 

2. Press and hold the Memory Scan/Memory Clear button for

three seconds. The channel will be tagged for scanning

and 

MEM

(memory channel) will appear on the LCD

whenever that channel is selected.

The radio will return to Standby mode as soon as the

Memory Scan/Memory Clear button is released.

Repeat steps 1 and 2 to tag as many channels as you wish.

To clear memory channels:

1. From Standby mode, select a channel to be cleared 

from a memory tagging using the Up/Down buttons. 

2. Press and hold the Memory Scan/Memory Clear button

for three seconds. The channel will be untagged and 

MEM

(memory channel) will no longer appear on the LCD

whenever that channel is selected.

The radio will return to Standby mode as soon as the Memory Scan/Memory Clear

button is released. Repeat steps 1 and 2 to clear additional channels from memory

locations.

Intro

Operation

Customer
Assistance

Warranty

Notice

Secondary Icons

Caution

Warning

Installation

Customer
Assistance

Operating Your  Radio

Standby Mode

Tri-Watch Button

Intro

Operation

Customer
Assistance

Warranty

Notice

in Icons

condary Icons

Caution

Warning

Installation

Customer
Assistance

Tri-Watch Mode

Advanced Operation

42 English

Nothing 

comes close to a Cobra

®

43

Advanced Operation

Cobra Electronics Corporation

has incorporated several features in your

CobraMarine

VHF radio to give you quick access to the voice calling channels 

and to let you monitor more than one channel at once.

Channel 16

This function gives you quick access to calling Channel 16 from any operational mode.

To switch to Channel 16:

1. Press the Channel 16 button to change to Channel 16.

To exit the Channel 16 mode and return to the previous

channel, press and hold the Channel 16 button.

While at Channel 16 in the Channel 16 mode, you can also

press the Up/Down buttons to change to other channels. 

In that event, another press of the Channel 16 button will

switch your radio to Channel 16.

Tri-Watch

Tri-Watch gives you one button access to scan the three locations of most importance

to you. Channel 16 will always be included as a scanned location. The remaining two

locations are selectable.

NOTE

The radio must be squelched for tri-watch to function. See page 33

for squelch procedure.

To enter Tri-Watch mode:

1. In Standby mode, use the Up/Down buttons to 

go to the channel you want as the first location 

to be scanned.

2. Press and hold the Tri-Watch button until 

TRI (Tri-Watch) appears on the LCD.

3. Use the Up/Down buttons to go to the channel 

you want as the second location to be scanned.

4. Press and release the Tri-Watch button.

The radio will begin scanning among Channel 16 and the

two Tri-Watch locations you selected. A signal on any one 

of the three channels will stop the scan to allow you to listen

to the traffic on the channel. The channel number will be

displayed on the LCD.

Intro

Operation

Customer
Assistance

Warranty

Notice

Secondary Icons

Caution

Warning

Installation

Customer
Assistance

Operating Your  Radio

Channel 16 Button

Memory Channel

Standby Mode

Memory Scan/
Clear Button

Tri-Watch Channel

Summary of Contents for Marine MR F75 EU

Page 1: ...equipment is intended for use in For Warranty Product Service and Accessory Information Please contact your local dealer or distributor See the enclosed leaflet that provides contact information for t...

Page 2: ...onditions Complete Mounting Kits Included Radio can be mounted on under or in almost any flat surface using one of the included brackets Waterproof Submersible to 1 metre of water for 30 minutes meets...

Page 3: ...Transceiver Controls Indicators and Connections A2 Microphone Speaker A3 Product Features A3 Important Safety Information 2 Recommendations for Marine Communication 4 VHF Marine Radio Protocols Licen...

Page 4: ...T drop the transceiver or microphone speaker Doing so may crack the case or damage a waterproof seal Once these items have been dropped the original waterproofing cannot be guaranteed DO NOT use chemi...

Page 5: ...nels and is switchable for use according to International Canadian or U S A regulations It features instant access to emergency Channel 16 by pressing one key Station License The UK requires a ships r...

Page 6: ...n Identify your station by your call sign ship name or other official number at both the beginning and end of each message Prohibited Communications You MUST NOT transmit False distress or emergency m...

Page 7: ...tion with a distress and safety watch system The range of the signal may vary but under normal conditions should be approximately 20 nautical miles Maritime Mobile Service Identity MMSI An MMSI is a n...

Page 8: ...culties and before your situation becomes an emergency Use the emergency message procedures only after your situation has become grave or you are faced with a sudden danger threatening life or propert...

Page 9: ...evaluate the need for evacuation Keep the radio nearby Even after your message has been received the coastguard can find you more quickly if you can transmit a signal for a rescue boat to home in on...

Page 10: ...88A only for ship to ship messages Public Correspondence Marine Operator Channels 1 2 3 4 5 7 23 24 25 26 27 28 60 61 62 63 64 65 66 78 82 84 85 86 87 88 For calls to marine operators at public coast...

Page 11: ...hip Movement 07A Commercial 08 Commercial intership only 09 Boater Calling Channel Non Commercial recreational 10 Commercial 11 Commercial VTS in selected areas 12 Port Operations VTS in selected area...

Page 12: ...tor Port Operation Ship Movement 61A U S government only Canada coastguard only West Coast coastguard only East Coast commercial fishing 62 Public Correspondence marine operator Port Operations Ship M...

Page 13: ...al VTS in selected areas 64 Public Correspondence marine operator Port Operations Ship Movement 64A U S government only Canada Commercial Fishing 65 Public Correspondence marine operator Port Operatio...

Page 14: ...nmental protection operations 82 Public Correspondence marine operator Port Operation Ship Movement 82A U S government only Canada coastguard only 83 Canada coastguard only 83A U S government only Can...

Page 15: ...lomon Islands E172 50 to W172 50 12 Auckland NOTE See time offset on page 37 for more information on setting the time zone Intro Operation Customer Assistance Warranty Notice Secondary Icons Caution W...

Page 16: ...ace Mounting Kit Tilt Lock Knobs I n t r o O p e r a t i o n C u s t o m e r A s s i s t a n c e N o t i c e M a i n I c o n s S e c o n d a r y I c o n s C a u t i o n I n s t a l l a t i o n C u s t...

Page 17: ...d Start Up Cobra Electronics Corporation recommendations for radio frequency exposure are based upon the federal regulatory requirements in the U S A Your country may have different requirements Ask y...

Page 18: ...ded automatically in any DSC distress message you may need to send That will take the search out of search and rescue To install a GPS device 1 Install the GPS device in a convenient location accordin...

Page 19: ...That is controlled by the circuitry of your radio To increase the volume you can choose one of the following a Turn the On Off Power Volume knob clockwise b Press and release the Volume Up button on t...

Page 20: ...ttons to enter the position of your vessel If no entry is made within 191 2 hours after the position entry screen appears nines will be displayed as the default position coordinates Intro Operation Cu...

Page 21: ...one sounds when your CobraMarine VHF radio is turned on and to confirm all button presses except for the Talk button If you would prefer not to hear the Confirmation Tone you can turn it off and on as...

Page 22: ...ing rapid advance b Press the Channel 16 button This will take you directly to Channel 16 Press and hold the Channel 16 button to return to Standby mode Up Down Buttons Channel 16 Button Setting Posit...

Page 23: ...sed NOTE If the Talk button is held down for five minutes the radio will automatically cease transmitting to prevent unwanted signal generation As soon as the Talk button is released it can be pressed...

Page 24: ...Tri Watch Button Intro Operation Customer Assistance Warranty Notice in Icons condary Icons Caution Warning Installation Customer Assistance Tri Watch Mode Advanced Operation 42 English Nothing comes...

Page 25: ...ondary Icons Caution Warning Installation Customer Assistance Intro Operation Customer Assistance Warranty Notice Main Icons Secondary Icons Caution Warning Installation Customer Assistance Standby Mo...

Page 26: ...er USERMMSI ID ENTRY 3 Press and hold the Call Set button to return to the Settings menu Intro Operation Customer Assistance Warranty Notice Secondary Icons Caution Warning Installation Customer Assis...

Page 27: ...n Icons Secondary Icons Caution Warning Installation Customer Assistance DSC Set Up 48 English Nothing comes close to a Cobra 49 Group MMSI Number Nautical organizations such as yacht clubs and the or...

Page 28: ...Abort the distress call process and return to Standby mode Enter MMSI Intro Operation Customer Assistance Warranty Notice Secondary Icons Caution Warning Installation Customer Assistance Operating Yo...

Page 29: ...ress the Call Set button to go to the nature of emergency selection screen 3 Use the Up Down and Call Set buttons to select the nature of your emergency 4 Press and hold the Distress button after the...

Page 30: ...ance Operating Your Radio Urgency Waiting Routine Waiting DSC Operation 54 English Nothing comes close to a Cobra 55 Sending an All Ships Call A DSC All Ships call is used for the same urgency and saf...

Page 31: ...n 56 English Nothing comes close to a Cobra 57 Sending an Individual Call The DSC Individual call feature allows you to notify one and only one station that you want to communicate with that station I...

Page 32: ...Caution Warning Installation Customer Assistance Operating Your Radio DSC Operation 58 English Nothing comes close to a Cobra 59 Receiving a Group Call When another station makes a Group call to your...

Page 33: ...utton to send your position 3 Press any button to return to Standby mode b If you choose not to reply 1 Use the Up Down buttons to select EXIT 2 Press the Call Set button to return to Standby mode wit...

Page 34: ...nsmit Position Send Exit Standby Mode DSC Operation 62 English Nothing comes close to a Cobra 63 Intro Operation Customer Assistance Warranty Notice Secondary Icons Caution Warning Installation Custom...

Page 35: ...3 Press the Call Set button to enter the Call Waiting mode NOTE The fourth line will show the type of message 4 Use the Up Down buttons to select the message you want to delete 5 Press and hold the Me...

Page 36: ...e 13 8 VDC Current Drain Stand by 200 mA Receive 300 mA Transmit 5A High power 1A Low Temperature Range 20 C to 60 C Unit Dimensions 15 9 cm x 5 7 cm x 18 cm Unit Weight 1100 g Receiver Frequency Rang...

Page 37: ...68 English Nothing comes close to a Cobra Nothing comes close to a Cobra 69 68 English...

Reviews: