background image

93 | 

P a g e


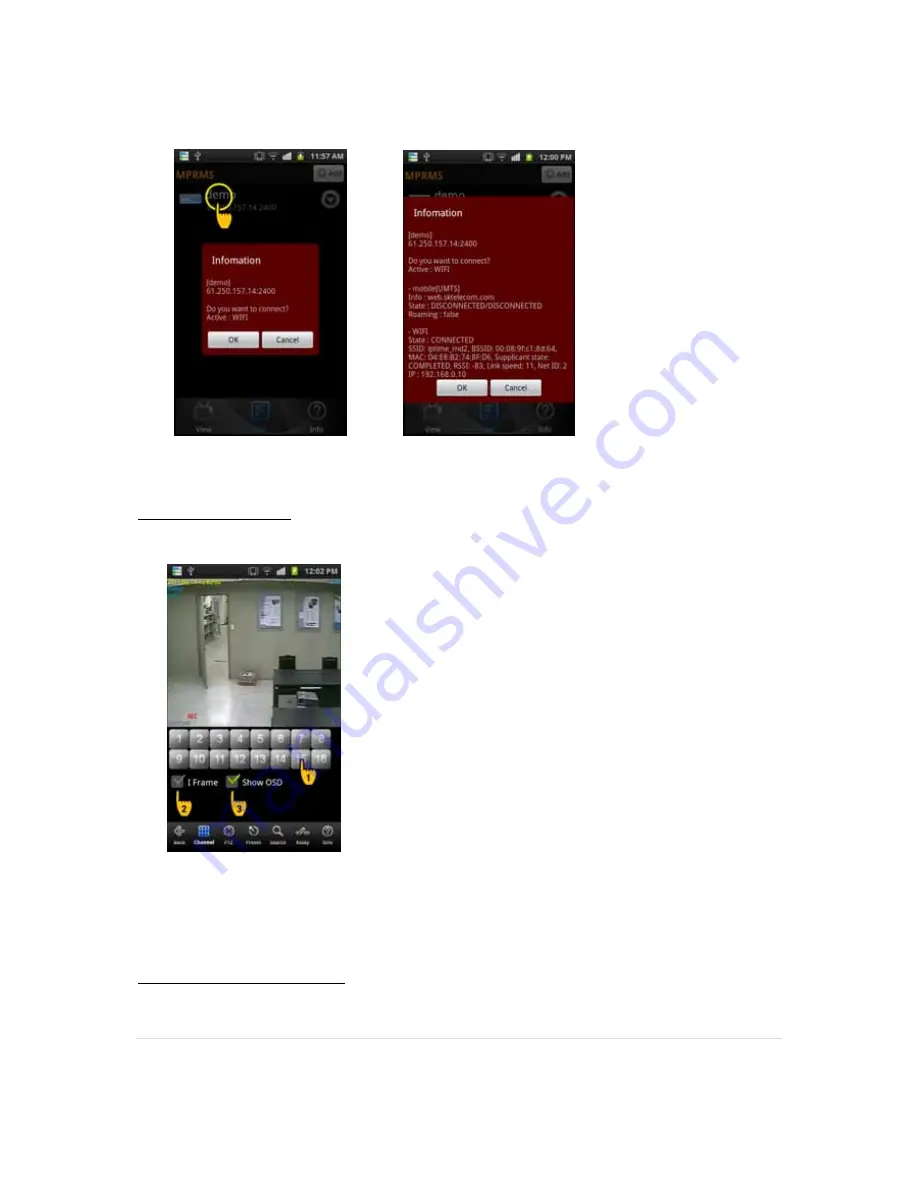
          (Select the list)                                        (Detailed info.) 


Live view on Android 

It shows the currently monitored images with real-time. 


(1) Numeric Button : Press a numeric button to select a channel. 

        (2) 1 frame: When selected, it transmits a still image with the certain interval in case the video 

streaming is interrupted due to the network load 

  (3) Show OSD: Select to display the info. such as channel name, date, time and event, etc. 

Main menu view on Android 


Summary of Contents for HDV043

Page 1: ...1 P a g e INSTRUCTION MANUAL Stand Alone 16Channel DIGITAL VIDEO RECORDER MODEL HDV043 HDV045 Ver 010313 Copyright 2011 Clover Electronics U S A All Rights Reserved...

Page 2: ...g Hard Disk Drive adding and removing a media drive upgrade or downgrade the Firmware replace any electronic components inside the physical units These actions should be under the guidance of a qualif...

Page 3: ...ight put you at the risk of fire electrocution and damage Never uplift the cover break down repair and maintain at your disposal Otherwise it might put you at the risk of fire electrocution and damage...

Page 4: ...is located Keep the device away from magnetic flow electric wave or vibration Do not put anything heavy on the product Otherwise it may be the cause of disorder Strong shockwave or vibration may be th...

Page 5: ...nd to comply with the limits for a Class A digital A digital device pursuant to part 15 of the FCC Rules These limits are designed to provide reasonable protection against harmful interference when th...

Page 6: ...igital Video Recorder Battery 1 5V AAA 2 pcs Screw For HDD mounting Software CD Manual and Client program Adapter DC 12V 6 67A Power Cable Power cable Remote Controller For DVR operation DVR Battery S...

Page 7: ...7 5 Setup Screen 27 6 Labeling Camera 28 7 Enable Recording 29 8 Prepare Network 30 Chapter 2 Basic Information 32 2 1 Menu Display 32 2 2 Description of Icon 33 2 3 Remote Controller 34 2 4 How to Se...

Page 8: ...ation 50 5 3 E mail Notification 51 5 4 Web Server 52 5 5 Free DDNS 53 5 6 Dual Codec Setup 54 Chapter 6 Camera 55 6 1 Camera Title 55 6 2 PTZ Setting 56 6 3 PTZ Advanced Setting 56 6 4 How to Use PTZ...

Page 9: ...h 70 9 3 Date Time Search 71 9 4 Event Search 72 9 5 Go to First Go to Last 73 9 6 Search Control 73 9 7 Audio 74 Chapter 10 Backup 75 10 1 Backup 75 SPECIFICATIONS 79 Chapter 11 Mobile Applications W...

Page 10: ...ynamic IP address Support Dual Stream network transmission Able to output simultaneously thru TV VGA S VHS Spot Able to set the resolution frame and quality per channel Support a number of PTZ protoco...

Page 11: ...Button Use as a control button on Setup menu Speed control on playback Stop button Pause button 2 Menu Display a menu Move to upper menu Cancel a function 3 Pan Tilt Display Pan Tilt menu 4 Audio Dis...

Page 12: ...nel No Button Function Description 1 Power Power Input 2 External SATA Port External storage and backup port 3 VGA VGA Monitor Output 4 Audio Out Audio Output 5 HDMI Out HDMI Video output 6 Audio Inpu...

Page 13: ...positive polarity at 5 Amp VGA Video Graphics Array Port VGA port uses D subminiature or D sub DE 15F E rated sized D Sub with 15 pin Female port Connect a VGA monitor to the DVR with a standard VGA...

Page 14: ...Reserved GND 5 Ground RGND 6 Red ground Red return GGND 7 Green ground Green return BGND 8 Blue ground Blue return KEY PWR SGND 9 10 Key not used 5V DC Sync ground ID0 11 Monitor ID bit 0 SDA 12 Bidi...

Page 15: ...monitor only supports Composite Video Inputs Figure 4 Main Monitor Connection The display resolution for Monitor is at 720x480 Please refer to the item marked Main Monitor Output SPOT Monitor Output C...

Page 16: ...th NTSC and PAL signals are automatically detected by the DVR and requires no further configuration Figure 5 Camera Connection Connect the cameras to the Video In ports located on the rear panel of th...

Page 17: ...t can be configured in the DVR settings Figure 6 DE 9M Serial Port RS 232 DE 9M Serial Port Pin Configuration Table Signal Type Pin Number Description DCD In 1 Carrier Detection Signal not used Rx 2 R...

Page 18: ...mal Close alarm output 1 16 Figure 8 Connection Example of Extension Box Sensor 1 16 inputs functions same as the S1 S4 inputs see next section in 10 way terminal Block Difference is that every port i...

Page 19: ...TZ cameras remotely if you do so There are single RS 485 communications ports these ports are used to connect external PTZ camera controllers Figure 9 PTZ and Keyboard in RS 485 Alarm Out Connecting t...

Page 20: ...ck or for mouse control A third option for the two USB ports are for firmware updating procedures You will only need to use one port for firmware updates Two USB ports are located one front side of th...

Page 21: ...Figure 12 Ethernet Pin Configuration Example 1 Direct connection using cross over cable This type of connection is used mostly for testing the DVR unit and for simple and short cable connection Since...

Page 22: ...ay address must be same address Then you must assign TCP IP address that belongs to same subnet address as DVR and PC Example IP address for DVR DVR TCP IP address 192 168 0 2 PC s TCP IP address 192...

Page 23: ...rules of network policy Please consult with your network administrator In this example we are going to assume that router is giving leasing TCP IP address When router is giving TCP IP address to the...

Page 24: ...ace it on the table top as seen below Figure 16 Table top placement 2 Connection After unpacking the unit you must connect all camera connections monitor connections network connection power connectio...

Page 25: ...connect either to VGA or BNC monitor of your choice If you have both types of monitor you may connect both of them Figure 18 VGA or Monitor Connection Step 3 Connect Network Cable to DVR unit Figure...

Page 26: ...r DC 12 volt Step 1 Included DC Power adapter is located in accessory box Step 2 Take the adapter and connect it with power cord Step 3 Connect the DC 12V male connector to female DC 12V port Step 4 C...

Page 27: ...ndicate booting progression if there is no activity for long period of time then possible corrupt or damaged firmware in DVR unit Please indicate such failure and contact technical support 5 Setup Scr...

Page 28: ...f having default label Here you may choose camera s that you want to give logical name and repeat to other camera s as needed In this example we have chosen Camera 1 marked Ch1 and will change the lab...

Page 29: ...ll cameras to record immediately DVR already may be configured to record on the HDD Step 1 Select Record item on upper main category then by default EVENT RECORDING tab should appear as shown on scree...

Page 30: ...mmunication Protocol where IP address is given to the DVR and these IP address are leased to the unit Usually IP address are none routable internal IP Address Internal IP address or known as Private I...

Page 31: ...DHCP services but must be in same Subnet and Gateway IP Users tend to use this method when certain IP address out of DHCP scope where particular IPs are configured to use NAT IP forwarding or DMZ NAT...

Page 32: ...anel a mouse and a remote Display Setup Menu with a front panel button There are Menu button on the front of unit Press it to display Menu Display Setup Menu with a remote Press Menu button on a remot...

Page 33: ...dicate the status Recording Video Loss Motion Detection Sensor 3 Status Bar 1 Display date and time 2 ER means Emergency Recording and SR means Schedule Recording 3 Show network status and key lock 4...

Page 34: ...BACK UP Press to start recorded data archiving to external media 4 AUDIO Select a audio channel 5 SEQ Press to display each camera in sequence for specific duration 6 PTZ PTZ control menu 7 SEARCH Ca...

Page 35: ...t ID 0 Menu System Information Remote ID Range 0 99 System ID must be configured on DVR system menu It cannot change DVR system on remote controller 2 How to use remote controller ID must be identifie...

Page 36: ...U button on the front panel 2 Mouse Right click 3 Remote Push MENU button Go to main menu Go to search menu Go to backup menu Go to audio output menu Start emergency recording Start schedule recording...

Page 37: ...use and drag it You can cancel by dragging with mouse left button clicked Also you may use Zoom In Zoom Out menu by displaying menu 2 How to magnify with a remote Front panel button On Live Display Me...

Page 38: ...vel 1 Slow speed Level 1 Level 2 Level 3 to increase reaction speed 3 Language Select a language 4 Vertion Show S W H W and N W 5 Health Indicates storage status Hard Disk 1 3 Display the temperature...

Page 39: ...Date Set date 3 Date format Select a Time Date display format 4 Daylight Saving Time Set ON to apply daylight saving time Enter Month Week Day to begin and also enter Month Week Day to end 5 Time Serv...

Page 40: ...ntp org Synchronize Period Select the period to syncronize between DVR and time server Power On Try to sync once power on 12Hour Try to sync every 12 hours 24Hour Try to sync every 24 hours Time Zone...

Page 41: ...Assign an authority per selected ID Configuration Available to set configuration Hard Disk Available to set Hard Disk Search Available to search Backup Available to back up PTZ Setting PTZ operation i...

Page 42: ...unted E SATA Display the capacity of E SATA Delete Select a disk and format delete it 2 Total Display total capacity and used capacity of Hard Disk 3 Over write Record continuously by overwriting the...

Page 43: ...purpose it will be used E SATA Select with which purpose it will be used Apply Save the setting Note After setting select Apply to save Then the system is rebooted 3 5 Default Setup 1 Default Setup E...

Page 44: ...system firmware with USB memory stick the firmware file must be saved in the USB storage first and then insert to DVR to start USB upgrade from the menu 2 Configuration Backup Save a configuration fi...

Page 45: ...uring specific time system locks the button automatically In order to unlock input the password 10 sec 30 sec 1 min OFF Key Beep If you select ON beep sound occurs 3 8 RS 485 In order to control the P...

Page 46: ...3 Login Display Select a login option As Per Last Login Display live image after system rebooting Cover All Camera Do not display live image after system rebooting 4 Login menu Select a log in option...

Page 47: ...op up 4 3 Spot Out Control extra spot output on rear panel By using additional monitor event triggered video display and sequence display are available 1 Mode Sequence Display videos in selected time...

Page 48: ...utput and VGA as Spot Out VGA Composite S Set VGA as main output and Composite as Spot Out HDMI Composite S Set HDMI as main output and Composite as Spot Out 2 Vga Resolution Select a resolution for V...

Page 49: ...c IP user OFF for static IP user 2 IP Address Input the IP address Example IP address 61 250 152 050 Subnet Mask 255 255 255 000 Gateway 61 250 152 001 DNS Address 164 124 101 002 3 DDNS Address Do no...

Page 50: ...rver If you don t know the Server address contact a person who manages SMTP Server you use 2 Mail From Enter the mail address which you use It is for preventing a mail blocked as spam 3 Mail Address E...

Page 51: ...ill image when an alarm occurs Sensor E mail is sent with still image when triggering a sensor Motion Detection E mail is sent with still image when detecting a motion Video Loss E mail is sent when v...

Page 52: ...a g e 5 4 Web Server Built in web server make user can connect the DVR remotely on the Internet Explorer 1 ON OFF Select ON to use remote N W connection through web 2 USE PORT Port for remote connect...

Page 53: ...a router you must make DMZ setting in the router setup for the IP your system has DMZ is a function to open all the ports for the selected IP Input registered information in DVR setup DDNS address Sel...

Page 54: ...use dual codec setup Channel Select channel to set Available to set per channel Split Resolution Transmitting resolution of split screen Fixed with CIF Picture Quality Select picture quality of split...

Page 55: ...55 P a g e Chapter 6 Camera 6 1 Camera Title Input a camera title using by virtual keyboard Press a space bar to change a language...

Page 56: ...ce 6 3 PTZ Advanced Setting 1 Reverse Control Pan Set the Pan works reverse direction 2 Reverse Control Tilt Set the Tilt works reverse direction 3 Touring Mode Preset Touring Use touring by DVR setti...

Page 57: ...aved before 3 Touring interval SEC Select the touring dwell time NOTE PTZ protocol selection Protocol is PTZ moving driver The protocol is registered as per the camera model name or protocol name Plea...

Page 58: ...ct the PTZ Remote controller menu Click the PTZ from remote controller 1 Select PTZ Button on the remote controller When you select PTZ button shape icon appear Then move to the channel you want by th...

Page 59: ...and select this menu Preset Save Preset moving Tour It tours as per the saved preset number MENU It can recalls the PTZ camera OSD menu Channel Change channel at split screen Available to move with di...

Page 60: ...ts the size and picture quality 1 Channel Set channel 2 On Off Set On or Off for recording 3 Resolution Set resolutioin 4 Quality Set picture quality of recorded video 5 Speed Set record frame 6 Post...

Page 61: ...Yellow Recording by motion detection or sensor triggering How to setup Select a channel After selecting the day of the week and time every mouse click makes color shift like N Grey C Green M Blue S R...

Page 62: ...different option 1 7 different holiday setup can be made After selecting record type from H1 to H7 set time with dragging mouse or remote direction 2 Select the Holiday on Holiday Calendar and then s...

Page 63: ...63 P a g e...

Page 64: ...t the sensor usage 3 Input Type Select the sensor input type N Open NORMAL OPEN The contact is normally opened but close when the signal is generated N Close NORMAL CLOSE The contact is normally close...

Page 65: ...apply it after the actual testing 4 Detection Area Select the motion detection area 1 5 The cursor moving by the direction key and if press enter this block is designated for motion detection MD selec...

Page 66: ...66 P a g e...

Page 67: ...Channel Select the channel to apply Preset channel Select the preset camera being applied for the event Preset number Select the preset number to move Popup Channel Select the usage Popup usage by ON...

Page 68: ...ime Relay out Select the alarm out Relay duration Relay out duration Internal buzzer Internal buzzer usage 3 Video loss It is the setup for PTZ pop up relay out buzzer in video loss Preset channel Sel...

Page 69: ...ll menu Select the SEARCH from remote controller and right button of mouse 2 Search mode selection Calendar search It searches by calendar Date Time search It searches specific Date Time Event search...

Page 70: ...ws red color on recorded date Using the direction key you can change the YEAR MONTH DATE 2 If there is the recorded data it shows red color so press the enter button on selected date Channel display c...

Page 71: ...arch If you know the specific date Time input the time to search 1 Record begin It shows the record began time 2 Record end It shows the record end time 3 Channel Select the channel to search 4 Play B...

Page 72: ...event recorded data 1 Record begin It shows the record began time 2 Record end It shows the record end time 3 Channel Select the channel to search 4 Play Begin Input the time to search 5 Play If you c...

Page 73: ...Audio during playback 8 Calendar search during playback 9 Mark In Mark Out If you click it during playback it recognizes as a backup start time and if you click it once again it recognizes as a backup...

Page 74: ...he audio out menu show up The menu call is possible by remote controller or mouse 2 Mode selection OFF No audio use CH1 Audio out only from CH1 CH2 Audio out only from CH2 CH3 Audio out only from CH3...

Page 75: ...SB Connect the USB pen drive to the DVR and select BACKUP button from remote controller or click the right button of mouse 1 Select the recognized backup device If it recognized normal it shows the de...

Page 76: ...atically input 5 Backup end time selection If the backup end time is the same hour select the minute and click end the time will be automatically input If the backup end time is the different hour go...

Page 77: ...is completed click the Backup start button then backup starts It shows the backup capacity USB pen drive capacity so if everything is OK click OK 8 Before backup it shows the USB port backup time the...

Page 78: ...ll bar It shows the current location from the total playback volume Open To open the other backup file Fast reverse playback Reverse playback One step reverse playback Pause One step playback Playback...

Page 79: ...ch Mode Calendar Date Time Event Search First Search Last Search Backup Search Speed x1 x2 x4 x8 x16 Audio In Out 4 1 Sensor In Alarm Out 4 1 PORT RS 232 External Keyboard controller PTZ RS 485 LAN 10...

Page 80: ...hone Application Installation 1 Access the App Store from your iPhone or iTunes application 2 Search for MPRMS 3 Choose to download and install the application there is no charge to use our MPRMS appl...

Page 81: ...ones MPRMS Application Launch the MPRMS Application and press New Enter the Reg Name Registration Name This can be any name to identify the specified DVR Make sure there are NO SPACES in the Reg Name...

Page 82: ...82 P a g e MPEG4 DVRs FDS 110 MJPEG DVRs MJPEG Enter the login information of the DVR The login information MUST MATCH the login information on the DVR...

Page 83: ...S Use Please disregard this configuration option if you are using DVR within the United States This feature is used in the following regions Asia Connecting to the DVR Press the DVR on the site list t...

Page 84: ...84 P a g e Connect remote access...

Page 85: ...y video excluding time resolution and the name of channel The feature is designed to transmit still photo in certain intervals when video streaming is interrupted due to network load See full screen I...

Page 86: ...86 P a g e Search from iPhone Select search the icon below 1 Select Date Time After selecting a date select SEARCH 2 Search key operation...

Page 87: ...ut from iPhone Relay can be controlled remotely Time selection Set the duration time of alarm output Off Alarm off Infinity Keep the alarm output continued PTZ control from iPhone PTZ control is avail...

Page 88: ...matic camera focus 4 Call the PTZ menu 5 Direction button 6 Camera focus control 7 Camera zoom control 8 Select the channel 9 Relay out button A user can set relay out 10 Select the PTZ menu 11 OSD di...

Page 89: ...oid To install the program on the Phone execute the MARKET program and download the MPRMS to install If the installation is completed you will see the MPRMS icon on the main SCREEN 1 2 3 Application E...

Page 90: ...ect the icon Executed Program Register the product information for Android Register the product information for remote monitoring 1 Register Select Add to start the registration 2 Enter the registrati...

Page 91: ...for static IP users 2 After selecting DDNS use enter the Password IP and Port Note Dynamic IP user only 3 You can check the DDNS ID from the DVR menu Menu System System Information Copy the WEBCODE an...

Page 92: ...it ends the connection Remote connection for Android Select the registered list for connection Once you click the registered device it shows the brief information like the 1st picture below If you cl...

Page 93: ...e 1 Numeric Button Press a numeric button to select a channel 2 1 frame When selected it transmits a still image with the certain interval in case the video streaming is interrupted due to the network...

Page 94: ...lect the menu to change the function Go back to the previous step or close the monitoring program Move to live mode Channel change 1 Frame and OSD display is available Go to PTZ mode Go to PTZ preset...

Page 95: ...Select PTZ mode PTZ mode screen 1 Go to PTZ mode Select the PTZ connected channel and click the PTZ button 2 How to control PTZ The PTZ camera moves to the selected direction Zoom in out Focus adjust...

Page 96: ...e movement of PTZ camera previously and make the automatic PTZ movement Select preset mode Preset mode screen 1 How to go to PTZ mode Select the PTZ connected channel and click the Preset button 2 How...

Page 97: ...ct the search mode 2 Select Time Search Select Time Search to enter the search conditions Note Select To Live to return to the live mode during the search 3 Enter the date and time Select the date and...

Page 98: ...98 P a g e Relay Out for Android Relay can be controlled remotely 1 Relay Select On or Off 2 Number Select the relay number 3 Time Select the duration time 4 Execute Make the alarm output work...

Page 99: ...on Select info Display the connection info Display Info Below is the example for an explanation IP 61 250 157 37 2000 Via DDNS Connected IP information MODEL 16CH 63 xxx xxx 0 16Ch model Webcode H6F60...

Page 100: ...or Android Select the back button Select the Yes button There are several ways to finish the program 1 If you click BACK it asks like Do you want to disconnect Then you may click Yes 2 Or you may just...

Page 101: ...phone Execute the program for Windows Mobile After save the program into the any folder you can see the MPRMS_Setup cab file as below picture Please refer to the user s manual of mobile phone how to c...

Page 102: ...ister the Product Information on Windows Mobile For mobile viewing you must register the network information of the DVR As for the network setting of DVR please refer to the user s manual of DVR 1 Reg...

Page 103: ...the picture above NAME Input any name you want ID Enter the DVR s login ID PASS Enter the DVR s login password MODEL Select the spec of the model among H 264 MPEG 4 and MJPEG 3 Enter DDNS info DDNS se...

Page 104: ...adtcapscctv net PORT The port value will be changed automatically Keep the value as it is SAVE Save the info 4 Static IP User Use STATIC Select if you are a static IP user ADDR Enter the static IP add...

Page 105: ...click the Info Setup 1 Only When selected it transmits a still image with the certain interval in case the video streaming is interrupted due to the network load 2 Disconnect Disconnect If you want t...

Page 106: ...electing the DVR click the Connect to see the video Search on Windows Mobile To play the recorded image select Search then click Rec Info Req to set the date and time for searching After setting the d...

Page 107: ...ton to move the camera position NOTE In order to stop moving user must press the STOP button Left Move to the left Right Move to the right Up Move to the upper Down Move to the down STOP Stop the move...

Page 108: ...e camera to move to a specified pre position P1 P16 Select numbers to save MOVE SET MOVE After selecting a number among from P1 P16 press SEND to move the camera to the specified pre position SET Afte...

Page 109: ...bile Click Alarm to control alarm output Select a number 1 16 Relay out port Default 1 Time Set the duration time ON OFF Press to start or stop Example If the duration time is set with 5 sec the alarm...

Page 110: ...ting the connection 1 Visit http www ddnsip net to register your DVR Enter the DVR s web code You can find the web code as below Call the Menu System Information Web code You can enter any name you wa...

Page 111: ...P a g e In the first connection install ActiveX If the ActiveX is installed then DVR IP and DVR Port is set as a default value by itself So if you enter the user ID and password you can connect to the...

Page 112: ...P address registered to the DVR automatically is displayed 4 DVR PORT The port registered to the DVR is automatically displayed 5 USER ID Enter DVR s user ID 6 USER PW Enter DVR s password Note The Pa...

Page 113: ...can use it when controlling the PTZ 14 CHANNEL Select the channel connected to a PTZ camera 15 ZOOM Adjust the zoom 16 FOCUS Adjust the focus 17 IRIS Control the IRIS 18 TOURING Select On or Off for...

Page 114: ...RECORDING 29 Firmware 2 Focus 95 96 107 frame 93 Frontal Keypad 27 HDD 29 Internal IP address 30 IP address 21 22 23 30 31 104 110 112 iPhone 80 85 86 87 ISP 31 Labeling Camera 28 MAX 113 maximum cabl...

Page 115: ...115 P a g e Zoom 95 107...

Page 116: ...l damages How to Obtain Factory Service Original purchaser must fill out the warranty card and mail it to the factory with the model number serial number and the date of purchase We will repair or rep...

Page 117: ...117 P a g e MEMO...

Reviews: