


V2.1 2021-01
Page 5 of 25
6.
Now open the large cardboard box and remove
from the packaging the microphone and large
ceiling bezel with bezel clamp.
7.
To install this system, cut a 65 mm (2.56") hole
into the ceiling tile to allow the large ceiling
bezel, just removed from the packaging, to be
fixed to the tile. The hole should ideally be cut
in the centre of the tile and must not be closer
than 76mm (3") from the edge of the tile or it
will not be possible to align the CCRM 4000
support bracket over the hole.
8.
Take the entire CCRM 4000 kit up to the final
location site. Carefully align the CCRM 4000
complete with ceiling tile bracket so that the
large slot is directly over the hole that has
previously been cut in the ceiling for the bezel.
Ensure that the front and back of the bracket
fits snugly over the ceiling tile “T-Bar rails”.
Secure the ceiling bracket to the T Bar rails
using the supplied four eye bolts finger tight.
9.
Insert the ceiling bezel up through the ceiling
tile through the hole and slot in the tile
bracket. Secure the bezel in place with the
bezel clamp using a 5mm Allen key.
10.
Now carefully remove from the foam packing
the IR sensor, remote control and safety cable
fixing kits and set aside.
Next remove the top bezel containing the
magnet assembly and Mini XLR microphone
connector.
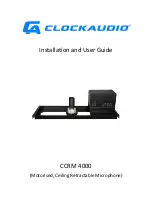
Eye
bolts
65mm
(2.56”)
hole
Ceiling bezel
with clamp
IR
Sensor
Microphone
Safety
cable kit
Top and lower
bezel with
magnet assembly
Remote
Summary of Contents for CCRM 4000
Page 1: ...Installation and User Guide CCRM 4000 Motorised Ceiling Retractable Microphone...
Page 2: ......
Page 6: ...Page iv of iv V2 1 2021 01...
Page 32: ......


