background image

Clinton Electronics Corp. 

   HD Series PVMs User Manual

02

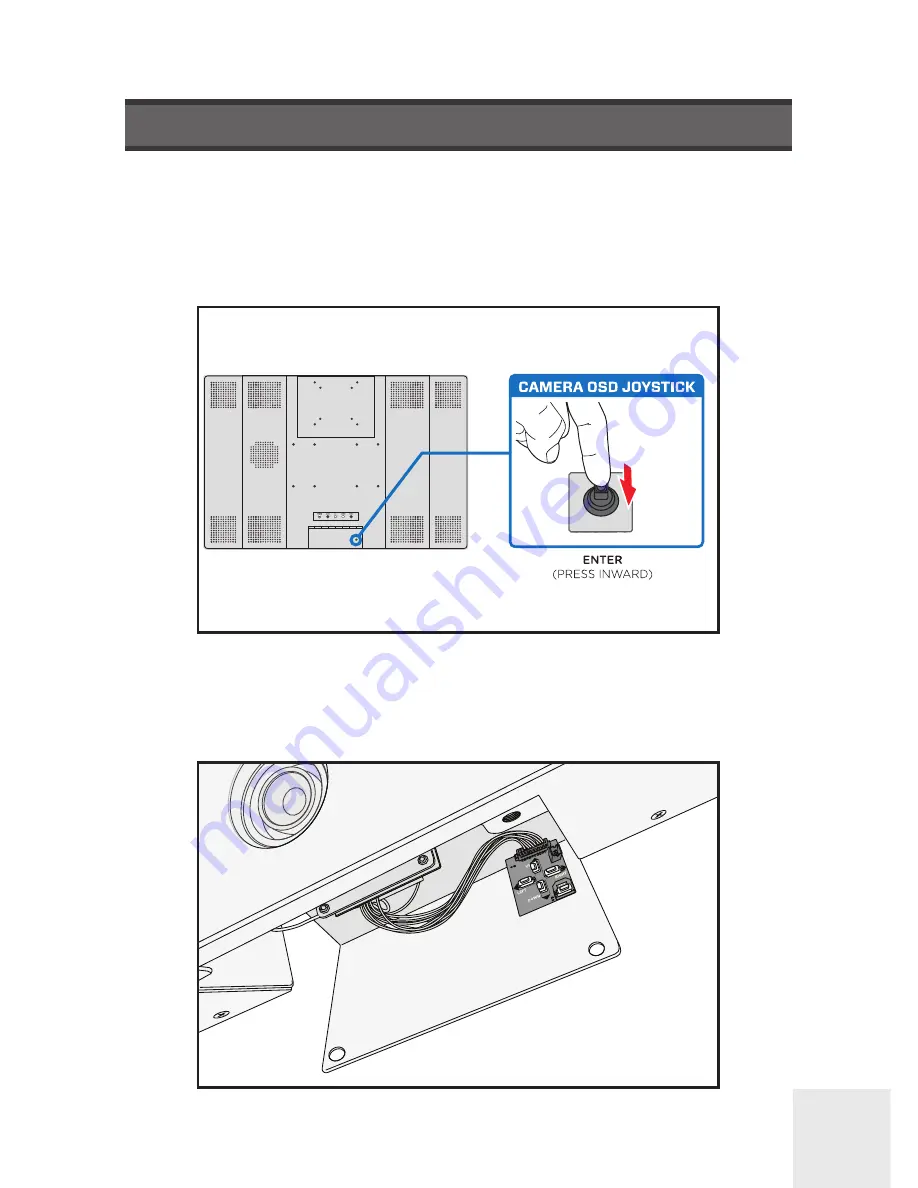
Settings can be adjusted using the built-in joystick (located on the back-side of the 

PVM) or on older models can be adjusted with the button pad (located inside the 

camera access door).

ACCESSING THE OSD

Button pad use:


Press the SET button to activate the OSD menu.

Joystick use:


Press the ‘IN’ on the joystick to activate the OSD menu.

Summary of Contents for HD Series

Page 1: ...orp 6701 Clinton Road Loves Park IL 61111 HD Series PVMs Camera On Screen Display User Manual Make sure you read this manual before using the camera Store this manual safely so that you can use it in the future Please use this manual along with the Installation Manual included with the camera ...

Page 2: ...ician for replacement of the obsolete outlet 10 Protect the power cord from being walked on or pinched particularly at plugs convenience receptacles and the point where they exit from the ap paratus 11 Only use attachments accessories specified by the manufacturer 12 Use only with the cart stand tri pod bracket or table specified by the manufacturer or sold with the appa ratus When a cart is used ...

Page 3: ...hout prior notice WARNING Changes or modifications not expressly approved by the manufacturer could void the user s authority to operate the equipment CAUTION To prevent electric shock and risk of fire hazards u Do NOT use power sources other than that specified u Do NOT expose the inside of this appliance to rain or moisture This installation should be made by a qualified service person and shoul...

Page 4: ...oil leak This is one of the most important parts of the camera Be careful not to leave finger prints on the lens cover Only use the camera under conditions when temperatures are between 20 F 122 F Be especially careful to provide ventilation when operating under high temperatures Do not touch the front lens of the camera Do not install the camera in extreme temperature conditions Severe lighting c...

Page 5: ...ITE BAL 12 ON SCREEN DISPLAY MENU 01 03 TABLE OF CONTENTS OSD MENU SETTINGS 04 DAY NIGHT 11 17 18 MOTION DIS Digital Image Stabilization 16 EXPOSURE 08 DNR Digital Noise Reduction 13 SYSTEM 19 20 EXIT 20 TROUBLESHOOTING 21 ZOOM FOCUS 05 06 ...

Page 6: ...rsor to the desired function to change the setting LENS MANUAL DC EXPOSURE BRIGHTNESS SHUTTER SENS UP AGC ZOOMFOCUS AF MODE SCANNING ONESHOT SYNC TDN LENS RESET REFOCUS BACKLIGHT OFF WDR HLC BLC DAY AND NIGHT AUTO B W COLOR EXTERN WHITE BAL AUTO MANUAL AWC SET DNR LOW AUTO OFF MIDDLE HIGH IMAGE SHARPNESS GAMMA COLOR GAIN MIRROR FLIP E ZOOM ACE DEFOG PRIVACY DIS ON OFF MOTION ON OFF SYSTEM COMM MOD...

Page 7: ...built in joystick located on the back side of the PVM or on older models can be adjusted with the button pad located inside the camera access door ACCESSING THE OSD Button pad use Press the SET button to activate the OSD menu Joystick use Press the IN on the joystick to activate the OSD menu ...

Page 8: ...anual may not be available or have fewer options on your camera MENU ZOOMFOCUS LENS EXPOSURE BACKLIGHT DAY NIGHT WHITE BAL DNR IMAGE DIS MOTION SYSTEM EXIT DC WDR AUTO MIDDLE OFF ON MENU LENS EXPOSURE BACKLIGHT DAY NIGHT WHITE BAL DNR IMAGE DIS MOTION SYSTEM EXIT MANUAL WDR AUTO MIDDLE OFF ON 10 PVMs with Fixed Lens 21 43 with Autofocus Lens Additional ZOOMFOCUS menu ...

Page 9: ...UP or DOWN buttons When an arrow is present press IN on the joystick to enter the sub menu Change the setting using the LEFT or RIGHT buttons MENU ZOOMFOCUS LENS EXPOSURE BACKLIGHT DAY NIGHT WHITE BAL DNR IMAGE DIS MOTION SYSTEM EXIT DC WDR AUTO MIDDLE OFF ON Notes An item with the icon also has sub menus To select a sub menu select an item with the icon and press IN on the joystick An item with t...

Page 10: ... adjustments HALF The lens scans only the current focal length taking about 15 seconds FULL The lens scans the entire focal length taking 30 seconds or longer CLINTON EXHD ZOOMFOCUS LENS EXPOSURE BACKLIGHT DAY NIGHT WHITE BAL DNR IMAGE DIS MOTION SYSTEM EXIT 0 1 2 3 4 5 6 7 8 9 10 11 DC OFF EXTERN AUTO MIDDLE OFF OFF ZOOMFOCUS AF MODE SCANNING ONESHOT SYNC TDN LENSRESET REFOCUS RETURN AUTO HALF ON...

Page 11: ...ut or press and hold on ONESHOT Notes Notes ONESHOT Press and hold the joystick IN to force the lens to quickly Auto Focus to the current zoom level focal length SYNC TDN Set to ON to automatically change the focus when the camera switches from Day to Night mode re focuses when switches back to Day mode from Night LENSRESET Press and hold the SETUP button to reset the lens this will go through the...

Page 12: ...ton Electronics Corp HD Series PVMs User Manual 07 MENU LENS EXPOSURE BACKLIGHT DAY NIGHT WHITE BAL DNR IMAGE DIS MOTION SYSTEM EXIT MANUAL WDR AUTO MIDDLE OFF ON These settings are not user adjustable LENS ...

Page 13: ... washed out image Press IN on the joystick to access the sub menu items listed below BRIGHTNESS Adjusts the video brightness selectable from 0 20 SHUTTER Select either AUTO MANUAL or FLICKER AUTO Automatic shutter speed control MANUAL Control the shutter speed manually 1 60 1 60 000 FLICKER Select this when you experience picture flicker which can happen when there is a clash with the frequency of...

Page 14: ...hts the light can mask out much of the on screen detail Use the HLC feature to remove these bright lit areas to allow detail such as a car license plate number to become more visible LEVEL The lower the level the more of the HLC mask will be applied COLOR Black White Yellow Cyan Green Magenta Red and Blue This function is useful for adjusting areas of interest that appear too bright or too dark du...

Page 15: ...ntal Position V POS Adjust LEFT or RIGHT to move the Vertical Position H SIZE Adjust LEFT or RIGHT to increase or decrease the Horizontal Size V SIZE Adjust LEFT or RIGHT to increase or decrease the Vertical Size WDR Wide Dynamic Range This function illuminates darker areas of an image while retaining the same light level for brighter areas to even out the overall brightness of images with high co...

Page 16: ...of ANTI SAT to compensate for over saturation D N THRES Day to Night change level N D THRES Night to Day change level DELAY Sets a delay time before the switch is made from day to night night to day Useful if the camera is placed in an area that is subject to shadows or intermittent light level changes COLOR The image is always displayed in color Automatic switching does not occur B W The image is...

Page 17: ...to find the optimal luminance level for the current environment point the camera towards a sheet of white paper then press and hold the joystick IN Contine holding the joystick IN until the text stops flashing MANUAL Select this to fine tune white balance manually Color Temp Kelvin and Red Blue gain values are adjustable NOTICE WHITE BALANCE may not work properly under the following conditions 1 W...

Page 18: ...TION From the main menu scroll to DNR and select one of the 4 following modes using the Left or Right buttons DNR AUTO LOW MIDDLE HIGH MIDDLE LOW HIGH OFF When adjusting the noise reduction level remember that the higher the level is set the greater the reduction in noise level as well as the brightness of the image but trailing may occur with moving objects NOTICE MENU ...

Page 19: ...ons SHARPNESS The outline of the image becomes cleaner and more distinctive as the SHARPNESS level increases If you increase the SHARPNESS level too high the picture may become distorted or noise may appear COLOR GAIN The higher the value the more saturated the colors are The lower the value the less color there is overall GAMMA Adjust how light and color are displayed MIRROR Mirror the camera ima...

Page 20: ...lor Enhancement Enhance the color contrast of the image DEFOG Images in extraordinary environments such as fog smoke rain or smog have a dynamic range lower than ordinary images This function is a contrast enhancement which is used to overcome such shortcomings PRIVACY Apply a mask to an area you want to hide Useful in areas where a camera can see into areas that are not relevant to security needs...

Page 21: ...the camera is viewing a mostly solid color wall or in low lighting conditions DIS Digital Image Stabilization RANGE Adjust the level of stabilization compensation The higher the level the more zoomed in the image will be FILTER Set the sensitivity to hold the DIS function in the worst case AUTO C Set the Auto Center mode Notes When DIS is turned on the image is zoomed in digitally Depending on the...

Page 22: ...If a moving object disappears estimate where it will reappear QUICK ZOOM Digital zoom to designated motion detection zones the motion detection zones are setup in the MOTION menu MOTION OSD Turn ON to track moving objects with a colored outlined box TEXT ALARM When motion is detected text will be displayed on screen to alert you to the type of motion Unknown Motion Motion Detected Blocking Detecte...

Page 23: ... MOTION must be set to ON for the switching from sources SD Card Player to Camera when the IMAGE MODE is set to Motion Changing the SIGNAL OUT to OFF from the sub menu will disable automat ic motion detection switching If Digital Image Stabilization is turned ON Quick Zoom will be disabled Enabling Quick Zoom will disable any E ZOOM adjustments The same image shown on the screen will be output to ...

Page 24: ... receive signal HD SDI EX SDI FRAME RATE Set the frame rate and resolution output from the camera Adjusting the frame rate to any other setting besides 1080p 30fps can result in no camera image on the screen of the PVM and or no camera image recorded on a connect DVR VIDEOSYS Choose either NTSC or PAL depending on the region of the world the camera is installed and display settings other connectin...

Page 25: ...l display on screen RESET Press IN on the joystick and hold the SET button to reset the camera OSD settings to the factory defaults Release the SET button when PUSHING is displayed 1 Select CAM TITLE then use the LEFT RIGHT button to set it to ON and then press the SET button 2 Use the 4 direction buttons to move to a desired letter and select the letter by pressing the SET button Repeat this to e...

Page 26: ... HD SDI if connected to HD SDI system or EX SDI if connected to EX SDI system HD SDI output is converted into other format such as HDMI DVI or VGA by using a video converter Make sure the converter s HD SDI input format supports the product s output video format The video image is not clear Check if the lens is clean Clean the lens with a clean cloth Check if the dome is clean Clean the dome with ...

Page 27: ...ra is facing directly into sunlight or fluorescent light Move the cam era if necessary Set Shutter to FLK Flicker HD SDI video may not appear to be normal if distance exceeds the maximum transferable distance When a BNC cable adapter is used to com bine two or more BNC cables for distributed HD SDI video transfer make sure the imped ance of the adapter is 75Ω Otherwise it may cause shorter transfe...

Page 28: ...s end When making video connections ensure the correct BNC connector is used EX SDI will not work on Analog only DVRs Devices EX SDI will not work on CVI TVI AHD DVRs Devices EX SDI will not work on HD SDI only DVRs Devices DISTANCES The camera can transmit EX SDI 1 0 which is capable of transmitting video up to 800 over RG59 coax cable Cable splices improper BNC termination damaged shielding kink...

Page 29: ...Clinton Electronics Corp HD Series PVMs User Manual 24 CONTACT ...

Page 30: ...om errors or omissions in this document or from the use of the information contained herein Clinton Electronics reserves the right to make changes or revisions in the product design or the product manual without reservation and without obligation to notify any person of such revisions and changes Sales 1 800 447 3306 Support 1 800 549 6393 www clintonelectronics com Clinton Electronics Corp 6701 C...

Reviews: