13.0 Installation scheme for wall pass-though (accessory)
Installation instructions
1. Create a core hole in the exterior
wall (max. wall thickness
480 mm) with a diameter of at
least 135 mm.
Watch out for any supply lines in
this area!
2. Insert the slide tube into the wall
pass-through created such that
the outer tube (larger diameter)
is on the inside of the wall.
In order to avoid cold bridges
insulate the telescopic tube with
suitable insulation material.
3. Brick the slide tube into the core
hole such that it sits flush on
both sides of the wall.
4. Fasten the protection grid on the
outside of the wall with 4 screws.
Take rain ingress into account
when fitting the grid.
5. Insert the interior flap valve and
fasten this likewise with 4 screws.
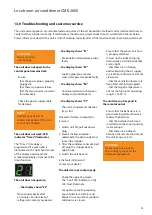
The "Top" legend on the flap
valve must be visible from the
inside!
6. When shutting down the unit,
e.g. before the start of the winter
period, seal the opening in
the flap valve with the sealing
cover in order to prevent air
circulation.
Sealing cover
Non-return flap
External grill
Telescopic tube
min. 400 mm
Fig. 11
Installation example
CLIMIA
12
Summary of Contents for CMK 2600
Page 1: ...Edition 3 0 English CLIMIA Local room air conditioner CMK 2600 Operating manual ...
Page 2: ...CLIMIA ...
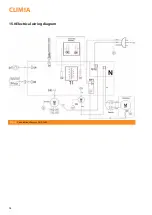
Page 14: ...15 0 Electrical wiring diagram Fig 12 Connection diagram CMK 2600 CLIMIA 14 ...
Page 19: ......
Page 20: ...Intakt GmbH Climia Klima und Wärmetechnik Niemeierstraße 13 D 32758 Detmold ...

