


Disassembly
Removing the Keyboard 2 - 15
2.Disassembly
Removing the Keyboard
1.
Turn
off
the computer and remove the battery (
page 2 - 5
).
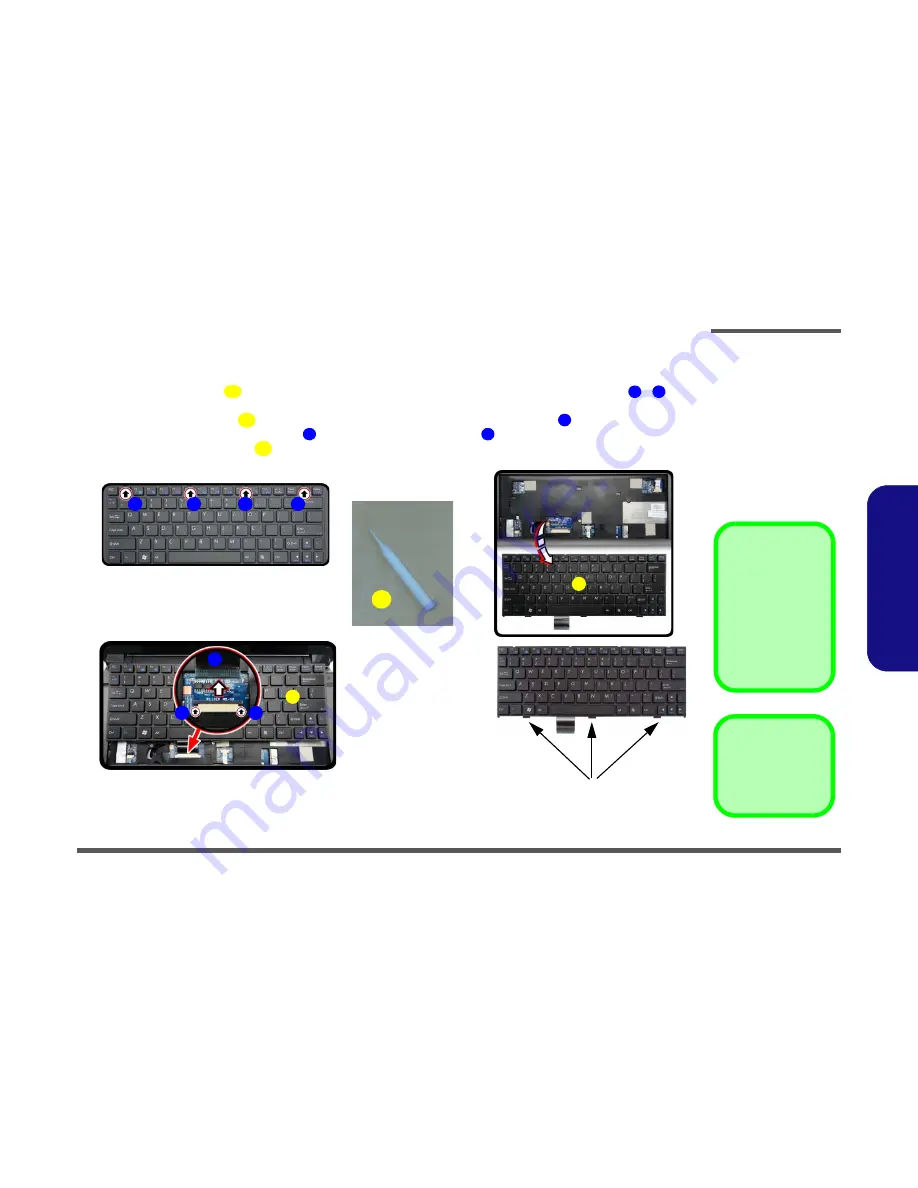
2.
Use
only
the small tool
provided (see picture below) to carefully press the
four
keyboard latches
-
at the
top of the keyboard to elevate the keyboard from its normal position (
Figure 11
a
).
3.
Carefully lift the keyboard
up, being careful not to bend the keyboard ribbon cable
(
Figure 11
b
).
4.
Disconnect the keyboard ribbon cable
from the locking collar socket
(
Figure 11
b
)
5.
Carefully lift up the keyboard
(
Figure 11c
) off the computer.
A
1
4
5
6
6
7
5
a.
b.
2
3
4
1
7
5
5
c.
6
d.
Keyboard Tabs
A
Tool for pressing
the keyboard
latches.
7
Re-Inserting the Key-
board
When re-inserting the
keyboard, align first
the
three
keyboard
tabs (
Figure 11d
) that
are located at the bot-
tom, to the slots in the
case.
Figure 11
Keyboard Removal
a. Press the four latches to
release the keyboard.
b. Lift the keyboard up and
disconnect the cable
from the locking collar.
c. Remove the keyboard.
5. Keyboard
Summary of Contents for w110er
Page 1: ...W110ER W110ERF ...
Page 2: ......
Page 3: ...Preface I Preface Notebook Computer W110ER W110ERF Service Manual ...
Page 12: ...Preface X Preface ...
Page 26: ...Introduction 1 12 1 Introduction ...
Page 42: ...Disassembly 2 16 2 Disassembly ...
Page 45: ...Part Lists Top A 3 A Part Lists Top Figure A 1 Top ...
Page 46: ...Part Lists A 4 Bottom A Part Lists Bottom Figure A 1 Bottom ...
Page 47: ...Part Lists MB A 5 A Part Lists MB Figure A 2 MB ...
Page 48: ...Part Lists A 6 A Part Lists LCD Figure A 3 LCD ...
Page 49: ...Part Lists HDD A 7 A Part Lists HDD Figure A 4 HDD ...
Page 50: ...Part Lists A 8 A Part Lists ...
Page 100: ...Schematic Diagrams B 50 B Schematic Diagrams ...


