


Disassembly
2 - 6 Removing the CMOS Battery
2.Disassembly
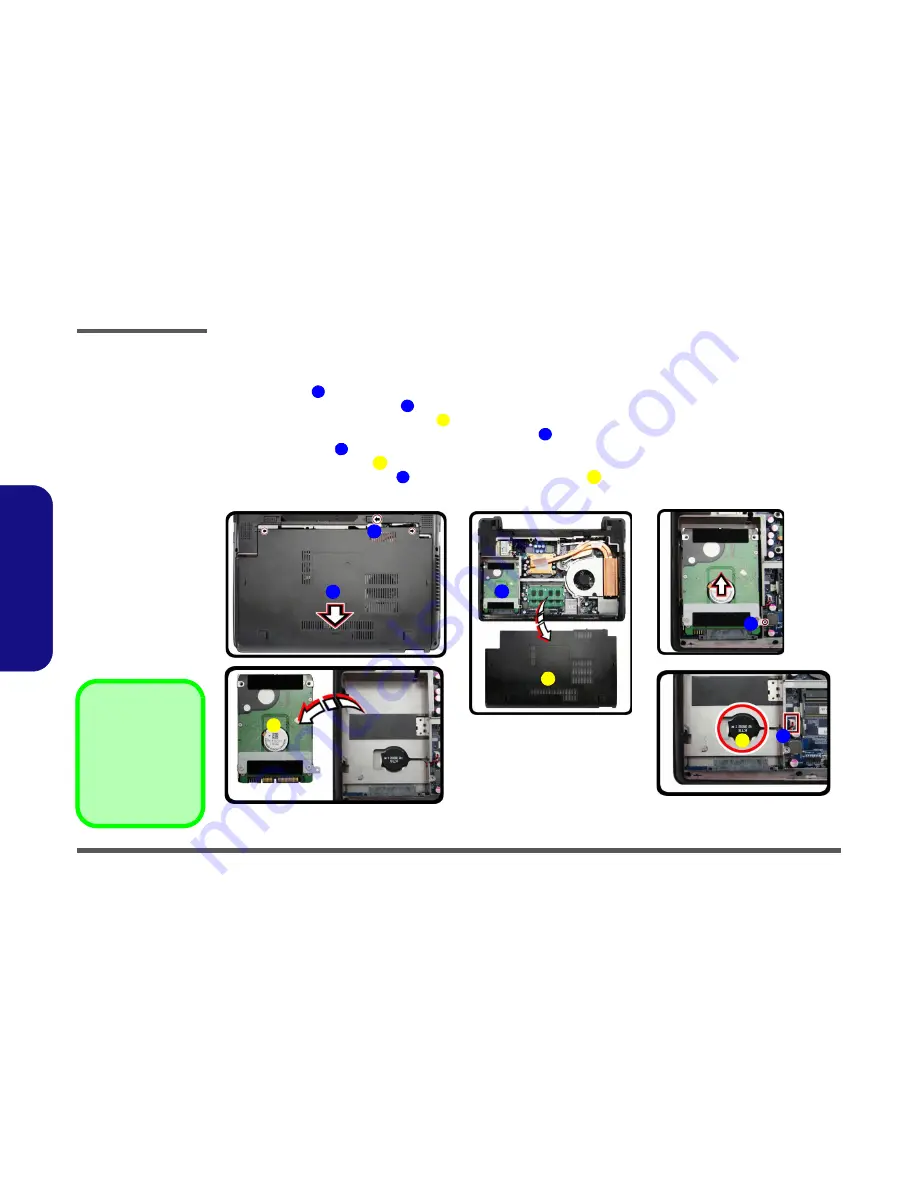
Removing the CMOS Battery
1.
Turn
off
the computer, remove the battery (
page 2 - 5
).
2.
Slide the latch
in the direction of the arrow, and hold it in place (
Figure 2a
)
.
3.
Slide the component bay cover
in the direction of the arrow,
4.
Carefully lift the component bay cover
up (
Figure 2b
)
.
5.
The CMOS battery is located under the hard disk at point
.
6.
Remove the screw
.
7.
Remove the HDD module
(
Figure 4b
).
8.
Carefully disconnect the cable
, then remove the CMOS baterry
from the computer.
9.
Reverse the process to install a new CMOS battery (do not forget to replace the screw and cover).
Figure 2
CMOS battery
Assembly Removal
a. Slide the latch and hold in
place.
b. Remove the bay cover
up.
c. Remove the screw.
d. Remove the HDD.
e. Disconnect the cable and
remove the CMOS bat-
tery.
3.
Component
bay cover
.
6.
HDD module
.
8.
CMOS battery
.
•
1 Screw
1
2
3
4
5
6
6
7
6
8
4
b.
c.
d.
3
5
6
e.
7
1
a.
2
8
Summary of Contents for w110er
Page 1: ...W110ER W110ERF ...
Page 2: ......
Page 3: ...Preface I Preface Notebook Computer W110ER W110ERF Service Manual ...
Page 12: ...Preface X Preface ...
Page 26: ...Introduction 1 12 1 Introduction ...
Page 42: ...Disassembly 2 16 2 Disassembly ...
Page 45: ...Part Lists Top A 3 A Part Lists Top Figure A 1 Top ...
Page 46: ...Part Lists A 4 Bottom A Part Lists Bottom Figure A 1 Bottom ...
Page 47: ...Part Lists MB A 5 A Part Lists MB Figure A 2 MB ...
Page 48: ...Part Lists A 6 A Part Lists LCD Figure A 3 LCD ...
Page 49: ...Part Lists HDD A 7 A Part Lists HDD Figure A 4 HDD ...
Page 50: ...Part Lists A 8 A Part Lists ...
Page 100: ...Schematic Diagrams B 50 B Schematic Diagrams ...


