background image

Page 12 


8  Maintenance / Replacing Parts 

*  The helmet, all lines, the air inlet and all connections should be inspected for the presence of dust 

and debris and cleaned before use. All parts should be inspected for wear and tear. 

*  Regularly inspect and clean the foam filter and screen filter in the air control valve and air inlet in the 

helmet. 

*  After use, the helmet should be hung by the handle in a clean place. 

8.1  Replacing the inner lens 

(1) Open the lens frame. 

Open the lens frame latch and remove frame. 

(2) Remove the inner lens. 

*  From the outside, use one hand to pull up the lens gasket in upper 

area. 

*  Use the other hand to push the lens out from the inside. 

*  Check the fit of the gasket. 

(3) Fit new inner lens. 

*  Clean the gasket and moisten the groove for the lens with mild soapy 

water. 

*  Place the new lens in the centre of the gasket and push it into the 

groove of the gasket with the installation tool. Avoid scratching the 

lens (see Figure 3). 

(4) Close the lens frame 

again. 

Hook the frame back in the latch and close. 

8.2  Replacing the outer lens and cover lenses 

Up to five perforated cover lenses can be fitted simultaneously. However, to ensure maximum visibility, 

we recommend using only the number of cover lenses necessary for the specific work operation. 

Follow the instructions below to ensure that the cover lenses can be easily removed by an operator 

wearing heavy work gloves. 


(1) Open the lens frame. 

Open the lens frame latch and remove frame. 

(2) Remove the outer lens. 

Carefully remove the outer lens from the mushroom-shaped studs. 

(3) Remove the used cover 

lenses. 

Carefully remove the cover lenses or remnants of the cover lenses from 

the mushroom-shaped studs. 

(4) Fit the new cover lenses. 

Position the tabs on the hinge side. 

Pull all except the last tab through to the front of the frame and press the 

cover lenses onto the mushroom-shaped studs on the inside of the 

frame. 

(5) Fit the new outer lens. 

When fitting the new outer lens, ensure that there is no dust or dirt be-

tween the lenses. 

Summary of Contents for BLAST HELMET APOLLO 600 CE

Page 1: ...e 21 Tel 49 0 8062 90080 83052 Bruckm hl E mail info clemco de Germany Web www clemco international com OWNER S MANUAL BLAST HELMET APOLLO 600 CE Supplied air respirator with continuous air flow Cat I...

Page 2: ...PARATION 7 5 AIR SUPPLY 8 5 1 Air quality 8 5 2 Air volume pressure and line length 9 6 OPERATION 9 7 SETTINGS 10 7 1 Control valve Art no 100074 10 7 2 Adjusting the helmet suspension 11 8 MAINTENANC...

Page 3: ...r 14 9 5 Sweatband helmet suspension 14 9 6 Blast helmet 15 9 7 Inner lens 15 10 STORAGE 15 10 1 Daily storage 15 10 2 Long term storage 15 11 REPLACEMENT PARTS 16 11 1 Helmet 16 11 2 Air control valv...

Page 4: ...5D Rubber cape 4436 In place of the nylon cape e g if a lot of blast media rebounds lighter than the leather cape 24406D ASS cape 4436 RA In place of the nylon cape if using fall pro tection during bl...

Page 5: ...that is approved for use with these substances or an additional respirator In accord ance with DGUV Regulation 112 190 Class 4B blast protection equipment can be used at up to 500 times the threshold...

Page 6: ...et is not suitable for use for other operations such as welding or painting The helmet is not suitable for use in flammable atmospheres The helmet can be worn with the head in the usual vertical or sl...

Page 7: ...maximum of 10 years 3 Description of the Equipment The minimal version of the blast helmet consists of the following components Helmet with chin strap suspension and cape Breathing air line length app...

Page 8: ...the owner s manual all instructions and labels and all warnings concerning the compressed air source Please observe the compressor manufacturer s state ments warnings concerning the use of the compres...

Page 9: ...40 m If it is necessary to use a longer line please contact the manufacturer to define suitable measures The pressure in the supply line must not exceed 8bar 6 Operation Prior to operation the helmet...

Page 10: ...air control valve and tighten it well 7 Settings 7 1 Control valve Art no 100074 Figure 1 Air control valve The Clemco air control valve allows the operator to increase or decrease the air flow by tu...

Page 11: ...e operator s head size Turn the screw clockwise to make the helmet suspension tighter turn the screw counter clockwise to make the helmet suspen sion looser 3 Adjust the chin strap Slide the buckle on...

Page 12: ...ol Avoid scratching the lens see Figure 3 4 Close the lens frame again Hook the frame back in the latch and close 8 2 Replacing the outer lens and cover lenses Up to five perforated cover lenses can b...

Page 13: ...suspension ensure that the chin strap is at the front 8 4 Cape Follow this procedure if the cape is soiled or needs to be replaced 1 Remove the cape Open the buckle on the cape belt by pressing the sm...

Page 14: ...erator and alter the properties of the material used 9 1 Filter The filter foam is inside the control valve It must be removed if it is soiled Use a small screwdriver to prise off the snap ring and re...

Page 15: ...e inner lens should be cleaned or replaced if it becomes soiled or scratched It can be cleaned with warm water and a mild detergent Solvents such as alcohol white spirit or ammonia must not be used Al...

Page 16: ...Description 1 23800 A A 600 outer helmet shell 2C 04491 I Acoustic foam right 2D 04492 I Acoustic foam left 2H 23815 D Nylon cape for A 600 24310 D Leather cape for A 600 2H1 08740I Inner collar for...

Page 17: ...6 32 x 3 8 2YD 08924 I Nut 6 50 100913 A 600 CE flow indicator complete with line 50 100915 A 600 air indicator 51 100914 Air line black 1 m 52 100917 A 600 screw fitting 53 24263 D Clip for 9 mm air...

Page 18: ...Page 18 Figure 4 Individual components of Apollo 600...

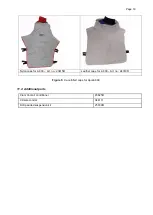
Page 19: ...pe for A 600 Art no 23815D Leather cape for A 600 Art no 24310D Figure 5 Ce certified cape for Apollo 600 11 4 Additional parts Clem Cool air conditioner 23825D Climate control 04411I DLX padded suspe...

Reviews: