17
CLEARSPAN
™
VALUE LINE
Revision date: 10.05.10
ATTACH END PANEL ASSEMBLIES
Gather the parts:
• End panel assemblies
• Fabric clips (Divide clips equally for both end panels)
• Tek screws
• Measuring tape
• Scissors
Assembly Procedure:
1. While standing inside the shelter, start at the peak of
the end rafter and pull the solid (plain) end panel over
the top of the rafter so the panel edge is wrapped to the
inside of the rafter.
2. Divide the quantity of fabric clips (#CC6216) in half and
pull the end panel edge over the rafter if needed.
3. Secure the solid end panel in place at the top center of
end rafter with one (1) fabric clip and Tek screw.
4. Take the remaining fabric clips for the first panel and
secure the panel to the back of the rafter using the
clips.
Evenly space the clips and work along the rafter.
NOTE:
Secure each fabric clip to the end rafter using
a Tek screw. Position the clip and the Tek screw in a
location that will not contact the main cover when it is
installed.
Actual number of clips may differ from what is
shown in the diagram that follows.
The end panel may be shipped as an untrimmed
rectangular piece. If desired, use scissors (or other
means) to trim the excess end panel material that
remains after the panel is attached.
5. Repeat Steps 1-4 to pull the remaining end panel up
and into position.
6. Continue with the next procedure.
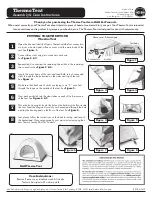
ATTACH END RATCHETS
The end ratchets are used to secure the bonnet portion of
the main cover. These are installed after the main cover is
attached.
Complete these steps:
1. Locate one (1) QH1061 ratchet and attach it to the end
conduit using a Tek screw as shown below.
The end panel has been removed to better show the
ratchet location. Ratchet is aligned with the strap in the
bonnet of the main cover.
2. Repeat the step to install the ratchet for the remaining
side of the first end panel and for the remaining end
panel as described.
3. Once all four end ratchets are attached, attach the
main cover.
QH1061
Ratchet