


CLEARSPAN
™
GARDEN CANOPIES
10
Revision date: 01.04.12
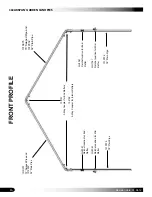
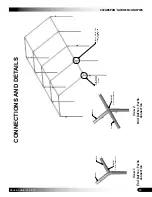
FRAME ASSEMBLY
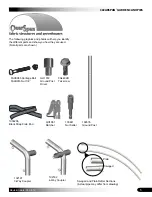
Gather the parts:
Assembled rafters
•
Carriage bolts (#FAH008b) and nuts (#FALB01b)
•
Purlin pipes (#131P058) 58" plain
•
Duct tape (customer-supplied)
•
Drill and drill bits
•
C-clamps or similar tool
•
Frame Assembly Procedure
NOTE:
Assistance is required to assemble the frame.
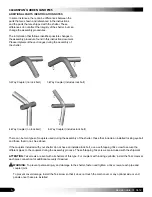
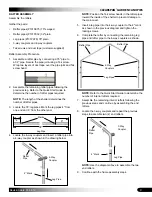
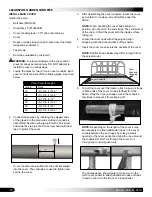
Locate one (1) end rafter assembly and insert the rafter
1.
legs into the first end pair of ground posts.
NOTE:
The open tube of each 3-way coupler should
point toward the other end of the frame. Slide the rafter
legs into the ground posts to the 6'' mark on the rafter
leg pipe and use duct tape or C-clamps to hold the
rafter leg at the 6'' mark.
Drill a 5/16'' hole through the rafter leg using the top
2.
hole in the ground post as a guide.
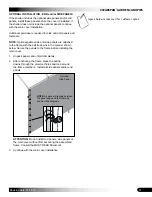
Insert a carriage bolt through the top hole in the ground
3.
post and rafter leg and install a nut on the bolt and
tighten.
Position nut to the inside of the frame.
Repeat the steps to attach the remaining rafter leg to
4.
the ground post and remove the clamps or tape.
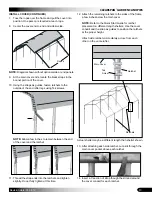
Locate one (1) interior rafter assembly and repeat
5.
the steps to install that rafter in the next set of ground
posts.
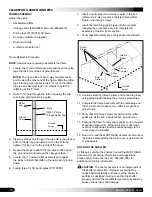
Locate three (3) 58'' purlin pipes (#131P058).
6.
Insert a purlin pipe into a 3-way coupler in the end
7.
rafter and a 4-way coupler in the first interior rafter.
Tighten the locking screws.
Insert the remaining purlin pipes into the couplers
8.
following the procedure above to complete the
assembly of the first frame section.
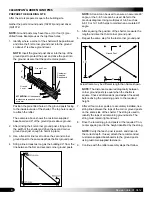
Verify that both rafters are evenly spaced and plumb.
9.
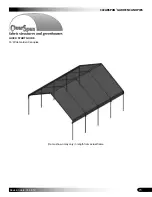
Continue erecting interior rafters and connecting them
10.
using purlin pipes following the previous procedures.
Complete the frame assembly with the remaining end
11.
rafter.
Frame shown above may differ in length from
actual frame.
Verify that all locking screws are tight and the rafter
12.
peaks are all the same height above ground level.
Examine the frame for any sharp edges on the couplers
13.
or exposed pipe joints. Wrap two layers of duct tape
over any sharp edges that may cause damage to the
cover when it is installed.
Read or reread the MUST READ document and anchor
14.
the frame before adding the main cover or optional end
or side panels.
ANCHOR THE SHELTER
At this point, anchor the shelter. Consult the MUST READ
document for anchoring information and suggestions.
Please call customer service at 1-800-245-9881 for
additional anchoring information.
CAUTION
: The anchor assembly is an integral part of
the shelter construction. Improper anchoring may
cause shelter instability and failure of the shelter to
perform as designed. Failing to anchor the shelter
properly will void the manufacturer’s warranty and may
cause serious injury and damage.
Drill 5/16'' Hole
Through Rafter Leg
Ground
Post
6'' Mark
Rafter
Leg
Ground
Level
Purlin
Pipes
Interior
Rafter
End
Rafter
4-Way
Coupler
3-Way
Coupler
Ground
Level


