Clear-Com trilogy Mercury Quick Start Manual Download Page 8


Mercury Quick Start Guide 

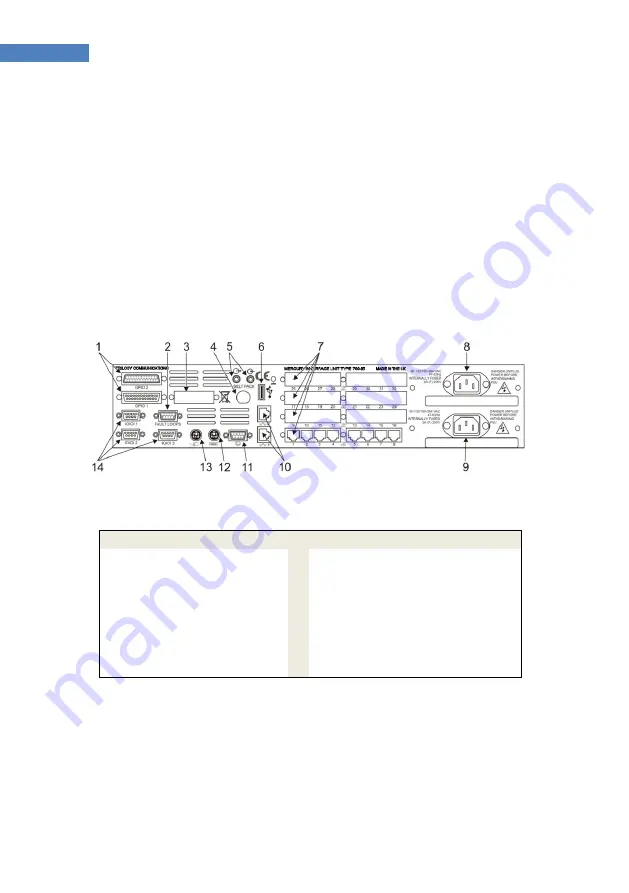
MIU - Key Connections 

Full details of all connectors are provided in the Implementation 

Guide. At this stage please identify the following key connectors 

from the MIU rear panel: 


8,9 - Mains IEC inlet (optional second inlet) 


12,13 - Keyboard and Mouse PS/2 connectors 

(alternatively, rear and front mounted USB 6) 


11 - Monitor SVGA 


10 - Ethernet RJ-45 (default connection to lower RJ-45) 


Item  Description 

  Item 

Description 

GPI Input & Output 

  8 

Mains inlet 2 

Fault Loops 

  9 

Mains inlet 1 

Mix (option) 

  10 

Network 1 & 2 

Aux Power 

  11 

Monitor SVGA 

PC audio (not used)    12 

Keyboard 

USB 

  13 

Mouse 

Option Boards 1 - 4 

  14 

COM Port 1,2,3 

Summary of Contents for trilogy Mercury

Page 1: ...Mercury Quick Start Guide...

Page 2: ...Option Boards 9 MCU Key Connections Front 10 MCU Key Connections Rear 11 Mercury Host Initial setup 12 Gateway the Configuration Editor 15 Gateway upload and restart 18 Next Steps 20 Hints and Tips 2...

Page 3: ...e detailed information is provided in the Implementation and Configuration Guides which are available for download from www trilogycomms com Here is an outline of the contents of this guide Plan your...

Page 4: ...iguration data 3 Two further addresses for the internal digital signal processing DSP module also set by the configuration Your laptop or PC must use an address in the same subnet range as the host s...

Page 5: ...ance of the database pre installed which allows it to start and run cleanly during the setup phase For anything other than a single or small MIU based system a different approach is needed and some gu...

Page 6: ...ns When prompted for the address of the database enter the IP address as recorded on your network plan earlier If the database is located on the same PC as Gateway you can use the network shorthand of...

Page 7: ...atabase is edited using Gateway which was installed on your PC in the preceding section As mentioned previously only one instance of the Mercury database is permitted across an entire system Enterpris...

Page 8: ...nlet optional second inlet 12 13 Keyboard and Mouse PS 2 connectors alternatively rear and front mounted USB 6 11 Monitor SVGA 10 Ethernet RJ 45 default connection to lower RJ 45 Item Description Item...

Page 9: ...he physical placement of option boards and the definitions within the configuration data must match exactly If your system contains a mix of board types we suggest you identify them and note their pos...

Page 10: ...1 System status LED 2 Audio loudspeaker connector 3 USB 2 0 currently disabled 4 Shutdown Restart button 5 System operation Input power status LED green red 6 Software status LED green red 7 Network...

Page 11: ...ns Rear Item Description 1 Video output HDMI 2 3 4 USB 5 Audio input channel 6 Auxiliary PTT 7 Customer Interface Adapter CIA 8 Factory reset button 9 Audio input channel 10 Network connector 11 Gigab...

Page 12: ...However do not connect the Host to your LAN at this stage Please follow the instructions below step by step for initial setup 1 Connect a keyboard mouse and monitor to the Host 2 Connect power to the...

Page 13: ...the MIU 6 Refer back to the IP address plan created earlier a If you are confident that the default values will not cause any conflicts on your network it is now safe to connect the Ethernet cable fr...

Page 14: ...he configuration must always match Any mistakes or inconsistencies in these values may lead to unpredictable audio behaviour For example if you declare a default gateway IP address for the Windows Hos...

Page 15: ...ase it will appear to freeze and the log in box will not appear Check carefully the IP settings of your PC and the Host Windows address Remember they must lie in the same subnet range and the firewall...

Page 16: ...tton seen upper left in the image above just below the text Domain 1 Refer to your IP Address plan and add the Host and Audio Card addresses to match your planned values Next set the correct Option Bo...

Page 17: ...ick Accept any warning messages by clicking OK Save a backup of your edited configuration by opening the menus again and choosing File Save As Choose a suitable location on your PC Now the data held i...

Page 18: ...buffer to active memory The system will restart which means all existing audio routes are cancelled and panel layouts cleared down This is disruptive and in a live environment requires careful schedu...

Page 19: ...on If you have been supplied with a custom configuration for your application then follow the steps above to load this ensuring at all times that IP settings are correct You can now go ahead and conn...

Page 20: ...now defined but does not have any key or label definitions Return to Gateway and open the basic panel editor by single clicking the entry in the navigation tree This editor shows a pictorial view of...

Page 21: ...om keys and must be programmed differently So Manager still speaks to Radio 1 but for the reply Manager must listen to the radio This means that for radios and similar equipment a different key type S...

Page 22: ...ck Start Guide Notes Trilogy Communications Ltd 2000 Beach Drive Cambridge Research Park Cambridge CB25 9TP United Kingdom Tel 44 0 1223 815000 Web www trilogycomms com Document 70090625 Trilogy Commu...

Reviews: