background image

16

Danger of burn


Lay the cable such that it is not crushed or creased and such that it does not come 

into contact with hot surfaces.


Keep the device away from heat sources e. g. radiators and the like.


Turn the device off, disconnect the plug from the mains socket and allow it to cool 
off completely before putting it away.

Beware of damages to devices


Do not use caustic or abrasive cleaning detergents for cleaning the device. The 
surface of the device could be damaged. If needed, wipe it with a dry and soft cloth.


Never point the steam at one place for a too long period. 


Please always use the floor cleaning cloth!


Do not put anything into the openings/nozzles of the device and take care  that they 

are not blocked.


Store the device in a dry, cool room. 


Always work with sufficient lighting.


Never fill the device with cleaners or other additives. They may irreparably damage 
the device and as such, the safe operation of the device can no longer be assured. 


Only use original spare parts provided by the manufacturer.


This device must be connected to a grounded mains socket. Only use the 
corresponding plug.


Surfaces, which have been treated with wax, may lose their coat due to heat and 

steam! 


Never exceed the max. fill volume for the water tank. Use normal or distilled 
water for filling. Other liquids may cause damage to the device.


Never use the device without water.

Warranty provisions

Any defects caused by improper use, damage, lime scale build-up or attempts at repair are 

excluded from the warranty. This also applies to normal wear and tear of the individual 
components.

06120_DE-GB-FR-NL_V1.indb   16

23.02.10   09:26

Summary of Contents for Premium Steam Cleaner

Page 1: ...sen Premium Gebrauchsanleitung Seite 2 Premium Steam Cleaner Operating Instructions Page 13 Premium Balai Vapeur Mode d emploi Page 24 Premium Stoombezem Handleiding Pagina 35 DE GB FR NL 06120_DE GB...

Page 2: ...__________7 Reinigungsfu montieren_ ____________________________________________________7 Handgriff montieren_ ________________________________________________________7 Bodenreinigungstuch und Teppich...

Page 3: ...Sie sich an die Sicherheitshinweise um Personen und Sachsch den zu vermeiden Tipps und Empfehlungen sind mit diesem Symbol gekennzeichnet Dieses Ger t arbeitet mit hei em Dampf Sicherheitshinweise Bes...

Page 4: ...gsgefahr Unsachgem e Bedienung kann zu Verletzungen Verbr hungen und Stromschl gen f hren Elektrizit t Stromschlaggefahr Halten Sie das Ger t von Feuchtigkeit fern Das Ger t ist nicht zur Verwendung i...

Page 5: ...gungsmittel Diese k nnen die Oberfl che des Ger tes besch digen Wischen Sie das Ger t bei Bedarf mit einem trockenen weichen Tuch ab Richten Sie den Dampf nie zu lange auf eine Stelle Verwenden Sie bi...

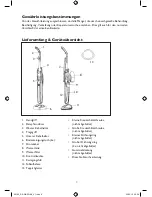
Page 6: ...13 7 1 Handgriff 2 Dampf Ausl ser 3 Oberer Kabelhalter 4 Tragegriff 5 Unterer Kabelhalter 6 Bodenreinigungstuch 2x 7 Stromkabel 8 Wassertank 9 Wasserfilter 10 Kontrollleuchte 11 Reinigungsfu 12 Fu au...

Page 7: ...findlichen Oberfl chen zu vermeiden Reinigungsfu montieren 1 Stecken Sie den Reinigungsfu 11 in die Fu aufnahme 12 2 Sichern Sie den Reinigungsfu 11 mit der kleinen Kreuzschlitzschraube indem Sie dies...

Page 8: ...icht schr g gehalten werden da sonst hei es Spritzwasser austritt Das Bodenreinigungstuch kann kurz nach dem Gebrauch noch sehr hei sein Wenn Sie dieses abnehmen wollen warten Sie ca 5 Minuten bis es...

Page 9: ...ang hei er Dampf aus Drehen Sie den Dampfbesen beim Wechseln des Bodenreinigungstuch nicht um 5 Wenn der Dampfbesen w hrend des Reinigungsvorgangs keinen Dampf mehr erzeugt lassen Sie den Dampf Ausl s...

Page 10: ...e ob der Dichtungsring um den Auslauf des Filters richtig in der Aussparung angebracht ist Sollte der Dichtungsring besch digt oder undicht sein wechseln Sie ihn durch den mitgelieferten kleinen Dicht...

Page 11: ...asser statt Dampf aus Das Wasser kondensiert im Rohr Dr cken Sie den Dampf Ausl ser so lange bis Dampf austritt Legen Sie ggf ein Tuch unter den Aufsatz da Wasser austreten kann Sollte widererwarten w...

Page 12: ...Ihrer rtlichen Gemeindever waltung Kundenservice Sollten Sie Fragen zu dem Ger t haben wenden Sie sich bitte an unseren Kundenservice DS Produkte GmbH 19258 GALLIN DEUTSCHLAND Tel 0180 5003530 E mail...

Page 13: ..._______18 Assembly of the cleaning foot_________________________________________________18 Assembly of the handle_ ____________________________________________________18 Put on the floor cleaning clot...

Page 14: ...this symbol This device operates with hot steam Safety Instructions Proper Use This device is made for being used on heat resistant surfaces If you are using the device on laminate please check the fo...

Page 15: ...r Disconnect the plug from the mains socket when you are not using the device for a prolonged period of time during a thunder storm or before cleaning the device When you remove the plug from the main...

Page 16: ...blocked Store the device in a dry cool room Always work with sufficient lighting Never fill the device with cleaners or other additives They may irreparably damage the device and as such the safe ope...

Page 17: ...h 2x 7 Power supply cable 8 Water tank 9 Water filter 10 Signal light 11 Cleaning foot 12 Foot housing 13 Carpet glider Small Philips head screw not illustrated Large Philips head screw not illustrate...

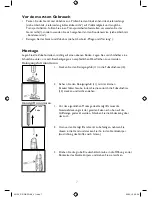
Page 18: ...he parts in order to avoid damaging any sensitive surfaces Assembly of the cleaning foot 1 Stick the cleaning foot 11 into the foot housing 12 2 Save the cleaning foot 11 with the small Philips head s...

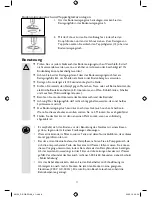
Page 19: ...an 45 against the floor Otherwise hot water could spatter out The floor cleaning cloth still is very hot shortly after it s use Allow it to cool down for 5 minutes when you want to take it off Always...

Page 20: ...has been switched off Do not turn the steam cleaner upside down when replacing the floor cleaning cloth 5 When the steam cleaner doesn t produce any more steam during the cleaning process release the...

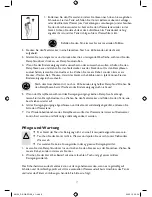
Page 21: ...ck if the joint ring around the filter s outlet is correctly installed in the cut out If the joint ring is damaged or leaky replace it with the small joint ring included in the package 3 Put the water...

Page 22: ...e Water emits instead of steam The water is condensing in the tube Push the steam trigger until steam emits If applicable place a cloth under the adapter as water may leak out If nevertheless water co...

Page 23: ...ectrical and electronic appliances For more information please contact the administration in your locality Customer Service Please contact our customer service centre with any questions relating to ou...

Page 24: ..._______29 Monter le pied de nettoyage_ _________________________________________________29 Monter la poign e_________________________________________________________29 Placer le chiffon de nettoyage d...

Page 25: ...curit sont marqu es de ce symbole Lisez attentivement et respectez les consignes de s curit pour viter les dommages physiques et mat riels Tous les conseils et recommandations sont caract ris s par ce...

Page 26: ...que l on ne puisse pas tr bucher sur celui ci Attention Risque de br lure Une manipulation non ad quate peut provoquer des blessures des br lures et des lectrocutions Dangers d lectrocution loignez l...

Page 27: ...un d tergent agressif et abrasif Il pourrait endommager la surface de l appareil Si n cessaire essuyez l appareil avec un chiffon doux et sec N orientez pas la vapeur trop longtemps sur un endroit Pou...

Page 28: ...e 2 D clencheur de vapeur 3 Crochet du haut pour enrouler le c ble 4 Anse 5 Crochet du bas pour enrouler le c ble 6 Chiffon de nettoyage du sol 2x 7 C ble lectrique 8 R servoir d eau 9 Filtre eau 10 L...

Page 29: ...protection pour viter d endommager ventuellement les surfaces sensibles Monter le pied de nettoyage 1 Introduisez le pied de nettoyage 11 dans le support du pied 12 2 S curisez le pied de nettoyage 1...

Page 30: ...oblique sinon de l eau br lante peut s chapper Le chiffon de nettoyage du sol peut tre encore br lant peu de temps apr s usage Si vous souhaitez l enlever attendez environ 5 minutes qu il soit refroi...

Page 31: ...dant environ 30 secondes de la vapeur br lante s chappe Pour changer le chiffon de nettoyage du sol ne retournez pas le balai vapeur 5 Lorsque le balai vapeur arr te de produire de la vapeur rel chez...

Page 32: ...u 2 Contr lez si le joint autour de l coulement du filtre est bien plac dans la gorge Si le joint tait endommag ou n tait plus tanche remplacez le par le petit joint fourni 3 Replacez le filtre eau et...

Page 33: ...eu de la vapeur L eau condense dans le tuyau Appuyez sur le d clencheur de vapeur jusqu ce que la vapeur sorte Si n cessaire placez un chiffon sur l accessoire car de l eau peu s chapper Si de l eau c...

Page 34: ...nique us s De plus amples informations sont disposition aupr s de votre municipalit Service clients Si vous avez des questions sur cet appareil veuillez vous adresser notre service clients DS Produkte...

Page 35: ...__________________40 Reinigingsvoet monteren____________________________________________________40 Handgreep monteren_______________________________________________________40 Vloerreinigingsdoek en ta...

Page 36: ...e vermijden Tips en aanbevelingen zijn aangeduid met dit symbool Dit apparaat werkt met hete stoom Veiligheidsinstructies Reglementair gebruik Dit apparaat is geschikt voor de reiniging van hittebeste...

Page 37: ...t apparaat is niet geschikt voor gebruik in open lucht Sluit het apparaat slechts aan op een stopcontact dat reglementair is ge nstalleerd en overeenstemt met de technische gegevens van het apparaat z...

Page 38: ...g steeds de vloerreinigingsdoek Steek niets in de openingen straalpijpen van het apparaat en let erop dat deze niet verstopt zijn Berg het apparaat weg in een droge koele ruimte Werk steeds met voldoe...

Page 39: ...rreinigingsdoek 2x 7 Stroomsnoer 8 Watertank 9 Waterfilter 10 Controlelampje 11 Reinigingsvoet 12 Voetaansluitstuk 13 Tapijtglijder Kleine kruiskopschroef niet afgebeeld Grote kruiskopschroef niet afg...

Page 40: ...n gevoelige oppervlakken te vermijden Reinigingsvoet monteren 1 Steek de reinigingsvoet 11 in het voetaansluitstuk 12 2 Fixeer de reinigingsvoet 11 met de kleine kruissleufschroef door hem door het vo...

Page 41: ...De reinigingsvoet mag niet schuin worden gehouden aangezien er anders heet opspattend water uitloopt De vloerreinigingsdoek kan kort na gebruik nog zeer heet zijn Wanneer u hem wilt afnemen moet u ca...

Page 42: ...bij de vervanging van de vloerreinigingsdoek niet om 5 Wanneer de stoomvloerreiniger tijdens het gebruik geen stoom meer afgeeft laat de stoomontspanner los Trek de stekker uit het stopcontact en vul...

Page 43: ...ichtring rond de uitstroomopening van de filter juist in de opening is aangebracht Is de afdichtring beschadigd of ondicht vervang hem dan door de meegeleverde kleine afdichtring 3 Zet de watertank en...

Page 44: ...Het water condenseert in de buis Duw zolang op de stoomontspanner tot er stoom wordt afgegeven Leeg eventueel een doek onder het opzetstuk aangezien er water kan uitlopen Zou voortaan tegen de verwac...

Page 45: ...pparaten Meer informatie vindt u bij uw plaatselijk gemeentebestuur Klantenservice Als u vragen heeft in verband met het apparaat kunt u zich richten tot onze klantenservice DS Produkte GmbH 19258 GAL...

Page 46: ...46 06120_DE GB FR NL_V1 indb 46 23 02 10 09 26...

Page 47: ...47 06120_DE GB FR NL_V1 indb 47 23 02 10 09 26...

Page 48: ...06120_DE GB FR NL_V1 indb 48 23 02 10 09 26...

Reviews: