background image

BLX-MR2-CC Manual  Page 5 of 7

Updated: 02/11/21

USER MANUAL: BLX-MR2-CC

READ ALL INSTRUCTIONS BEFORE OPERATING EQUIPMENT

Bracket Installation

1. 

Select a handrail/side of the unit to install the 

bracket. Consider traffic flow direction and 

accessibility.

2. 

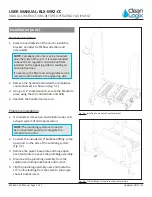
Remove the handrail and install the compliance 

counter bracket as shown in [Fig. 5.1]

3. 

Using a 1/2" socket/wrench, secure the bracket in 

place using the (2) included nuts and bolts.

4. 

Reattach the handrail and secure.

Plumbing Installation

1. 

If connected, remove air and solutions lines and 

exhaust system of all compressed air.

2. 

Connect the included 1/4" bulkhead fitting to the 

open port on the side of the sanitizing system 


[Fig. 5.2]

3. 

Remove the plastic base plate and hinge open 

each foot plate to expose the plumbing assembly.

4. 

Disconnect the plumbing assembly from the 

solution and airline bulk-heads and remove.

5. 

Flip the plumbing assembly over and locate the 

1/4" airline leading from the valve to the single-

shot air output inlets. 

Installation (cont.)

Fig. 5.1:

 Installing Compliance Counter bracket

NOTE:

 The plumbing system will need to 

be removed temporarily to integrate the 

compliance counter.

Fig. 5.2:

 1/4" bulkhead for Compliance Counter airline

NOTE:

 Compliance Counter can be mounted 

on either side of the unit. It is recommended 

to have the air regulator and solution filter 

installed on the opposing side for routing air 

and solution lines. 
If necessary, the filter and air regulator can be 

removed and installed on the opposing side.

Summary of Contents for BLX-MR2-CC

Page 1: ...USER MANUAL English Original Instructions Updated 02 11 21 MODEL BLX MR2 CC MISTER 2 COMPLIANCE COUNTER ...

Page 2: ...tructions 2 Ensure solid footing and use both hands when operating the unit 3 Avoid contact of chemicals with skin and eyes If contact occurs see MSDS sheet for further first aid measures 4 Follow safety instructions of chemical manufacturer MSDS 5 Always follow plant and OSHA guidelines about the use of equipment 6 Disconnect air before servicing equipment 7 Always follow safety precautions and o...

Page 3: ...included with unit Specifications Compressed Air 30 PSI minimum Liquid Temperature Range 40 100 F 4 37 C Chemical compatibility Chemical products used with this equipment must be formulated for this type of application and compatible with unit materials and seals Requirements NOTE For more information on chemical compatibility consult the chemical manufacturer SDS for your product or contact our s...

Page 4: ...BLX MR2 CC Manual Page 4 of 7 Updated 02 11 21 USER MANUAL BLX MR2 CC READ ALL INSTRUCTIONS BEFORE OPERATING EQUIPMENT Installation CAN BE INSTALLED ON EITHER SIDE OF UNIT ...

Page 5: ...side of the sanitizing system Fig 5 2 3 Remove the plastic base plate and hinge open each foot plate to expose the plumbing assembly 4 Disconnect the plumbing assembly from the solution and airline bulk heads and remove 5 Flip the plumbing assembly over and locate the 1 4 airline leading from the valve to the single shot air output inlets Installation cont Fig 5 1 Installing Compliance Counter bra...

Page 6: ... the Compliance Counter to the exterior side of the bulkhead to complete installation 11 Replace plastic base plate and reconnect air and solution supply to resume normal operations see main user manual for priming instructions Operation and Use 1 Activate MR2 to trigger the counter up to 9 999 activations can be recorded before requiring reset 2 Open the window cover to access reset button to res...

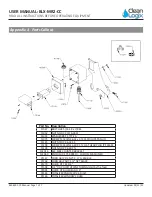
Page 7: ...CREW MACHINE 6 32 x 3 4 SS PHILLIPS PAN HD F1125 NUT NYLOCK 6 32 SS F1198 SCREW MACHINE 4 40 X 1 2 FLAT HEAD PHILLIPS 316SS F1199 NUT NYLOCK 4 40 ZN M2016 BLX MR2 COUNTER BRACKET M2060 ENCLOSURE PC 8X8X10 CUSTOM MACHINED P1147 CORD GRIP 1 2 NPT X 170 450 BLK P1148 CORD GRIP NUT 1 2 NPT BLACK P1279 QUICK FIT TEE 1 4 P1508 1 4 OD POLYETHYLENE TUBING sold by the foot P2091 QUICK FIT BULKHEAD 1 4 P214...

Reviews: