English
GREAT BRITAIN •
customer service
tel:
020 8247 9300
internet
www.clasohlson.co.uk
postal
10 – 13 Market Place, Kingston Upon Thames, Surrey, KT1 1JZ
1
3
4
2
5
Ver
. 20170731
Laser Projector
Art.no 18-1441 Model XYLL-001P-B
36-6856
XYLL-001P-B
Please read the entire instruction manual before using the product and
then save it for future reference. We reserve the right for any errors in
text or images and any necessary changes made to technical data.
In the event of technical problems or other queries, please contact our
Customer Services.
Safety
Parts
Instructions for use
•
Warning:
Class 2 laser –
Never look directly into the laser beam
.
Doing so could damage your eyesight.
• Never point the laser beam towards people or animals.
• Never aim the laser beam towards any vehicle in motion on land,
water or in the air.
• Never let children play with the product.
• Never subject the product to knocks or blows.
• Do not place the product where there is a risk of it falling into water
or other liquid.
• Never try to dismantle or repair the product yourself.
• Make sure that the mains adaptor is always accessible when
the laser projector is connected to the mains.
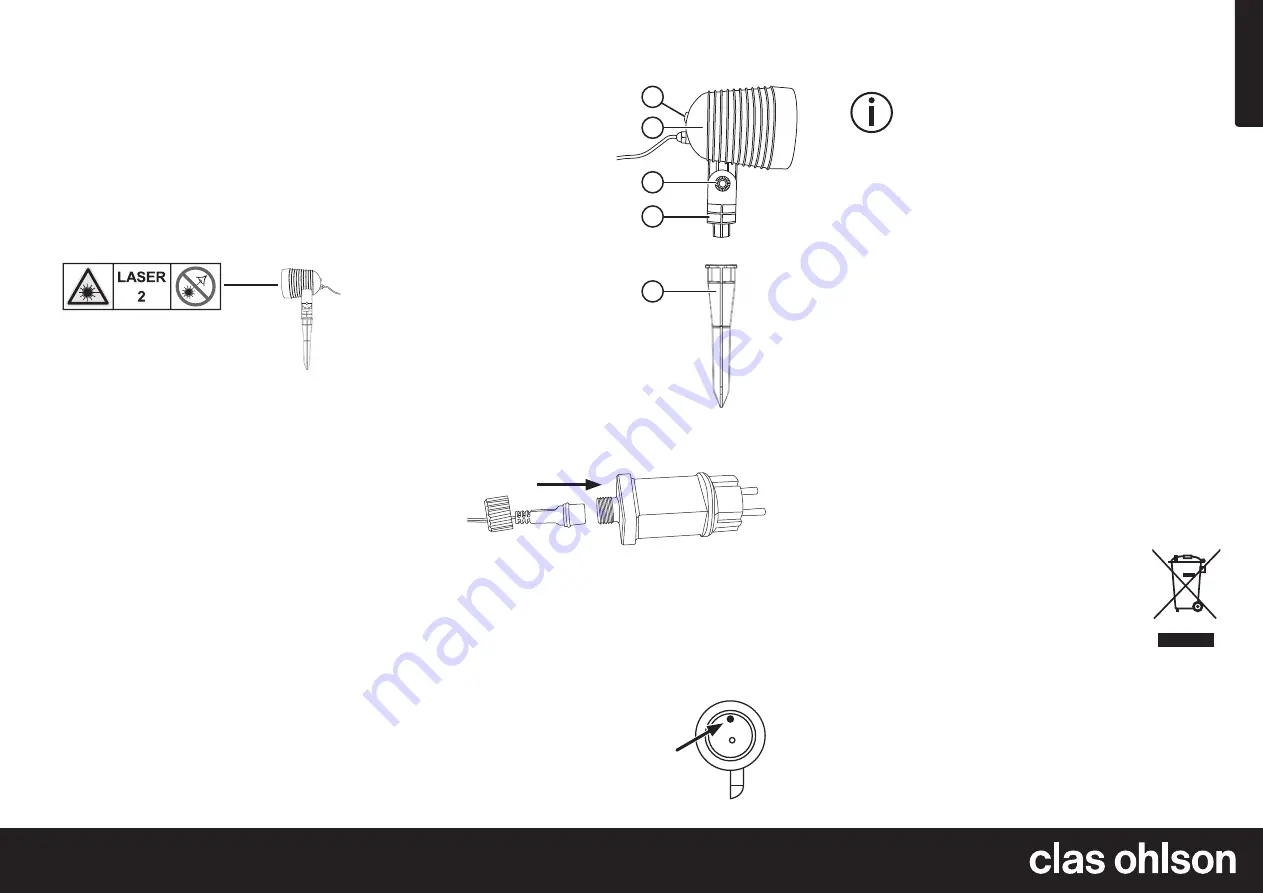
1. On/off/pattern selector
2. Projector
3. Locking screw
4. Foot
5. Ground spike
Assembly
1. Push the ground spike (5) onto the foot (4) of the projector.
2. Connect the projector cable to the mains adaptor (it only fits one
way) and tighten the connection by screwing on the lock nut.
3. Stick the ground spike into the ground and aim the projector
at a wall. Adjust the size of the projected image by changing
the distance between the projector and the wall, max 5 m.
4. Undo the locking screw to adjust the angle of the projector,
then tighten the screw again.
5. Plug the mains adaptor into a wall socket.
6. Remove the protective tape
covering the light sensor
(marked in the figure).
Note:
The laser projector is equipped with a light sensor which switches
the projector off if the ambient lighting is not dark enough.
Press the selector button (1) repeatedly to switch the projector on and
off and to select the desired pattern/light effect.
1. Green/red rotating light
2. Red rotating light
3. Green rotating light
4. Red/green slowly flashing and rotating light
5. Red/green flashing and rotating light
6. Red/green quickly flashing and rotating light
7. Constant red/green light
8. Constant red light
9. Constant green light
10. Off
Care and maintenance
• Disconnect the mains adaptor from the wall socket before cleaning
the projector with a damp cloth. Use only mild cleaning agents,
never solvents or corrosive chemicals.
• If it is not to be used for a long time, the projector should be
disconnected from the wall socket and stored in a dry, dust-free
environment, out of children’s reach.
Responsible disposal
This symbol indicates that this product should not
be disposed of with general household waste. This
applies throughout the entire EU. In order to prevent any
harm to the environment or health hazards caused by
incorrect waste disposal, the product must be handed
in for recycling so that the material can be disposed
of in a responsible manner. When recycling your
product, take it to your local collection facility or contact
the place of purchase. They will ensure that the product
is disposed of in an environmentally sound manner.
Specifications
Adaptor input
100–240 V AC 50/60 Hz
Light source
Laser
IP rating
IP44
Cable length
5 m
Size
38 × 13.5 × Ø 10.5 cm
Weight
0.7 kg


