8
E
N
G
LI
S
H
. Using the case externally (connect to USB port)
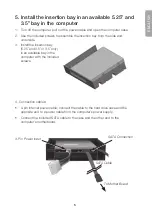
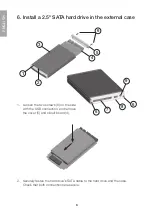
1. Connect the included USB cables between (8) and (9) on the case and on the
computer. (Two USB ports are used to provide a better power supply to the
hard drive.)
2. The computer will locate the external case automatically; no extra drive routines
are needed.
3. The new device will appear in “My Computer” under “Hard Disk Drives”
(remember that the hard disk must be partitioned and formatted before use,
otherwise it will not appear in “My Computer”).
4. The LED on the case shows the hard drive’s status:
• Constant light:
Hard drive is connected and working.
• Blinking red light:
Reading or writing to the hard drive.
7. Removing the external case
If you wish to remove the external case without turning off your computer, click on
the icon in the activity window and select the device to be removed and click on “Ok”
before removing the cable.
8. Troubleshooting
Problem
The computer cannot locate the USB hard drive.
Solution:
1. Check that the hard drive has a formatted partition.
2. Make sure that the USB cable is properly connected to the computer
and the external case.
3. Make sure that the USB port/s is supplying the external case with
power (try using another USB device in the port).
9. Specifications
Interface
Compatible with USB2.0 & USB1.1 standard. SATA
Data transfer rate: Up to 480Mbs (USB2.0), 12Mbs (USB1.1)
Insertion bay:
5.25˝ and 3.5˝ with SATA connection
External case:
Compatible with 2.5˝ hard drive

