background image

8

Parts & Service: 020 8988 7400 / E-mail: [email protected] or [email protected]

The following starting points are suggested. However, adjustment is partly trial 
and error, depending on the viscosity of the material and coverage required. 
Always take care that the paint material is free of lumps. Follow the 
manufacturers instructions when mixing materials.

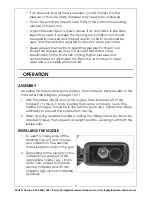
a When spraying acoustic panels, 

set the orifice plate to the third 
smallest size (5/16”) opening.

b When spraying sand finish with dry-

walling material, set the orifice 
plate to the smallest size (7/32”) 
opening.

c When spraying orange peel 

texture, set the orifice plateto the 
third smallest size (7/32”) opening. 
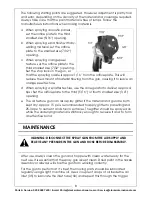
Set the stop lock on the gun, so 
that the spraying nozzle is approx 1/16” from the orifice plate. This will 
reduce the amount of material flowing from the gun, causing it to leave an 
orange peel texture. 

d When spraying a splatter texture, use the air regulator to deliver approx 4-

6psi. Set the orifice plate to the third (5/16”) or fourth smallest size (1/4”) 
opening

e The air texture gun can also spray glitter if the material and gun are both 

kept dry. Approx 15 psi is recommended to apply glitter to panelling and 
25-30 psi to cement and stucco surfaces. The glitter should be sprayed on 
while the underlying material is still tacky enough to receive it and to form 
an effective bond.

MAINTENANCE

After use, always clean the gun and hopper with clean water ready for the 
next use. It is essential that the spray gun is kept clean. Dried paint in the nozzle 
assembly or airways will stop the gun from working correctly.

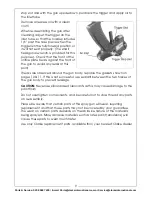
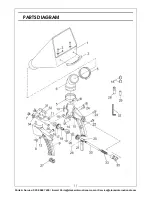
For the gun to perform at it’s best the moving parts should be lubricated 
regularly using a light machine oil. Use a couple of drops of oil inside the air 
inlet (35) to lubricate the inlet tube (30) and repeat this through the trigger 

WARNING: DISCONNECT THE SPRAY GUN FROM THE AIR SUPPLY AND 
RELIEVE ANY PRESSURE IN THE GUN AND HOSE BEFORE DISASSEMBLY.

Summary of Contents for CTG8

Page 1: ...OPERATING MAINTENANCE INSTRUCTIONS ORIGINAL INSTRUCTIONS GC0718 ISS 2 AIR TEXTURE GUN MODEL NO CTG8 PART NO 5091120 ...

Page 2: ...ng finishes It can spray most liquid dry wall materials from joint cement ceiling acoustics wall texture splatter semi fog or any such material that will feed through the hopper Use of the 4 nozzles and 5 spray pattern orifice plate gives a total of 20 different spraying combinations When opening the carton for the first time check against the following list that all the items are present Any dama...

Page 3: ...roof of purchase This guarantee is invalid if the product is found to have been abused or tampered with in any way or not used for the purpose for which it was intended Faulty goods should be returned to their place of purchase no product can be returned to us without prior permission This guarantee does not effect your statutory rights Hopper Capacity 7 95 litre 1 75 gal Weight 1 5 kg Air Inlet O...

Page 4: ... for air tools 3 Do not exceed the maximum pressure for the airline component 4 Check airline hoses for leaks or worn condition before use and ensure that all connections are secure Keep the hose away from heat oil and sharp edges 5 Avoid damaging the component for example by applying excessive force of any kind USE OF SPRAY GUN EQUIPMENT NOTE Paint products used may be covered by COSHH Regulation...

Page 5: ...different size nozzles The larger the nozzle the more compressed air is required and a minimum of 6 5 cfm will be required from the compressor if the largest nozzle is being used Ensure your compressor is able to supply sufficient air pressure for the gun The air supply to the spray gun must be clean and dry without any oil or water contamination Follow the air compressor operating guidelines to e...

Page 6: ...ll shorten the life of the air tool due to faster wear and is a possible safety hazard OPERATION ASSEMBLY Assemble the texture spray gun as follows The numbers in brackets refer to the Parts List Parts Diagram on pages 10 11 1 With the jubilee clip 5 around the hopper base loosened off fit the hopper 1 to the gun body pushing the hopper onto body neck the handle on hopper should be in line with th...

Page 7: ...t etc 3 Turn air off and fill hopper with material to be sprayed 1 75 gallons max Always mix the paint to the correct viscosity for spraying according to the manufacturer s instructions DO NOT OVERFILL the more paint the heavier the spray gun 4 Hold the gun approximately 12 from wall to be covered supporting the gun using the handle on the hopper 5 Gently squeeze the trigger until resistance is fe...

Page 8: ...el texture d When spraying a splatter texture use the air regulator to deliver approx 4 6psi Set the orifice plate to the third 5 16 or fourth smallest size 1 4 opening e The air texture gun can also spray glitter if the material and gun are both kept dry Approx 15 psi is recommended to apply glitter to panelling and 25 30 psi to cement and stucco surfaces The glitter should be sprayed on while th...

Page 9: ...id any leaks at this point If leaks are observed around the gun body replace the gaskets shown on pages 10 11 If this is not successful use sealant between the two halves of the gun body to prevent leakage CAUTION Never use silicon based lubricants as this may cause damage to the paint finish Do not overtighten components and be careful not to cross thread any parts on re assembly Please be aware ...

Page 10: ... Inlet Support Bush 2 Handle 22 Socket Head Screw 12mm 3 Screw 23 Socket Head Screw 15mm 4 Washer 24 Socket Head Screw 25mm 5 Jubilee Clip 25 Throttle Lever 6 45 deg Elbow 26 2 5mm Set Screw 7 Retaining Wingnut 27 Retaining Cap 8 Adjusting Wingnut 28 Box Spanner 9 Gun Body left 29 Rubber Bonnet 10 Gun Body right 30 Inlet Tube 11 Bolt 31 Front Orifice Plate 12 Washer 32 Adhesive Rubber Backing 13 G...

Page 11: ...11 Parts Service 020 8988 7400 E mail Parts clarkeinternational com or Service clarkeinternational com PARTS DIAGRAM ...

Page 12: ......

Reviews: