background image

9

Parts & Service: 020 8988 7400 / E-mail: [email protected] or [email protected]
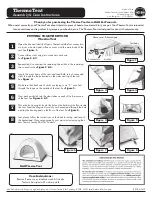
PROTECTIVE STRIPS

In order to protect the fabric cover at points of wear, some adhesive 
tape is provided. This should be adhered to the frame at the positions 
shown after peeling off the adhesive backing strip.

1. Cut the backing strip into suitable 

lengths of approximately 9” 
(25cm) and attach at the positions 
shown on every shoulder and on 
every appex joint.

COVER PLACEMENT/TIE DOWN

1. Place a protective cover on the ground to one side of the frame.

2. Unfold the roof cover onto the protective cover with the eyelets next to the 

sill plate. The inside of the cover should be facing up. Do not step on the 
cover.

3. Weave the rope (14) 

through each eyelet 
and around the Front 
Purlin (6), and the rest 
of the purlins (7). Refer 
to the illustration on the 
top of the next page

.

When weaving, leave 
about 1/2 inch between 
the Roof Cover and the 
bottom purlins.

4. After weaving the rope 

(14), tie down the Rope 
to the end Base Plates. 

CAUTION: TAKE CARE NOT TO 
TEAR THE ROOF COVER 
EYELETS OUT OF THE FABRIC.

5. Tie the other ropes 

(14) to the center and 
end eyelets on the other side of the cover.

6. Throw the ropes over the top of the frame to the other side. See illustration 

above.

Summary of Contents for 3503594

Page 1: ...ASSEMBLY INSTRUCTIONS ORIGINAL INSTRUCTIONS GC0921 X LARGE GARAGE WORKSHOP MODEL NO CIG1432 PART NO 3503594 ...

Page 2: ...f purchase Please keep your receipt which will be required as proof of purchase This guarantee is invalid if the product is found to have been abused or tampered with in any way or not used for the purpose for which it was intended Faulty goods should be returned to their place of purchase no product can be returned to us without prior permission This guarantee does not effect your statutory right...

Page 3: ...e operated on level ground We advise that 4 to 6 people may be required to safely erect the frame and install the cover owing to the size and weight Select a calm day to install the cover due to the high windage of the cover both during fitting and before it is totally secured in position POSITIONING AND INSTALLATION OF THE GARAGE POSITIONING THE GARAGE This garage is a temporary structure and is ...

Page 4: ...f the roof top with a broom or mop to prevent collapse with the resultant damage to property or personal injury NEVER clear the roof of snow or debris from inside the garage DO NOT use hard edged tools or instruments such as rakes or shovels to remove snow These can cause punctures to the cover DO NOT use bleach alkaline or harsh detergents for cleaning Doing so will damage the material Soap and w...

Page 5: ...A suitable extension lead to a locally available power supply will be required Condensation will be much less of an issue during the summer months If storing a vehicle in your garage over the winter months we recommend the use of a secondary lightweight cover over your vehicle COMPONENT PARTS INVENTORY ...

Page 6: ...rea or pad area must extend at least 6 inches 15cm larger than the size of the garage See examples below 4 If possible pick a location for the garage that has a natural or man made wind break eg barn house hedge or hill etc Level the pad area and clear of any debris 5 Bring the following tools not supplied to the assembly site Screwdrivers Adjustable wrench Ladder s cherry picker lift or platform ...

Page 7: ...n attach a Brace 9 between the last Purlin 7 and Straight Tube 4 using a long bolt 11 and nut 12 4 Repeat steps 1 and 2 at the end of this row NOTE In the entire assembly all bolts must be mounted from the outside in so that the roof cover 15c will not be damaged by the bolt ends 5 Assemble and secure three arches at a time Refer to the illustration following Lay out three Roof Curved Pipes 1 six ...

Page 8: ...remainder of the anchors on the inside of the Bows at intervals See Figure 8 NOTE Additional anchors may be required in windy areas 2 If you are installing on asphalt drill a deep 1 diameter hole to accept the anchor through the asphalt 3 If installing in dirt drive the anchor into the soil using a hammer and the drive rod provided The more you hammer the more the anchor goes into the soil compact...

Page 9: ... one side of the frame 2 Unfold the roof cover onto the protective cover with the eyelets next to the sill plate The inside of the cover should be facing up Do not step on the cover 3 Weave the rope 14 through each eyelet and around the Front Purlin 6 and the rest of the purlins 7 Refer to the illustration on the top of the next page When weaving leave about 1 2 inch between the Roof Cover and the...

Page 10: ...Front Purlin 6 and the rest of the purlins 7 as shown in the illustration above 9 After weaving the rope 14 tie down the rope to the end frame 10 Attach the Split Door Panel 15a to the front entrance of the garage using Ball Tie Downs 13 through each eyelet 11 Attach the Solid End Panel 15b to the back of the garage using Ball Tie Downs 13 though each eyelet 12 Attach the Ratchet Tie Down 16 to ea...

Page 11: ...nents are not equally durable and will require replacement over time at differing intervals MAINTENANCE 1 The cover can be cleaned with soap and water 2 For best performance keep all parts of this product clean and dry 3 Check periodically two to three times in the first week and tighten the turnbuckles and all hardware as needed You may need to remove and re set the turnbuckles to allow for more ...

Page 12: ......

Reviews: