


16633 Foltz Parkway
●
Strongsville, OH 44149 USA
●
Telephone: +1 (440) 572-1500
●
Fax: +1 (440) 238-8828
www.clark-reliance.com
●
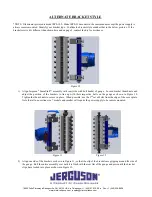
INSTALLATION ONTO GLASS GAUGE
UNIVERSAL BRACKET
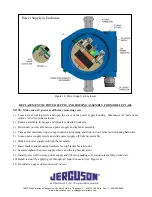
*NOTE: Illuminator pictured is model EPL-100. Model EPL-316 mounts in the same manner except the power supply is
always remote mounted. Identify your bracket type. Confirm the bracket style matches that in the below pictures. If the
bracket received does not match the illustrations below, see page 5 or 6 for alternate bracket styles.
Figure 1 Figure 2
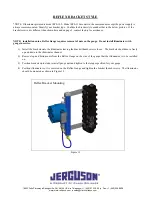
Step 1:
Check to make sure brackets are properly assembled on the illuminator. The cable should be fed through the stud
protruding from behind the illuminator, locking in the bracket as shown above in Figure 2. One end of the cable should be
crimped into an oval for pulling leverage and the other should be crimped securely around a thumb nut.
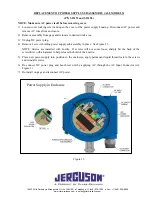
Figure 3
Step 2:
Press Jerguson
®
LumaStar
™
assembly against rear of gauge as shown in Figure 3, aligning the bracket cutouts
over the gauge bolt heads as shown. Align the brackets with the 2
nd
set of bolts in from each end of the gage, when possible.
Note that all one-section size 7 models and smaller will require the power supply to be remote mounted.