


16633 Foltz Parkway
●
Strongsville, OH 44149 USA
●
Telephone: +1 (440) 572-1500
●
Fax: +1 (440) 238-8828
www.clark-reliance.com
●
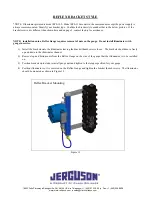
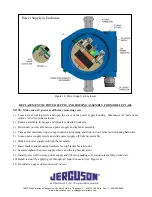
REPLACEMENT OF POWER SUPPLY SUB ASSEMBLY (ALL MODELS)
(P/N S23293 and S23294)
NOTE: Make sure AC power is off before removing cover.
1)
Loosen cover locking screw and open the cover of the power supply housing. Disconnect AC power and
remove AC wires from enclosure.
2)
Remove assembly from gage and relocate to desired work area.
3)
Unplug DC power plug.
4)
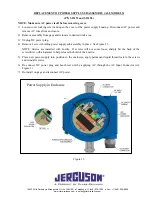
Remove 2 screws holding power supply sub assembly in place. See Figure 15.
NOTE: Screws are installed with Loctite. If screws will not come loose, sharply hit the back of the
screwdriver with a hammer to help release the hold of the Loctite.
5)
Place new power supply into position in the enclosure, apply permanent liquid thread lock to the screws
and reinstall screws.
6)
Re-connect DC power plug and bench test unit by applying AC through the AC Input Connector (ref.
Figure 1).
7)
Re-install on gage and reconnect AC power.
Figure 15
Power Supply in Enclosure


