background image

21

NZ503

English

English

Owner’

s Manual

English

Owner’

s Manual

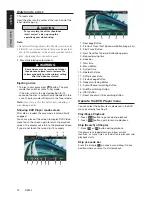
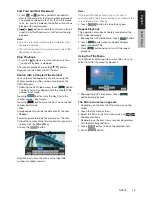
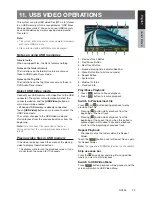
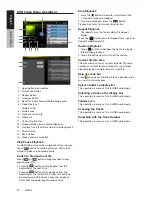
Operate the Video files Player menu

You can select the button items displayed in the Video 
files player menu by directly touching it.

Play/Pause Playback

1. Touch [

] button to pause during playback.

2. Touch [

] button again to resume playback.

Switch to Previous/next file

1. Press 

[ ]

 or 

[ ]

 button during playback to play 

previous /next file 

 Note: 

If play more than 2 seconds, press [ ] button will 

play from start of current track. 

Skip using seek bar

Press the triangle on seek bar and drag it to any 
position where you want to start playback.

Fast Forward /Fast Backward

1. Press 

[ ]

 or 

[ ]

 button and hold 2 seconds to start 

fast backward or fast forward during playback. The 
playback speed starts at 2x, then will increase to 
4x, 8x, and 16x. Release the button will continue 
playback with normal speed.

2. 

[

]

 or 

[

]

 button on remote control can also be 

used to start fast backward or fast forward during 
playback. 

Note:

No audio is reproduced during fast forward and fast 
backward operation.

The fast forward and fast backward speed may differ 
depending on the disc.

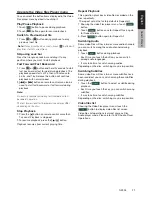
Stop Playback

1. Press the 

[ ]

 button on remote control more than 

1 second. Playback is stopped.

2. To resume playback, press the 

 ]

 button.

Playback resumes from current playing time.

Repeat Playback

This operation plays back video files recorded on the 
disc repeatedly.
 The repeat set as the factory default is Repeat all.
1. Showing the video files player menu, touch 

[

]


button.

2. Touch 

[

]

 button once for Repeat Track, again 

for Repeat Folder.

3. Press 

[

]

 button again for Repeat All.

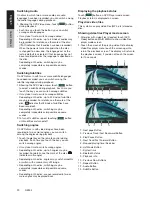
Switching Audio

Some video files will have two or more audio channels; 
you can switch among the audio channels during 
playback.
1. Touch 

[

]

 button during playback.

•  Each time you touch the button, you can switch 

among audio languages.

•  It may take time to switch among audios.
Depending on the disc, switching may be impossible.

Switching Subtitles

Some video files will have two or more subtitles have 
been recorded; you can switch among these subtitles 
during playback.
1. Touch the 

[

]

 button to select a subtitle during 

playback.

•  Each time you touch the key, you can switch among 

subtitles.

•  It may take time to switch among subtitles.
Depending on the disc, switching may be impossible.

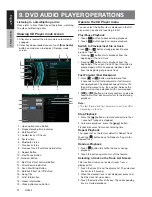
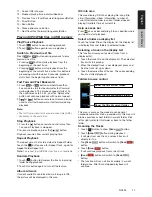
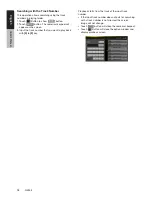
Video files list

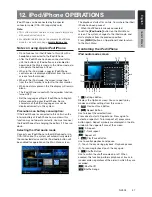
Showing the Video files player menu; touch the  

[

]

 button to display video files list screen.

Video files list operations is almost same as Disc 
Audio player mode. Please refer to DVD Audio Player 
Operations.

Summary of Contents for NZ503

Page 1: ...NZ503 Owner s manual Installation manual DVD MULTIMEDIA STATION WITH BUILT IN NAVIGATION 7 TOUCH PANEL CONTROL ...

Page 2: ...1 NZ503 1 English NX602 ...

Page 3: ...e CD Player menu 22 Listening To MP3 WMA 23 10 USB AUDIO OPERATIONS 26 Notes on using USB memories 26 Select USB Audio mode 26 Playing MP3 WMA files in USB memory 27 11 USB VIDEO OPERATIONS 29 Notes on using USB memories 29 Select USB Video mode 29 Playing video files in USB memory 29 USB Video Menu Operations 30 12 iPod iPhone OPERATIONS 31 Notes on using Apple iPod iPhone 31 Controlling the iPod...

Page 4: ...1 AUX 2 OPERATIONS 48 20 CAMERA OPERATIONS 48 21 REAR SOURCE OPERATIONS 49 DVD Video in Rear 49 AUX 1 in Rear 50 AUX 2 in Rear 50 iPod Video in Rear 50 22 SETTING OPERATIONS 51 General Setup Menu 51 Video Setup Menu 51 Audio Setup Menu 52 Navigation Setup Menu 52 Others Setup Menu 52 Set the Anti Theft code 53 23 TROUBLESHOOTING 54 GENERAL 54 DVD PLAYER 54 USB DEVICE 55 Bluetooth 55 SiriusXM Advis...

Page 5: ...separately Expanding visual features Rear Monitor Rear Vision Camera iPod iPhone Expanding audio features External Power Amplifier USB Memory Bluetooth Telephone SiriusXM Connect Vehicle Tuner Expanding HD Radio features English English Owner s Manual Radio Antenna Jack Connector Cable SiriusXM GPS Antenna HD Radio HD Radio Tuner THD400 NZ501 HD SiriusXM SiriusXM Vehicle Tuner VEHICLE TUNER Englis...

Page 6: ... developer to meet Apple performance standards Apple is not responsible for the operation of this device or its compliance with safety and regulatory standards Please note that the use of this accessory with iPod or iPhone may affect wireless performance iPhone iPod and iTunes are trademarks of Apple Inc registered in the U S and other countries 6 SiriusXM and all related marks and logos are trade...

Page 7: ... modifications to this product unapproved by the manufacturer will void the warranty and will violate FCC approval NZ503 CNE 8121E CL 1 1 机身大贴纸 5x75mm 红色外框线为刀模线 80g铜版纸 过哑胶 印刷黑色 PANTONE Black C 内容印刷正确 清晰 贴纸表面干净 整洁 不得有脏污 斑点 折痕 必整齐 不得歪斜 7 8121 1005 00 01 黄红双 20121120 ...

Page 8: ...ust be recognized as USB mass storage class to work properly Some models may not operate correctly When the memorized data is lost or damaged by any chance Clarion shall not be liable for any damage When using an USB memory stick we recommend that you backup your data stored on it before by using a personal computer etc Data files may be broken when using USB memory sticks in the following situati...

Page 9: ...lly by the edges Do not use commercially available disc protection sheets or discs equipped with stabilizers etc These may damage the disc or cause breakdown of the internal mechanism Storage Do not expose discs to direct sunlight or any heat source Do not expose discs to excess humidity or dust Do not expose discs to direct heat from heaters Cleaning To remove fingermarks and dust use a soft clot...

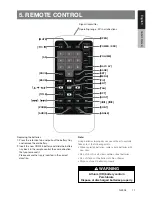
Page 10: ...is button to hardware reset the unit Note When the RESET button is pressed frequencies of radio stations titles etc stored in memory are cleared AUX 1 JACK AUX 1 Connector Buttons Short press to search next track or chapter in Pandora mode Short press to preset up or preset down in Tuner SiriusXM modes Press and hold to seek up or seek down in Tuner mode Press and hold to channel up or channel dow...

Page 11: ... END Function Only be available when a call incoming or in telephone talking Press to reject call when a call incoming press to end a call when in telephone talking ISR SEND Button ISR Function When in tuner mode press and hold this button for 3 seconds to save current station and band to ISR memory and at the same time the tuner will enter ISR mode with current station Note In ISR mode the tuning...

Page 12: ...on Note Using batteries improperly can cause them to explode Take note of the following points When replacing batteries replace both batteries with new ones Do not short circuit disassemble or heat batteries Do not dispose of batteries into fire or flames Dispose of spent batteries properly WARNING Lithium CR battery contain Perchlorate Dispose of discharged batteries properly Signal transmitter O...

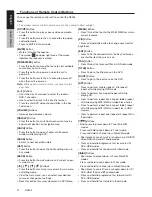
Page 13: ...to enter the MAIN MENU or return current resource PIC Button Press and hold this button to change your monitor brightness ENT Button Press to fix the entered data in the Key Pad screen or enter the item the cursor is on TAG Button Press this button to record TAG in HD Radio mode TITLE Button Press to go to the title menu on the DVD ROOT Button Press to go to the root menu on the DVD RPT Button Pre...

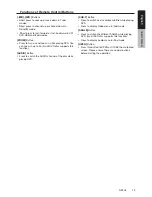
Page 14: ...can zoom in up to 3x No all DVD disc supports this function AUDIO Button Press to switch the AUDIO channel of the disc while playing DVD SUB T Button Press to switch next available subtitle while playing DVD Press to display Video menu in iPod mode ANGLE Button Press to switch the different ANGLE while playing DVD No all DVD disc supports this function Press to display Audio menu in iPod mode OPEN...

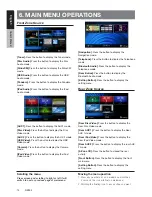
Page 15: ... button to display the Telephone mode Bluetooth Audio Press the button to display the Telephone mode Rear Button Press the button to display the Bluetooth Audio mode Setting Button Press the button to display the setting menu Rear Zone Source Rear Disc Video Press the button to display the Rear Disc Video mode Rear AUX 1 Press the button to display the Rear AUX 1 mode Rear iPod Video Press the but...

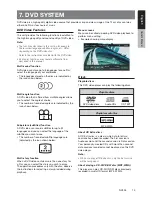
Page 16: ... are indicated by the icon shown below Multi story function When a DVD video contains more than one story for a film you can select the story you wish to enjoy The operation procedures vary with the disc observe the instructions for selecting a story provided during playback Menu screens Menu can be called up during DVD video playback to perform menu setting Example showing menu display Discs Play...

Page 17: ...d is intended for home and other limited viewing uses only unless otherwise authorized by Rovi Corporation Reverse engineering or disassembly is prohibited Use of this product by the customer is restricted to play program materials to which the Rovi copyright protection process has been applied Manufactured under license from Dolby Laboratories Dolby Pro Logic and the double D symbol are trademark...

Page 18: ...ll appear Input the old password and touch the OK key or input 4356 to reset password Input a new password and touch the OK key Input the same new password again and touch the OK key Note When a disc with view restrictions is inserted you will be prompted to input this password The disc will not be viewable until the correct password is entered Set rating for parental level control 1 Select Others...

Page 19: ... After disc is loaded the play mode is automatically engaged Touch any place of the screen to display DVD Video menu touch the screen again to return the playback screen The display will return to the playback screen if you do not touch the screen for 10 seconds 1 2 3 4 5 6 7 8 9 10 11 12 13 14 15 16 17 1 Next page Button 2 Previous Track Fast Backward Button long press 3 Play Pause Button 4 Next ...

Page 20: ...rns the Key Pad to the title number input mode Title A large segment to divide the data area of the disc Chapter A small segment to divide the data area of the disc 2 Input the number of the title chapter that you want to play with the 0 to 9 key 3 Touch the button Playback starts from the scene of the input title number or chapter number Note If the input title chapter number does not exist or se...

Page 21: ...eat touching button until subtitles are turned off Switching angles On DVD discs in with video images have been recorded in two or more angles you can switch among the angles during playback 1 Touch Angle key on the remote control during playback Each time you touch the key you can switch among angles It may take time to switch among angles Depending on the disc up to 9 angles may be recorded For ...

Page 22: ...ote control more than 1 second Playback is stopped 2 To resume playback press the button Playback resumes from current playing time Repeat Playback This operation plays back video files recorded on the disc repeatedly The repeat set as the factory default is Repeat all 1 Showing the video files player menu touch button 2 Touch button once for Repeat Track again for Repeat Folder 3 Press button aga...

Page 23: ... next track Pressing button starts playback from the beginning of the current track When this button is pressed again within 2 seconds playback starts from the beginning of previous track Fast Forward Fast Backward 1 Press or button and hold more than 2 seconds to start fast backward or fast forward during playback The playback speed starts at 2x then will increase to 4x 8x and 16x Release the but...

Page 24: ... Rotation effect 3 Press button will turn off the Rotation effect Listening To MP3 WMA This unit is an ID3 Tag compatible model This unit supports the ID3 TAGs of the Version 2 4 2 3 1 1 and 1 0 In displaying this unit gives priority to the Version 2 3 and 2 4 TAGs What is MP3 WMA MP3 is an audio compression method and classified into audio layer 3 of MPEG standards WMA is an audio compression met...

Page 25: ...lict with the ISO9660 and playback will be impossible Number of files or folders 1 The maximum allowable number of folders is 255 including root directory the maximum allowable number of files is 1500 max 255 per folder This represents the maximum number of tracks that can be played back 2 Tracks are played in the order that they were recorded onto a disc Tracks might not always be played in the o...

Page 26: ...lected folder 3 Current Folder Showing title of current folder The number on the folder symbol is the number of files and folders number in current folder Touch the title of current folder play list will show files and folders in upper folder Stop Playback 1 Press the button on remote control more than 1 second Playback is stopped 2 To resume playback press the button Playback resumes from current...

Page 27: ...ierarchical levels Otherwise playback may be impossible The maximum allowable number of folders is 65535 including root directory and folders with no MP3 WMA file The maximum allowable number of files in a folder is 65535 You can store the MP3 files WMA files together in a folder The system may become slow if the files or folders exceed the limitation above Notes on the Tag titles The limitations ...

Page 28: ... Touch button to Random the tracks in playing folder during playback 2 Touch this button again to turn off the feature Album Art work If current audio file contains album art image in ID3 the picture will be displayed in this area ID3 info area This area display ID3 info of playing file song title artist information album information number of current file total number in current folder elapsed pl...

Page 29: ...l keypad will appear on the screen 3 Input the track number that you want to play back with 0 to 9 key Playback starts from the track of the input track number If the input track number does not exist or searching with a track number is not allowed the screen image will not change Touch button will close the numerical keypad Touch Button will close the option window and display playback screen ...

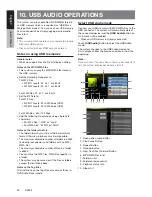
Page 30: ... same device that you disconnected last the system will play back where it left off Playing video files in USB memory If the video is playing touch the screen of the playing video to display Operation buttons The display will return to the playback screen if you do not touch the screen for 10 seconds 1 2 3 4 5 6 7 8 9 1 Previous Track Button 2 Play Pause Button 3 Next Track Button 4 Elapsed playin...

Page 31: ...rom the beginning of previous track Stop Playback 1 Press the button on remote control more than 1 second Playback is stopped 2 To resume playback press the button Playback resumes from current playing time Repeat Playback The repeat set as the factory default is Repeat Folder Touch the button once for Repeat Track again for Repeat Folder Repeat All Random Playback 1 Touch button to Random the tra...

Page 32: ...t operate correctly You must connect the iPod iPhone after charging the battery if it has run down Selecting the iPod Audio mode Connect your iPod iPhone to the USB connector via CCA 750 cable The system will automatically detect the connected device and the iPod Audio button will be enabled for operation on the Main Menu screen The playback starts after a while from where the iPod iPhone has been...

Page 33: ...But only Previous Track Play Pause and Next Track can be operated Refer to 17 17 Close the Settings Page 18 18 Display video of iPod iPhone Follow operation steps to display video of iPod iPhone in Simple Control Mode Connect the iPod to USB connector via CCA 750 cable Select iPod Audio mode Press the button on iPod audio mode screen to display Settings page Set the Simple Control to On Press butt...

Page 34: ... Previous Level Folder If the list is in root press the button can close the list 26 Closed the List 27 Search with the first alphabet in current list Selecting the iPod Video mode Connect your iPod iPhone to the USB connector via CCA 750 cable The system will automatically detect the connected device and the iPod Video button will be enabled for operation on the Main Menu screen When an iPod iPho...

Page 35: ... are as same as iPod Audio mode Please refer to the iPod Audio Mode operation key Note Video playback is not available on all iPod iPhone devices Please contact your Clarion dealer for details An optional connection cable or accessory may be required for this feature Note AUDIO ONLY is displayed when the automobile is moving Image data may not be played back according to the status of the iPod iPh...

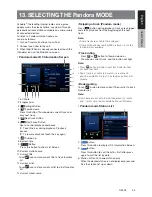
Page 36: ...ack favorites list 12 Current artist Touch icon to store current artist to artist favorites list 13 Current album name Skipping a track Pandora mode Press button during playback tracks are skipped and starts playback from the beginning of the next track Note Some track are not able to be skipped If skip limit has been reached Skip 6 tracks in 1H this fuction will not available Track rating Press o...

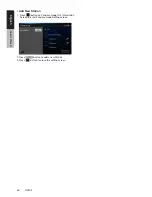
Page 37: ... English Owner s Manual Add New Station 1 Press button on Pandora mode ID 3 Information Screen to enter Pandora mode Setting screen 2 Press button to add a new Station 3 Press button to close the setting screen ...

Page 38: ...en the connection with a Bluetooth audio player has been established the icon is displayed at the top of the screen Bluetooth audio player settings Confirming Bluetooth Information and setting Pass Key You can confirm various information concerning about the Bluetooth Interface features 1 Touch the key to display the information on the screen 2 When you finish confirming the Bluetooth information ...

Page 39: ...er device which is already registered perform the following operation 1 Touch the Device key to display the Device Select screen 2 Touch the currently connected device then press the key to disconnect the active device 3 Touch the desired Device key you wish to use Press key to select it as your active device The corresponding cellular phone is set as current telephone If the power of the cellular...

Page 40: ...rd depending on the communication condition Select the BT Phone mode 1 Press MENU button on Operational Panel to return to the Main Menu 2 Touch the Bluetooth Telephone key to select the Bluetooth Telephone mode The Telephone screen is displayed When no Bluetooth Telephone connected the icon is displayed at the top of the screen When the connection with a Bluetooth Telephone has been established t...

Page 41: ...evel if the person on the other end of the telephone has a reception problem Register your cellular phone Pairing You can register up to 3 cellular phones The registering method is as same as Registering your Bluetooth audio player 1 Turn on the power of the cellular phone you wish to register 2 Touch the Device key to display the Device Select screen 3 Touch the key to display the Inquiring Devic...

Page 42: ...ng the Phone Book function from this unit 1 Perform the Object Push transfer operation of the Phone Book data on the current cellular phone For details of the operation see the operation manual of the cellular phone Note Some cellular phones may not be able to transfer the Phone Book data Some cellular phones cannot transfer the Phone Book data when the hands free mode is set or it is also registe...

Page 43: ... 3 Touch the key to call the specified number The Telephone Interrupt screen is displayed and calling starts When the call is finished touch the key to hang up Making a call using the History The system will memorize the Dialed Received calls record data in the memory You can confirm it and use it to make a call from this unit 1 Touch the key The History List screen is displayed The items are sort...

Page 44: ...ction of lower frequency Step Tuning 1 Press the FM1 2 3 AM button to select the radio band FM or AM 2 Touch the or key in frequency panel to tune up or down by one step Recalling a preset station 1 Press the FM1 2 3 AM button to select the desire band FM or AM on the tuner 2 Touch the key Press the preset station 1 to 6 on preset list 3 Press the key then press the button to auto search and store...

Page 45: ... all areas offer HD Radio broadcasts HD Radio stations may not always broadcast sub channels Volume levels of HD Radio stations may vary Increase the volume gradually from the minimal setting after the channel is selected Be sure to lower the volume setting before switching to another mode or channel Additional information about HD Radio can be found at www hdradio com Listening to HD Radio Note C...

Page 46: ...sired band FM or AM 2 Press the key and then press the key to start the Auto Store A beep sounds and the stations with good reception are stored automatically to the preset list HD Radio Sub channel Function If the key is enabled please touch the key to tune to next available sub channel Note Not all stations have HD Radio sub channel broadcasts The key is only enabled when current station has sub...

Page 47: ...can be found by tuning to Channel 0 In addition the Radio ID is located on the bottom of the SiriusXM Connect Vehicle Tuner Please note that the SiriusXM Radio ID does not include the letters I O S or F Channel Selection 1 Touch the button on the SiriusXM Menu display to enter channel list preview mode You can select any channels in list directly 2 Select the channel with Only channels that can be...

Page 48: ...Touch button in Lock item to enter pass code screen enter the right code to enter lock list 3 Press and flick the track list up or down 4 Press and hold the channel item and it will be locked or unlocked alternately 5 Touch the channel item tune to the channel Setting the password 1 Touch button to enter setting page 2 Touch button in password item to set a new pass code following the screen indic...

Page 49: ... unit will broadcast audio of external device Press Menu button on Operational Panel to return to the Main Menu You cannot directly control external devices connected to AUX 1or AUX 2 input 20 CAMERA OPERATIONS Switching to Camera mode Press Camera button on Main Menu to select desired mode The LCD will display the external camera video The screen will display No Video Signal menu if a valid camer...

Page 50: ...e the Multi Zone Remote Control to closed NOTE 1 If the source is selected as the front the source in rear can t be selected 2 If the source is selected as the rear the source in front can t be selected 3 Press the Front Button to access the main menu but not close the Rear DVD Video in Rear 1 2 7 3 4 5 6 1 Next Row Buttons Press the button can display the hidden button 2 Previous chapter 3 Play o...

Page 51: ...utton Same as iPod function of front source 7 Front Rear button If the screen displays Rear Source press to switch to Front Source If the screen displays Front Source Press to switch to Rear Source iPod Video Rear Source ID3 Mode Note If the source is selected as the front the source in rear can t be selected If the source is selected as the rear the source in front can t be selected Press the Fro...

Page 52: ...A Set PANDORA On or Off TFT Auto Open There are two options On and Off If current setting is On the TFT screen will slide out automatically when the system is power on If current setting is Off the TFT screen will always keep the last position when the system is power on Camera Audio There are three options Off On Mute When the car is in reverses if current setting is Off current source will conti...

Page 53: ...nchronized with GPS local time or not Navi Interrupt There are three choose On Popup Off On The navigation screen will cover to AV screen when reaching some key point Popup When small turn info window will pop up in the top of the AV screen to indicate the key point Off Turn off this function Voice Guidance Enable or disable the navigation voice guidance Voice Guidance Mix There are two choose On ...

Page 54: ... displayed Enter the new password twice then anti theft code is set and your unit is secured When the Anti theft is On you need enter correct Anti theft code to turn the unit on If you enter wrong code three times the unit is locked and must be unlocked by the professionals 2 If your unit is secured hold the more then 2 seconds then the Anti Theft setting mode will display The numerical keypad is ...

Page 55: ...e control unit it may not work The battery of the remote control unit is dead or there is no battery in the remote control unit Check the battery of the remote control unit Problem Cause Measure Disc cannot be loaded A disc is already loaded Eject the disc before loading the new one There is foreign matter already in the disc slot Remove the foreign matter or consult a service station Sound skips ...

Page 56: ...not encoded properly Use MP3 WMA files encoded properly The video of iPod iPhone image is disturbed The TV Signal setting of the iPod iPhone is not set correctly Set the TV Signal setting NTSC PAL of the iPod iPhone correctly Bluetooth Problem Cause Measure Cannot pair the Bluetooth enable device with the car audio system The device does not support the profiles required for the system Use another...

Page 57: ...f 99 99 or more pixel missing or normally lit pixels account for 0 01 Message Description Check Tuner Check the SiriusXM tuner connection on the back of the unit to ensure that its correctly connected Check Antenna Ensure the SiriusXM antenna cable is connected to the SiriusXM tuner correctly Check the SiriusXM antenna wire for breaks or sharp bends Replace the antenna if necessary Load Factory de...

Page 58: ...ches etc Replace with a non scratched non warped disc Invalid Disc A disc is loaded upside down inside the DVD deck and does not play Eject the disc then reload it properly PARENTAL VIOLATION Parental level error Set the correct Parental level Disc Region incorrect Region code error Eject the disc and replace correct region code disc If an error display other than the ones described above appears ...

Page 59: ...ixels 1 152 000 Resolution 800 x 480 x 3 RGB Bluetooth Specification Bluetooth Ver 2 1 EDR Profile HFP1 5 Hands Free Profile HSP1 0 Headset Profile A2DP Advanced Audio Distribution Profile AVRCP1 2 1 3 1 4 AV Remote Control Profile Power Class 2 MP3 mode Bit rate 32 kbps to 320 kbps Sampling rate 32 kHz 44 1 kHz 48 kHz WMA mode Bit rate 64 kbps to 192 kbps Sampling rate 32 kHz 44 1 kHz 48 kHz USB ...

Page 60: ...kg Remote Control dimensions Remote Control weight 1 76 oz 50g including battery 52 mm m m 4 2 1 12 mm 178 mm 9 1 5 m m 6 1 5 m m 50 mm Power Output 19W RMS x 4 Channels at 4 and 1 THD N Signal to Noise Ratio 95dBA reference 1W into 4 C M Y CM MY CY CMY K 11 pdf 1 2012 5 22 17 19 50 ...

Page 61: ... R Line Out Video Out Front L Video Audio R Audio L Video Out Camera Yellow White White Red Red Red White Yellow Purple Gray Gray Red Black Black Black White Connector Cable Steering Wheel Remote Control Terminal SiriusXM Yellow Monitor CCA 750 sold separately Yellow White Red Red Audio R Audio L Red White Green GPS Antenna External Microphone Connection HD Radio HD Radio Tuner THD400 NZ501 Refer ...

Page 62: ... White White Black Green Green Black Blue White Orange White Red Brown Blue 12V main power Ground Rear right Rear right Parking brake cord Purple White Reverse gear cord Front right Front right Front left Front left Rear left Rear left Amplifier turn on cord Illumination 12V accessory Phone interrupt 1 Auto antenna Note 1 Connecting the PHONE INTERRUPT terminal The phone interrupt will mute the au...

Page 63: ...n the main unit For detailed information refer to the instruction sheet or manual for the iPod iPhone cable Note This unit may not support all functions of all iPod iPhone devices The iPod iPhone connection will charge your iPod iPhone unless the iPod iPhone battery is completely depleted If the specified cord of the cellular phone is connected to the phone interrupt cord of the main unit the audi...

Page 64: ...Clarion Co Ltd All Rights Reserved Copyright 2012 Clarion Co Ltd Printed in China Imprime au Chiné Impreso en China ...

Reviews: