background image

E

n

g

lis

h

O

w

n

e

r’s

 M

a

n

u

a

l

M505

6

Optional


Wired


Remote


Control


Unit


Operations

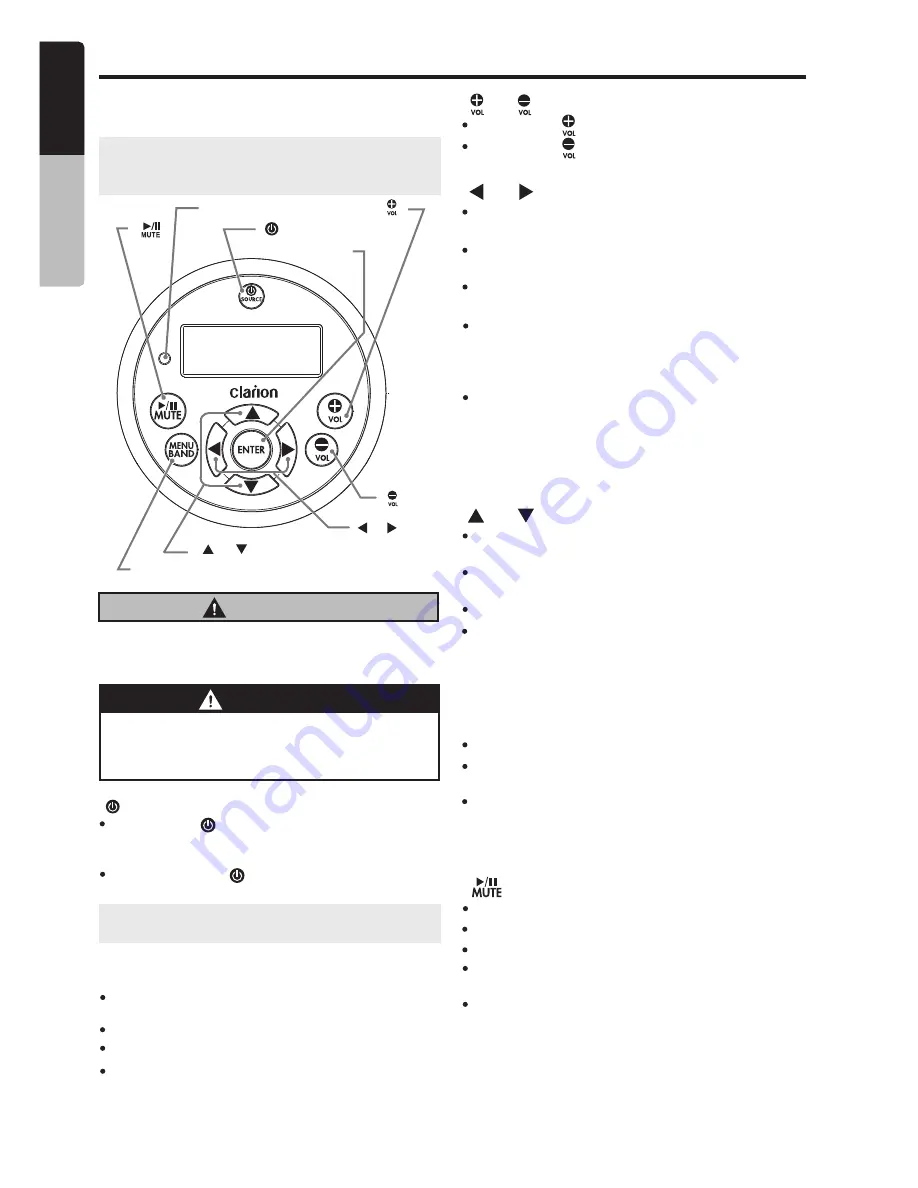
Following  operations  are  enabled  by  remote 

control  with  the  separately  sold  Wired  Remote 

Control Unit MW1 (shown below),MW2 or MW4

.

Note:

  If  the  remote  control  is  connected  with 

this unit while the power on, please restart this 

unit again to confirm the normal display.

[

MENU

/

BAND

]

[

ENTER

]

[    

[    

/

SOURCE

]

]

[ ], [

]

[    ]

[    ]

[ ], [ ]

IR

-

Receiver

CAUTION

Lower the volume level before powering the 
source unit off. The source unit stores the 
last volume setting.

WARNING

EXPOSING THE UNIT TO WATER WITH 
THE FRONT PANEL OPEN WILL CAUSE 
DAMAGE OR UNIT MALFUNCTION!

[    / SOURCE]  Button

[     ] / [     ]  Buttons

[     ] / [     ]  Buttons

[     ] / [     ]  Buttons

[         ]  Buttons

[MENU/BAND]  Buttons

Press the 

[      /SOURCE] 

button to turn the

power on and press and hold it (1 sec.) to 
turn the power off.
Each time the 

[      /SOURCE] 

button is 

pressed, the mode switches.

USB


mode – Previous/Next track & Fast Forward

/Reverse (Press and hold)

USB


mode – Folder Up/Down & Select (in Folder 

search mode)

USB


mode - Play / Pause

Tuner/Weather Band 

mode–Station Up/Down

&Seek Up/Down (Press and hold)

Tuner/Weather Band 

mode–Preset Station Up

/Down & Enter into Manual Store (Press and hold)

Tuner/Weather Band 

mode - Mute On / Off

Press this button to access menu items for 
necessary functions in every mode.

Tuner/SiriusXM

 mode - Select the band

Press the 

[     ]

 button to increase the volume.

Press the 

[     ]

 button to idecrease the volume.

iPod/iPhone


mode – Previous/Next track & Fast 

Forward/Reverse (Press and hold)

iPod/iPhone


mode – Select (in Menu mode)

iPod/iPhone


mode - Play / Pause

Note

If the above equipment is not connected,

corresponding mode cannot be selected.

SiriusXM


mode – Channel Tune Up/Down,Fast 

Channel Tune Up/Down (Press and hold),


Move 

cursor (Direct mode)& 

Enter the P

arent Code


Window

SiriusXM Replay


mode – Press and Release 

the Left or Right Arrow to skip back or forward 
one song/track.
Press and Hold will Fast Forward/Fast Rewind 
through the Replay buffered content.

SiriusXM


mode – Preset channel Up/Down,Category 

Up/Down  (in  Category  mode),  Numeric  Up/Down 
(Direct mode

), 

input Parent code interface

In different modes, the menu items are different. 
Please see the operation introduction of every 
mode for more details.

SiriusXM


mode - Replay Mode, Press and Hold

 for 3-seconds to exit Replay Mode.

BT Audio


mode - Play / Pause

[ENTER]  Button

USB


mode - Confirm (in Menu mode)

TUNER/Weather Band 

mode - Confirm (in 

Preset and Manual store)

iPod/iPhone


mode - Confirm (in Menu mode)

SiriusXM


mode - Jump to Alert ch / Confirm ch 

(in Search mode)

Summary of Contents for M505

Page 1: ...MARINE USB MP3 WMA RECEIVER Owner s manual Installation manual ...

Page 2: ...l Remote Control 5 Remote Contol 5 optional Wired Remote Control Unit Operations 6 5 OPERATIONS 7 Basic Operation 7 System Menu 8 Audio Menu 8 Weather Band Operation 10 Radio Operation 9 SiriusXM Satallite Radio Operations 11 USB Operations 13 iPod iPhone Mode Operation 14 6 TROUBLESHOOTING 16 7 SPECIFICATIONS 18 INSTALLATION AND WIRE CONNECTION 19 Aux Operation 13 Bluetooth Operation 15 ...

Page 3: ...ce complies with Industry Canada licence exempt RSS standard s Operation is subject to the following two conditions 1 This device may not cause interference and 2 This device must accept any interference including interference that may cause undesired operation of the device 3 2 Changes or modifications not expressly approved by the party responsible for compliance could void the user s authority ...

Page 4: ...memory Press and Hold Scan play Preset scan SiriusXM mode Preset scan Operational Panel Name of Buttons and their Functions MENU Button USB mode Search function iPod mode iPod menu SiriusXM mode Replay mode Category search Direct Select 1 6 Buttons 1 Button Scan play Preset station 1 2 Button Repeat play Preset station 2 3 Button Random play Preset station 3 4 Button Play Pause Top play Press and ...

Page 5: ...er in the direction shown 2 Insert battery Cr2025 into insertion guides with printed side up 3 Press battery into compartment as shown 4 Replace and slide cover until it clicks into place 1 2 3 SRC Button Toggle the audio source Power On Power Off Press and Hold Button Preset station up down Previous next track Fast Forward Backward Press and Hold SCN PS Button Scan play Preset scan SiriusXM mode ...

Page 6: ...ressandhold Tuner Weather Band mode Mute On Off Press this button to access menu items for necessary functions in every mode Tuner SiriusXM mode Select the band Press the button to increase the volume Press the button to idecrease the volume iPod iPhonemode Previous Next track Fast Forward Reverse Press and hold iPod iPhonemode Select in Menu mode iPod iPhonemode Play Pause Note If the above equip...

Page 7: ... up 2 Press the SRC button to turn on power under standby mode Press and hold to turn off the power the Press the SRC button to display source menu External equipment not connected to this unit is not displayed Rotating the VOLUME to increase decrease the volume The adjustable range of volume is o to 46 Mute DisplaySysteminformation Press the MUTE button to turn the mute On and Off press the DISP ...

Page 8: ...ect setting mode Press or button to select options rotate the VOLUME knob to adjust a value option Rotate the VOLUME knob to adjust the desired Bass level range from 7 to 7 Rotate the VOLUME knob to select Loundness between ON and OFF Rotate the VOLUME knob to select subwoofer between ON and OFF Rotate the VOLUME knob to change EQ Flat Jazz Pop Classic Rock News Urban Rave Movie Techno User Rotate...

Page 9: ...o signal could be received To select LOCAL function press and hold the DISP button on the front panel then press the button repeatedly until LOCAL or DX display on the LCD rotate the VOLUME knob to select local or distant mode Area Set This option allows you to select the appropriate frequency spacing for your area 1 Press and hold the DISP button 2 Press the button to select TUNER AREA 3 Rotate t...

Page 10: ... one numeric button among 1 to 6 on the front panel to select the corresponding stored stations M505 10 English Owner s Manual Presets Scan Preset scan receives the stations stored in preset memory in order This functionis useful when searching for a desired station in memory 1 Press the PS AS button 2 When a desired station is tuned in press the PS AS button again to continue receving that statio...

Page 11: ...l 3 Repeat the procedure to store up to 5 other channels on to the same band 1 Press the BAND to select the desired band of Presets you wish to access 2 Press the preset button 1 6 that has your desired Satellite Radio channel stored in memory Note A total of 18 channels can be stored in the preset memory 6 channels or each band SXM1 SXM2 and SXM3 Note If no operation is perfprmed for 10 seconds t...

Page 12: ...ature content channels to be locked press and hold the DISP button during tuning to the desired channel and select the LOCK CH and press the MUTE to start to lock channel You will be asked to input password and LOCK will be displayed if it is successful 3 For unlocking the mature content channels press and hold the DISP button and press to select UNLOCKCH Enter the password and you can unlock the ...

Page 13: ...evice Then take off the USB device During playback pressing the DISP button will automatically cycle through the following information on the file being played on the LCD ALBUM ARTIST TITLE CLOCK The top function resets the MP3 WMA player to the first track of the device Press and hold 4 button to play the first track on the device Display Function Top Function 2 Rotate the VOLUME knob to search t...

Page 14: ...rack Play Pause Press the button to pause the track song that is currently playing Press the button to resume playing the track song that has been paused During playback pressing the DISP button will automatically cycle through the following information on the file being played on the LCD ALBUM ARTIST TITLE CLOCK Display Function 2 Rotate the VOLUME knob to switch between categories PLAYLISTS ARTI...

Page 15: ...nd main unit are in the same play pause status in BT MUSIC mode ID3 Display During music streaming playback press DISP to view the ID3 display information ALBUM TITLE CLOCK ARTIST Note The search feature requires the paired and connected device that the minimum Bluetooth AVRCP1 4 be incorporated to function 1 From your Bluetooth enabled device turn the Bluetooth ON and search for Bluetooth devices...

Page 16: ...ers damaged Heavily biased volume balance Speaker wiring is in contact with metal part of car Car battery fuse blown Replace with new fuse of correct rating Check wiring and correct Check the wiring and correct Increase volume level Replace speakers Check wiring and correct Check wiring and correct Replace with new fuse of correct rating GENERAL Replace speakers Adjust the channel balance to cente...

Page 17: ...sXM channel lineup The vehicle must be outside and the antenna must have a clear view of the southern sky The magnetic antenna must be mounted on the outside of the vehicle for the best reception The selected channel has been locked by a mature channel has been selected A prompt to enter the unlock code will appear An update to your SiriusXM subscription has been received by the SiriusXM tuner Pre...

Page 18: ...ofiles A2DP Advanced Audio Distribution Profile AVRCP 1 4 Audio Video Remote Control Profile SSP Simple Secure Pairing Send Receive Sensitivity Class 2 μ Power Output RMS 20W 4 Channels at 4 Ω and 1 THD N Signal to Noise Ratio 74dB reference LPF 1 W into 4 MP3 WMA mode MP3 sampling rate 32kHz 44 1kHz 48kHz MP3 bit rate 8 320kbps and varibale bit rate WMA bit rate 8 320kbps Logical format ISO9660 J...

Page 19: ... for installing the source unit before starting o 2 Install the unit within 30 of the horizontal plane Figure 2 3 If you have to do any work on the car body such as drilling holes consult your car dealer beforehand 1 2 3 Place the mounting bracket into the instrument panel use a crewdriver to bend each stopper of the mounting bracket inward then secure the stopper Wire as shown in Section 7 Insert...

Page 20: ...Notes of installation Unit installation Method A 1 Insert mounting bracket into dash board choose appropriate mounting tab according to the gap width bending the mounting tab outwards with a screwdriver to fix the mounting bracket in place 2 Slide the unit into the bracket until you hear a click sound Dashboard Mounting Bracket Screwdriver M4 Nut M4 washer M4 washer Source unit Support Strap M4 Nu...

Page 21: ...on Lead 1 5A Yellow wire Memory back up lead Yellow wire Memory back up lead Bluw wire Connect directly to battery Connect directly to battery Power Antenna Front Right Front Left Rear Left Rear Right Grey White Green Purple Grey Black White Black Green Black Purple Black Red wire Power lead Accessory 12V Connect it to the car power supply terminal for antenna Blue White wire Amplifier turn on lea...

Page 22: ...M505 10 2014 Clarion Corporation of America All Rights Reserved Copyright 2014 Printed in China Clarion Corporation of America ...

Reviews: