background image

E

n

g

lis

h

14. 


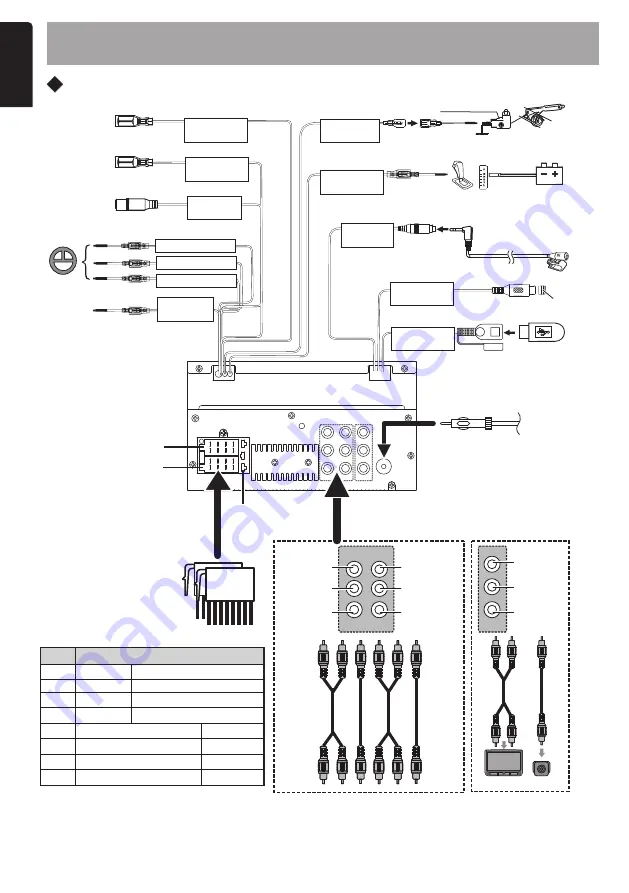
INSTALLATION AND CONNECTION WIRE

EN-18

Optional

(Not included)

Optional

(Not included)

ANT

2 4 6 8

1 3 5 7

2 4 6 8

1 3 5 7

REAR 

OUT

FRONT 

OUT 

CAMERA

IN

VIDEO 

OUT

L

R

Rear Audio 
Preout(Left)

Rear Audio 
Preout(Right)

Rear View 
Camera In

Front Audio 
Preout(Left)

Front Audio 
Preout(Right)

Visual Output

AV IN 

VIDEO 

IN

AV IN Audio 
Input(Left)

AV IN Audio 
Input(Right)

Video Input

FM/AM
Antenna

Fuse
(15A)

Pin

Color and Function

B)

A4

Yellow

A6

Orange

Illumination

Earth (Ground) Connection

Ignition(ACC)

Black

A8

A7

Red

B1/B2
B3/B4
B5/B6

B7/B8

ISO Connector

Connector A

Connector B

)/Purple Black(-)
Gray(+)/Gray Black(-)
White(+)/White Black(-)

Green(+)/Green Black(-)

Rear Right
Front Right
Front Left

Rear Left

Steering 

Wheel

ST Remote

 GND

ST Remote Input 1

ST Remote Input 2

Cap

OE 

SWC Input

Subwoofer 

External 

Microphone

External 

MIC

PRK / SW

Brake Switch

Ground

Power 

Remote Out

Power

Antenna

Reverse

Wiring and Connections

USB  Device

(Not Included) 

USB

Dash DVR 

Remote

Summary of Contents for FX450

Page 1: ...DISPLAY AUDIO Bluetooth TM Apple CarPlay Android Auto FX450 ...

Page 2: ...NU 8 1 Pairing the Bluetooth device 7 8 3 Call Waiting 7 8 2 Receiving a Call 7 8 4 Phonebook 7 8 5 Call Records 8 8 6 Voice Assistant 8 8 7 Bluetooth Setting Menu 8 5 2 Initial Settings 4 5 3 Power Off Clock 4 10 2 About Android Auto 11 11 2 Parking Camera 14 11 4 Bluetooth Settings 14 11 5 Software Information 14 12 15 24Bit DSP AUDIO 13 16 TROUBLESHOOTING 14 17 INSTALLATION AND CONNECTION WIRE ...

Page 3: ...nce exempt RSS s Operation is subject to the following two conditions 1 This device may not cause interference and 2 This device must accept any interference including interference that may cause undesired operation of the device FCC IC Radiation Exposure Statement This equipment complies with FCC and IC radiation exposure limits set forth for an uncontrolled environment This equipment should be i...

Page 4: ...ome Screen Descriptions Mute Unmute Bluetooth Phone Bluetooth Audio Clock Audio Setting AV IN Retrun to Previous Item Switch to Carplay Android Auto Screen Setting Menu Radio Apple Carplay Android Auto USB Playback EN 4 NOTE Perform this setup when you use this unit first time The warning is only for 6 seconds To select the suitable Area list of areas and turn on or off the Demo function tap to co...

Page 5: ...tations with the strongest signals for the selected band Tunes in only to the stations with sufficient signal strength ON OFF Default Presets Tap and hold to select the preset position to save the current frequency Tap on to select the desired preset station Area This option allows you to select the difference radio tuner frequency spacing BRAZIL South America USA United States of America LATIN La...

Page 6: ...ard or fast backward NORMAL 4 3 16 9 Select a screen mode Adjust image quality in video screen Play Pause EN 6 WARNING Risk of road accidents Never watch video or TV while you drive Music Function Setup Media Content List Track Up Down Play Pause 7 USB PLAYBACK Media Content List 1 to display the Playback List Tap on 2 Select whether you search by audio files video files 1 to display the Playback ...

Page 7: ...ne for the first time the radio will be download the phone book Phonebook Device List Touch to answer a phone call or to reject an incoming call Receiving a Call Entering a phone number Voice Recognition EN 7 1 When you receive a call while talking on another call you can answer the Call Waiting newly received call by taping The current call is on hold 2 Each time you tap the caller will change 3 ...

Page 8: ...he Voice function is dependent on mobile phones some Android phone don t have this function Bluetooth Setting Menu 1 Tap access system settings menu 2 Tap to display the Bluetooth settings mode and tap on a setting repeatedly to change setting Select Device Mic Gain Tap the Device name you want to connect To connect the device To disconnect the device To delete the registered Bluetooth device If t...

Page 9: ... the content list the playback starts NOTE Tap to return the top menu 3 Tap to move to the upper hierarchy Play Pause Selecting a Track Tap on to move to the beginning of the previous next track Tap and hold to Fast forward backward Tap on to Play Pause audio playback Music Function Setup Tap on to access the Music playback Function Setup Menu Repeat Random On Random plays all files Off Normal pla...

Page 10: ...ful please unplug and insert USB cable and try again Apple Carplay Apple Carplay When iPhone compatible with CarPlay is connected to the USB terminal the Bluetooth smartphone currently connected is disconnected NOTE CarPlay Sidebar CarPlay Sidebar Left NOTE Please unplug the USB cable after you change the CarPlay Sidebar option Operation of Apple CarPlay Hold to activate Siri Switch forward and ba...

Page 11: ... an device via USB terminal android auto Android Auto If Android Auto connection to the Car AV System is not successful please unplug and insert USB cable and try again NOTE Initial setup Android Auto When you use Android Auto first time you must engage parking brake and follow the instructions to do on your phone To use Android Auto Please engage parking brake and follow the instructions on your ...

Page 12: ...r Tap into the Wallpaper mode can set the background imgae User1 Select Tap to select the imgae from Strored in USB device Tap to confirm the selection You can set the background image from stored in USB device on yourself Before operating this procedure it is necessary to connect the device which has the image to load To selecting the image set to background The default is First Image Tap select ...

Page 13: ...s the desired function in the Steering Remote Controller Select the function you want the Steering Remote to learning Power Off Clock Tap to Enable or Disable the power off clock mode AV Setup Tap into the Rear AV IN mode the selection function sets the AV IN DTV DVR mode then activate Default Volume This function allow to change the Default Volume Level The default volume level is 15 NOTE The vol...

Page 14: ...itial default position Parking Camera Tap access into Camera menu to adjust the Parking Guide Adjust Tap on access into to adjust the parking guidelines CarPlay Sidebar Q A Select the position of the control bar Left or Right shown on the touch panel The default is Left Phone Devices Bluetooth Settings Tap access into Phone Devices mode to set the below items Tap on access into study the Smart Pho...

Page 15: ...nt and rear volume balance 15 front to 15 rear Balance Adjust the left and right volume balance 15 right to 15 left 12 24Bit DSP AUDIO EN 15 Music Zone Select the preset listening zone to fit with prefect listening position Bass Boost Source Gain Bass Boost Set the amount of bass boost Finely adjust the volume of the current source to minimize the difference in volume between different sources Lou...

Page 16: ...acing with a different USB device Replace speakers Check wiring and correct Store these files properly in the USB device Unit fuse blown The USB device has been inserted with wrong direction The device does not support the profiles required for the system The Bluetooth function of the device is not enabled Replace with new fuse of correct rating Reversing the connection direction of the USB device...

Page 17: ... are no user serviceable parts inside If you drop anything into the unit during installation consult your dealer or an authorized Clarion service center 2 Use a soft dry cloth to clean the case Never use a rough cloth thinner benzine or alcohol etc For tough dirt apply a little cold or warm water to a soft cloth and wipe off the dirt gently Bend the tabs of the mounting sleeve with a screwdriver o...

Page 18: ...t FM AM Antenna Fuse 15A Pin Color and Function Battery A4 Yellow A6 Orange Illumination Earth Ground Connection Ignition ACC Black A8 A7 Red B1 B2 B3 B4 B5 B6 B7 B8 ISO Connector Connector A Connector B Purple Purple Black Gray Gray Black White White Black Green Green Black Rear Right Front Right Front Left Rear Left Steering Wheel ST Remote GND ST Remote Input 1 ST Remote Input 2 Cap OE SWC Inpu...

Page 19: ...2 uV FM 44 7 uV AM MW Color System of External Video Input NTSC PAL External Video Input RCA 3 5m Jack 1 Vp p 75Ω Audio section Maximum Power 50Wx4 Continuous Power Output RMS 22Wx4 Preout Level V 3V 10kΩ Preout Impedance 1 3kΩ Speaker Impedance 4 8 Ω Output Frequency Band 20 20000Hz General Operating Voltage 14 4V 9 16 V Operational Temperature Range 20 C 80 C Maximum Current Consumption 15A Supp...

Page 20: ...FX450 10 2020 Clarion Co Ltd Copyright 2020 Clarion Co Ltd Printed in China ...

Reviews: