Clare Controls Clare Video Doorbell Quick Start Manual Download Page 8

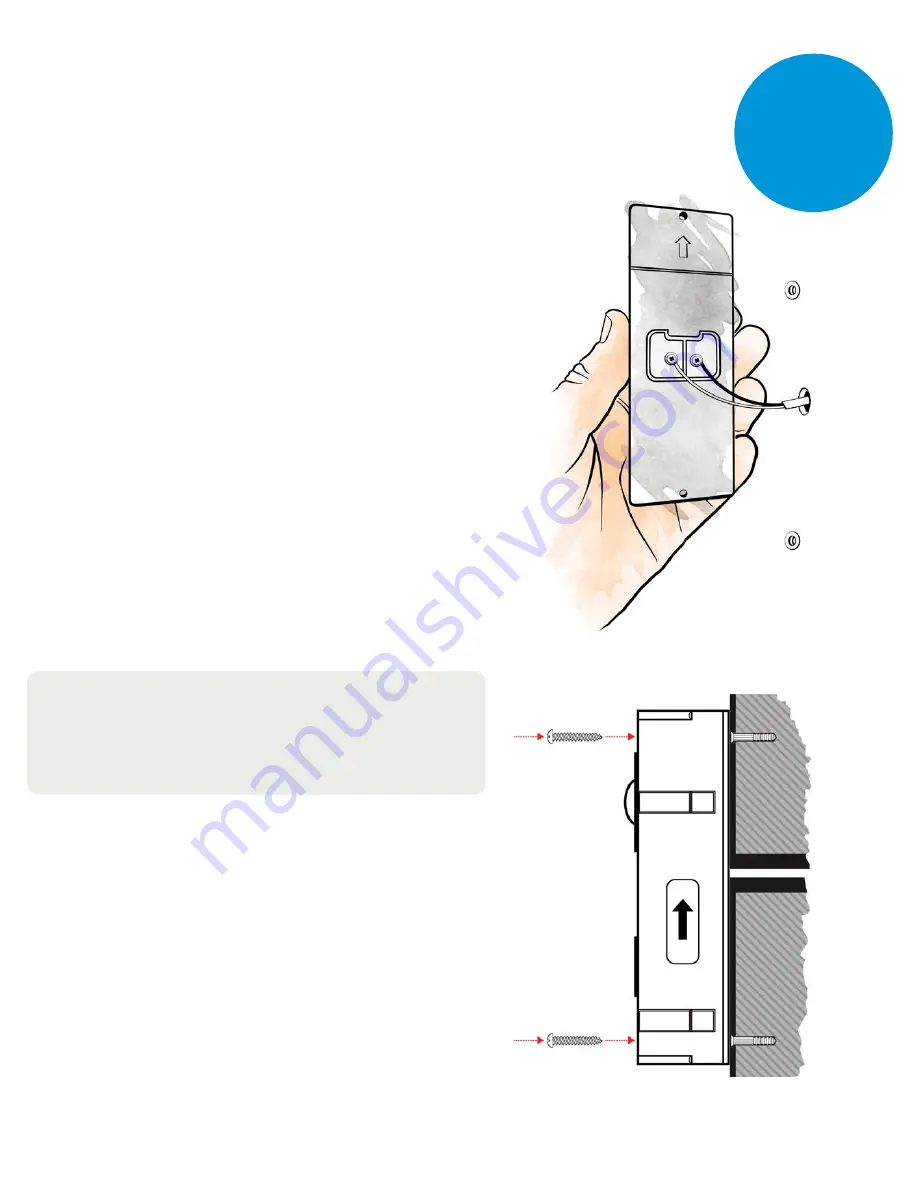
Next, refer to diagram 3 to connect your 
existing doorbell wiring to the leads  
located on the back of the video doorbell. 
 
If your existing wiring is not long enough, 
use the supplied wires and connectors to 
extend the wiring. Using a pair of pliers, 
insert the wires into the connector and 
depress the yellow button until fully seated.

Note: 

The two wires used to power the video  

doorbell can be hooked up to either terminal 
on the back of the video doorbell.

Once wiring is complete, install the  
doorbell using the supplied screws.  
Restore the power at the breaker and 
follow the instructions for setting up  
the ClareVision Plus App.

Connecting Power To The  

Video Doorbell

Diagram 3

Diagram 4

Install

Step 3

Summary of Contents for Clare Video Doorbell

Page 1: ...Clare Video Doorbell Quick Start Guide...

Page 2: ...Welcome To Your New Clare Video Doorbell 180 2MP HD Camera Omni directional Microphone Doorbell Button Mode Button Uses Existing Doorbell Wiring Micro SD card Getting Started 2...

Page 3: ...t What s Included In The Box 3 3 Wall anchors 1 Security key 1 Drill bit 4 Faceplates 1 Mounting template Clare Video Doorbell Camera 4 Terminal screws 3 Mounting screws 2 Wire extensions 2 Security s...

Page 4: ...it s most likely a digital doorbell and you must install the supplied diode Refer to Install Step 4 for more information on installing the diode Mechanical vs Digital Doorbells The Clare Video Doorbe...

Page 5: ...doorbell will be installed and test the strength of the Wi Fi If a 65dBM signal or better is not achievable we recommend installation of a Wi Fi range extender or Wireless Access Point WAP to ensure...

Page 6: ...e starting installation make sure to shut off the power being supplied to your doorbell at the breaker panel Next remove your existing doorbell and disconnect the wires connected to the screws on the...

Page 7: ...y remove the faceplate When mounting the doorbell to brick concrete or stucco use the supplied drill template as a guide to mark the locations for installing the supplied wall anchors Using the includ...

Page 8: ...pliers insert the wires into the connector and depress the yellow button until fully seated Note Thetwowiresusedtopowerthevideo doorbellcanbehookeduptoeitherterminal onthebackofthevideodoorbell Once w...

Page 9: ...either device your doorbell will just not ring properly If this is the case simply reverse the direction of the diode and verify proper installation by ringing the doorbell Installation When Using a D...

Page 10: ...ClareVision Plus App for iOS and Android After opening the App tap on the Clare Cloud icon on the bottom menu bar and follow the on screen instructions to create a new account Playback 10 Note Before...

Page 11: ...the password for yourWi Fi network and tap Generate 3 Select Video Doorbell from the menu screen and then scan the QR code on the front of the video doorbell Ensure that your mobile device is connect...

Page 12: ...Restoring Power After the video doorbell has been installed reinstall the faceplate by pressing gently until it clicks into place Refer to diagram 6 to install the security set screw located on the bo...

Page 13: ...lareVision Plus App Live and RecordedVideo Settings 2 Way Audio Take Photo TakeVideo HD BasicVideo LiveView Configuration Stop Start Volume CameraView Zoom Main Menu Settings Back Settings Add Device...

Page 14: ...ull field of view of the camera In certain situations some objects may trigger an abundance of notifications This is a normal issue and is simple to correct Scan the QR code or follow the link below f...

Page 15: ...tifies you This will factory reset your ClareVideo Doorbell camera to default settings You can only factory reset the doorbell after it has been connected to aWi Fi network If the doorbell is not conn...

Page 16: ...visit www ClareControls com to learn more and watch helpful installation setup videos www clarecontrols com ClareCare Support Dealer Technical Support US 941 404 1072 Canada 844 360 4806 claresupport...

Reviews: