background image

8

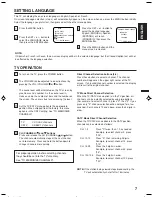
TO MEMORIZE CHANNELS

This TV is equipped with a channel memory feature which
allows channels to skip up or down to the next channel set
into memory, skipping over unwanted channels.
Before selecting channels, they must be programmed into
the TV's memory. In addition to normal VHF and UHF
channels, this TV can receive up to 113 Cable TV channels.
To use this TV with an antenna, set the TV/CATV menu
option to the TV setting. When shipped from the factory, this
menu option is in the CATV setting.

CATV CHART

TV/CATV SELECTION

Press the MENU button.

Press the SET + or – button until the
indicator next to "CH SETUP" begins
to flash, then press the ENTER
button.

Press the SET + or – button until the
indicator next to "TV/CATV" begins
to flash.

Press the ENTER button to select
the TV or CATV mode. The arrow
indicates the selected mode.

Press the MENU button twice to
return to normal TV viewing.

The chart below is typical of many cable system channel
allocations.

14

A

15

B

16

C

17

D

18

E

19

F

20

G

21

H

22

I

32

S

33

T

34

U

35

V

36

W

37

AA

38

BB

39

CC

40

DD

23

J

24

K

25

L

26

M

27

N

28

O

29

P

30

Q

31

R

50

NN

51

OO

52

PP

53

QQ

54

RR

55

SS

56
TT

57

UU

58

VV

41

EE

42
FF

43

GG

44

HH

45

II

46
JJ

47

KK

48
LL

49

MM

68

III

69

JJJ

70

KKK

71

LLL

72

MMM

73

NNN

74

OOO

75

PPP

76

QQQ

59

WW

60

AAA

61

BBB

62

CCC

63

DDD

64

EEE

65

FFF

66

GGG

67

HHH

86
86

87
87

88
88

89
89

90
90

91
91

92
92

93
93

94
94

77

RRR

78

SSS

79

TTT

80

UUU

81

VVV

82

WWW

83

XXX

84

YYY

85

ZZZ

104
104

105
105

106
106

107
107

108
108

109
109

110
110

111
111

112
112

95

A-5

96

A-4

97

A-3

98

A-2

99

A-1

100
100

101
101

102
102

103
103

122
122

123
123

124
124

125
125

01
5A

113
113

114
114

115
115

116
116

117
117

118
118

119
119

120
120

121
121

Number on this TV
Corresponding CATV channel

NOTE:

 Contact your cable company to determine the

type of cable system used in your area.

AUTOMATIC CHANNEL MEMORY

Press the MENU button.

Press the SET + or – button until the
indicator next to "CH SETUP" begins
to flash, then press the ENTER
button.

Press the SET + or – button until the
indicator next to "AUTO CH MEMORY"
begins to flash, then press the ENTER
button. The TV will begin memorizing
all the channels available in your
area. Channel numbers will remain
red until auto memorizing is complete.

Press the MENU button twice to
return to normal TV viewing.

TO ADD/DELETE CHANNELS

Press the MENU button.

Press the SET + or – button until the
indicator next to "CH SETUP" begins
to flash, then press the ENTER
button.

Press the SET + or – button until the
indicator next to "ADD/DELETE"
begins to flash, then press the
ENTER button.

Select the desired channels to be
added or deleted using the Direct
Channel Selection buttons (10 keys,
0-9), the CH 


or 


button or the SET

+ or – button.

1

2

3

4

5

1

2

3

4

1

2

3

4

5

Press the ENTER button to select ADD or DELETE.
If an unmemorized channel was selected (step 4), the
channel indication will be red. Press the ENTER button
if you wish to ADD the unmemorized channel. The
channel indicator will change from red to green when a
channel is added and the channel will be memorized.
If a memorized channel was selected (step 4), the
channel indication will be green.

Press the MENU button three times after adding or
deleting all of the desired channels, to return to normal
TV viewing.

6


á       ñ


á         ñ


á       ñ


á         ñ


á       ñ


á         ñ

ADD

CH 012

〈 

0-9 / + / – / ENTER / MENU 


Press the ENTER button if you wish
to DELETE the channel from memory.
The channel indicator will change
from green to red when a channel is
deleted.
Repeat Steps 4 and 5 for each
channel to be added or deleted.

 3Q30201B-E

22/12/04, 15:00

8

Summary of Contents for JCTV3242B

Page 1: ...E NO JCTV3242B INSTRUCTION MANUAL MANUEL D INSTRUCTIONS TV CATV MODE SELECTION SÉLECTION DU MODE TV CATV When shipped from the factory the TV CATV menu option is set to the CATV Cable Television mode If not using CATV set this menu option to the TV mode Lorsque l appareil sort de l usine l option du menu TV CATV est en mode CATV câblodistribution Si vous n utilisez pas la câblodistribution choisis...

Page 2: ...he openings should never be blocked by placing the unit on a bed sofa rug or other similar surface This unit should never be placed near or over a radiator or heat source This unit should not be placed in a built in installation such as a bookcase or rack unless proper ventilation is provided or the manufacturer s instructions have been adhered to 10 POWER SOURCE This unit should be operated only ...

Page 3: ... wall outlet and refer servicing to qualified service personnel under the following conditions a When the power supply cord or plug is damaged b If liquid has been spilled or objects have fallen into the unit c If the unit has been exposed to rain or water d If the unit does not operate normally by following the operating instructions Adjust only those controls that are covered by the operating in...

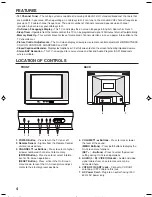
Page 4: ...oder Displays text captions or 1 2 of full screen text on the screen for hearing impaired viewers Stereo SAP Reception This TV is designed to receive stereo and Second Audio Program SAP broadcasts where available 4 VOLUME Buttons Press to raise or lower the level of the sound MENU Buttons Press both buttons to display the On Screen menu functions SET Buttons Press to select the desired setting dur...

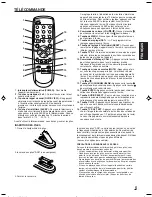
Page 5: ...l 2 in the Closed Caption mode 16 TV CAP TEXT Button Press this button to switch between normal TV and the two Closed Caption modes captions and 1 2 of full screen text Closed Captioning will display text on screen for hearing impaired viewers MENU VOL SLEEP MUTE QUICK VIEW CALL VOL ENTER CH CH 1 2 3 4 5 6 7 0 8 9 SET CH 1 2 TV CAP TEXT RESET AUDIO SELECT TV AV POWER REMOTE CONTROL 1 Open the batt...

Page 6: ...bled channels 300 75 ohm Matching Transformer not supplied Combiner not supplied 300 75 ohm Matching Transformer not supplied VHF Antenna Incoming CATV Single 75 ohm Cable Combination VHF UHF Antenna 300 ohm Twin lead Wire Splitter Take off the Splitter Single 75 ohm Cable 300 ohm Twin lead Wire 300 ohm Twin lead Wire UHF Antenna Combination VHF UHF Antenna Single 75 ohm Cable or 300 ohm Twin lead...

Page 7: ... as needed Example to select channel 2 press 002 Press 0 then remaining 2 digits Example to select channel 12 press 012 Press the 2 digits in order Example to select channel 36 press 36 Press the 3 digits in order Example to select channel 120 press 120 1 2 3 4 CH CHANNEL and buttons Press and release the CH CHANNEL or button The channel automatically stops at the next channel set into memory Pres...

Page 8: ...5 116 116 117 117 118 118 119 119 120 120 121 121 Number on this TV Corresponding CATV channel NOTE Contact your cable company to determine the type of cable system used in your area AUTOMATIC CHANNEL MEMORY Press the MENU button Press the SET or button until the indicator next to CH SETUP begins to flash then press the ENTER button Press the SET or button until the indicator next to AUTO CH MEMOR...

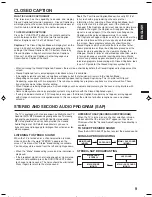
Page 9: ...where it is available If no caption signal is received no captions will appear but the television will remain in the Caption Mode Misspellings or unusual characters may occasionally appear during Closed Captioning This is normal with Closed Captioning especially with live programs This is because during live programs captions are also entered live These transmissions do not allow time for editing ...

Page 10: ...cture clearer USING THE AUDIO STABILIZER FEATURE Press the MENU button Press the SET or button until the indicator next to STABLE SOUND begins to flash The Audio Stabilizer feature decreases the volume differ ence of very loud and very soft sounds This feature is best used in a night time environment where it may be difficult to hear a whisper but an explosion may wake up someone sleeping The Audi...

Page 11: ...gonal bars on screen No Remote operation Select proper language in the menu options Display is not shown in your language No reception above channel 13 No CATV reception Batteries are weak dead or inserted incorrectly Remote is out of range move closer to TV within 15 feet Make sure Remote is aimed at sensor Confirm there are no obstructions between the Remote and the TV Make sure the power cord i...

Page 12: ...ditions improper unauthorized service improper maintenance modifications or repair by the consumer abuse misuse neglect accident incorrect inline voltage fire flood or any other natural disasters cleaning of video heads if applicable signal reception problems caused by external antenna cable systems or interference This Video Product is only warranted to the original retail purchaser or gift recip...

Page 13: ...13 ENGLISH MEMO ...
Page 14: ...ez pas ces orifices d aération en plaçant l appareil sur une surface molle comme un lit un divan ou un tapis Ne le placez pas non plus près ou au dessus d un radiateur ou d une bouche de chauffage ni sur une étagère ou dans un meuble fermé dont les parois pourraient bloquer la circulation d air autour de l appareil 10 SOURCE D ALIMENTATION Cet appareil ne peut être raccordé qu à la source d alimen...

Page 15: ...lifié si a La fiche ou le cordon d alimentation a été endommagé b Un objet est tombé sur l appareil ou un liquide a pénétré à l intérieur c L appareil a été exposé à la pluie d L appareil ne fonctionne pas convenablement quand vous suivez les instructions Effectuez seulement les réglages expliqués dans le manuel d instructions car des réglages inadéquats peuvent endommager sérieusement l appareil ...

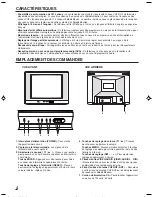
Page 16: ...ants Réception stéréo ou sur un second programme audio SPA Ce téléviseur a été conçu pour la réception et la reproduction des émissions en stéréophonie et celles diffusées avec un second programme audio CARACTÉRISTIQUES EMPLACEMENT DES COMMANDES VUE AVANT VUE ARRIERE 1 Interupteur d alimentation POWER Pour mettre l appareil en hors circuit 2 Capteur de la télécommande Les signaux de la télécommand...

Page 17: ...Touches CH CHANNEL Appuyez sur la touche pour syntoniser un canal supérieur Appuyez sur la touche pour syntoniser un canal inférieur 13 Touche ENTER Appuyez sur cette touche pour choisir ou valider des informations apparaissant à l écran 14 Touche AUDIO SELECT Pour choisir une réception et une reproduction sonore monophonique ou en stéréophonie ou celle provenant d un second programme audio SPA 15...

Page 18: ...llés Si vous êtes abonné à un service de câblodistribution exigeant l utilisation d un convertisseur débrouilleur raccordez le câble coaxial d entrée de 75 ohms au convertisseur débrouilleur Au moyen d un autre câble coaxial de 75 ohms raccordez la prise de sortie du convertisseur débrouilleur à la prise d antenne du téléviseur Suivez les instructions ci dessous Réglez le téléviseur sur le canal d...

Page 19: ...st selectionné Reportez vous à la section sur la MISE EN MÉMOIRE DES CANAUX FONCTIONNEMENT DU TÉLÉVISEUR Sélection directe des canaux câblodistribués Quand l option du menu TV CATV est réglée au mode de câblodistribution CATV les canaux peuvent être captés syntonisés de la façon suivante CH 1 9 Pressez deux fois la touche 0 puis 1 à 9 selon le cas Par exemple pour le canal 2 pressez 002 CH 10 12 P...

Page 20: ...RQUE Contactez votre compagnie de câblodistribution pour déterminer le type de réseau de câblodistribution utilisé dans votre région SYNTONISATION AUTOMATIQUE DES CANAUX POUR AJOUTER EFFACER DES CANAUX DE LA MÉMOIRE Numéro sur ce téléviseur Canal de câblodistribution correspondant ADD CH 012 0 9 ENTER MENU Pressez la touche ENTER pour choisir ADD ou DELETE Si vous avez choisi un canal non mémorisé...

Page 21: ...paraissent parfois pendant le sous titrage C est tout à fait normal surtout si l émission est en direct car alors les sous titres sont créés en direct et il n y a pas assez de temps pour les vérifier Lorsque le décodeur de sous titres est mis en fonction l affichage du volume ou du symbole de la mise en sourdine peut ne pas être visible ou peut interférer avec les sous titres Certains systèmes de ...

Page 22: ... image Augmentation de la dominante rouge Diminution de la brillance des couleurs COULEUR NETTETÉ TEINTE Augmentation de la brillance des couleurs CONTRAST CONTRASTE COLOUR COULEUR BRIGHTNESS LUMINOSITÉ TINT TEINTE SHARPNESS NETTETÉ STABILISATEUR AUDIO Le stabilisateur audio réduit la différence entre les sons très puissants et très légers Ce dispositif est particulièrement utile en soirée lorsqu ...

Page 23: ...0 mesuré à la diagonale 2 5 2 5 W 2 enceintes de 8 ohms pleine gamme 51 mm x 119 mm 2 x 4 11 16 181 canaux à synthétiseur de fréquences à quartz PLL Infrarouges à accès direct 2 piles AAA non comprises VHF 2 13 UHF 14 69 CATV 01 97 5A A 3 98 99 A 2 A 1 14 22 A I 23 36 J W 37 65 AA FFF 66 125 GGG 125 Vidéo Entrée RCA 1 0 V c c 75 ohms Audio Entrée RCA 8dBm 50K ohms Antenne Entrée VHF UHF coaxiale 7...

Page 24: ...ronnementales anormales une réparation incorrectement effectuée par une personne non autorisée un mauvais entretien des modifications ou réparations effectuées par le propriétaire un usage abusif une mauvaise utilisation de la négligence un accident un raccord à un réseau électrique de tension inadéquat un incendie une inondation ou tout autre désastre naturel le nettoyage des têtes vidéo si l app...

Reviews: