background image


15

Hardware Installation Guide for Cisco UCS E-Series Servers

OL-26447-03

  Recommended Safety Practices for Installing Cisco UCS E-Series Servers

Recommended Safety Practices for Installing Cisco UCS 
E-Series Servers

This section describes recommended practices for safe and effective installation of the hardware, and 
includes the following topics:

Safety Recommendations, page 15

Preventing Electrostatic Discharge Damage, page 16

General Guidelines for Installing the E-Series Servers on a Rack, page 16

Maintenance Guidelines for E-Series Servers, page 17

Safety Warnings for E-Series Servers, page 17

Safety Recommendations

To prevent hazardous conditions, follow these safety recommendations while working with this 
equipment: 

Keep tools away from walk areas where you or others could fall over them.

Do not wear loose clothing around the router. Fasten your tie or scarf and roll up your sleeves to 
prevent clothing from being caught in the chassis.

Wear safety glasses when working under any conditions that might be hazardous to your eyes.

Locate the emergency power-off switch in the room before you start working. If an electrical 
accident occurs, shut the power off.

Before working on the router, turn off the power and unplug the power cord. 

Power LED

Green

Status can be one of the following:

Steady—CIMC and CPU are both operating 
normally.

Blinking—CPU is operating normally, and CIMC is 
booting up.

Amber

Status can be one of the following:

Steady—CIMC is operating normally, and the CPU 
is powered down.

Blinking —CIMC is in the process of booting up, 
and the CPU is powered down.

1.

This is memory installed on the DIMM 0 slot.

2.

This is the DIMM 1 slot.

3.

This is the DIMM 2 slot.

Table 9

Double-Wide E-Series Server LEDs (continued)

LED

Color

Indicates

Summary of Contents for UCS E Series

Page 1: ...ardware Requirements page 3 E Series Servers page 7 Understanding the E Series Server LED State page 13 Recommended Safety Practices for Installing Cisco UCS E Series Servers page 15 Installing the E Series Servers page 19 Migrating the E Series Server from an ISR G2 into a Cisco ISR 4451 X page 28 Online Insertion and Removal page 29 Installing or Replacing Hard Disk Drives on the E Series Server...

Page 2: ...e Engine Support added to install the SM E Series Network Compute Engine SM E Series NCE into the Generation 2 Cisco Integrated Services Routers ISR G2 and the Cisco 4451 X Integrated Services Router Cisco ISR 4451 X 2 2 1 Hardware Information for the M2 E Series Servers section on page 5 Single Wide E Series Server refresh Intel Ivy Bridge E3 1105C v2 support added on the UCS E140S M2 single wide...

Page 3: ... E Series Server 6 cores CPU 1 8 GHz clock speed UCS E140DP M1 Double wide E Series Server 4 cores CPU with PCIe 2 0 GHz clock speed UCS E160DP M1 Double wide E Series Server 6 cores CPU with PCIe 1 8 GHz clock speed The following M2 E Series Servers are supported UCS EN120S M2 SM E Series Network Compute Engine SM E Series NCE 2 cores CPU 2 0 GHz clock speed UCS E140S M2 Single wide E Series Serv...

Page 4: ...B to 16 GB Supports DDR3 1333 MHz VLP UDIMM 1 5 V 4 GB and 8 GB 8 GB to 48 GB Supports DDR3 1333 MHz RDIMM 1 35 V 4 GB 8 GB and 16 GB 8 GB to 48 GB Supports DDR3 1333 MHz RDIMM 1 35 V 4 GB 8 GB and 16 GB RAID RAID 0 and RAID 1 RAID 0 RAID 1 and RAID 5 RAID 0 and RAID 1 Storage Type SATA SAS SSD and SED SATA SAS SSD and SED SATA SAS SSD and SED HDD SAS 10K RPM SATA 7200 RPM and SAS SSD Drives1 Supp...

Page 5: ...1 E Series Server 3945 ISR G2 1 E Series Server 3945e ISR G2 1 E Series Server ISR 4451 X 1 E Series Server 1 All hardware drives within the E Series Server must be installed with the same type of storage device either all SAS drives or all SATA drives Table 4 M1 E Series Servers Hardware at a Glance continued Feature UCS E140S M1 Single Wide E Series Server UCS E140D M1 and UCS E160D M1 Double Wi...

Page 6: ...3925 3925e 3945 3945e 4451 X MaximumNumber of E Series Servers or NCE per Router 2911 ISR G2 1 NCE 2921 ISR G2 1 NCE 2951 ISR G2 2 NCEs 3925 ISR G2 2 NCEs 3925e ISR G2 2 NCEs 3945 ISR G2 4 NCEs 3945e ISR G2 4 NCEs ISR 4451 X 2 NCEs 2911 ISR G2 1 E Series Server 2921 ISR G2 1 E Series Server 2951 ISR G2 2 E Series Servers 3925 ISR G2 2 E Series Servers 3925e ISR G2 2 E Series Servers 3945 ISR G2 4 ...

Page 7: ...s Server page 11 Table 6 Supported Cisco EtherSwitch EHWIC and Cisco EtherSwitch Service Modules Cisco EtherSwitch EHWIC Cisco EtherSwitch Service Module EHWIC D 8ESG P EHWIC D 8ESG P EHWIC D 8ESG EHWIC D 8ESG EHWIC 4ESG P EHWIC 4ESG P EHWIC 4ESG EHWIC 4ESG SM D ES3G 48 P SM D ES3 48 P SM D ES2 48 SM ES3G 24 P SM ES3 24 P SM ES2 24 P SM ES2 24 SM ES3G 16 P SM X ES3D 48 P SM X ES3 24 P SM X ES3 16 ...

Page 8: ...s NCE Figure 1 Front Panel of the Single Wide E Series Server and the SM E Series NCE 1 Gigabit Ethernet port 2 Management port 3 Power switch 4 LEDs for HDD1 5 Keyboard Video Mouse KVM port Note Use the KVM connector that is shipped with the E Series Server See the next figure 6 Hard disk drive 1 7 LEDs for HDD0 8 USB 9 Hard disk drive 2 10 Reset switch 284518 PWR HDD1 HDD0 ACT FLT EN KVW USB SYS...

Page 9: ...eries Servers OL 26447 03 E Series Servers The following figure shows the KVM connector that is shipped with the single wide E Series Server Figure 2 KVM Connector 1 USB connector 2 DB15 connector video port 3 DB9 connector serial port 284862 3 2 1 ...

Page 10: ...owing figure shows the internal components of the single wide E Series Server Figure 3 Single Wide E Series Server 1 Memory DIMM slots 2 HDD 3 SD0 Note The SD card in the SD0 card slot contains the Cisco Integrated Management Controller CIMC software and must always be present 4 SD1 284865 1 2 2 3 4 ...

Page 11: ...slot contains the CIMC software and should always be present 7 Gigabit Ethernet ports GE2 and GE3 8 Management port 9 USB ports Each port provides up to 500 mA of current Devices that require higher power such as CD DVD ROM need their own external power 10 Optional HDD2 PCIe assembly or blank slot 11 Hard disk drives HDD0 and HDD1 12 Optional Alternate PCIe assembly with FCoE port Note Use with PC...

Page 12: ...es Servers The following figure shows the internal components of the double wide E Series Server Figure 5 Double Wide E Series Server 1 Memory DIMM slots 2 Optional PCIe assembly Available for HDD2 FCoE port or 4 Gigabit Ethernet ports 3 Hard disk drives HDD0 and HDD1 302317 1 2 3 ...

Page 13: ...us of the hard drive activity Can be one of the following Steady Hard drive is present Blinking Active Off Inactive or there is no power supplied to the CPU HDD1 FLT Amber The CPU is in use Fault is detected on the hard drive Note The SYS LED displays solid green SYS Green Status can be one of the following Solid Operation is normal Note If DRAM is not detected the SYS LED still displays solid gre...

Page 14: ...y or other internal sensors D0A Green Status of the hard drive activity Can be one of the following Steady Hard drive is present Blinking Activity Off Inactive or there is no power supplied to the CPU D0F Amber Fault is detected on the hard drive D1A Green Status of the hard drive activity Can be one of the following Steady Hard drive is present Blinking Active Off Inactive or there is no power su...

Page 15: ...others could fall over them Do not wear loose clothing around the router Fasten your tie or scarf and roll up your sleeves to prevent clothing from being caught in the chassis Wear safety glasses when working under any conditions that might be hazardous to your eyes Locate the emergency power off switch in the room before you start working If an electrical accident occurs shut the power off Before...

Page 16: ...ervice modules and network modules are improperly handled and can result in complete or intermittent equipment failure Always observe the following electrostatic discharge damage ESD prevention procedures when installing removing and replacing the E Series Servers Make sure that the router chassis is electrically connected to earth ground Wear an ESD preventive wrist strap and make sure that it ma...

Page 17: ... Inc Safety Warnings for E Series Servers The following safety warning statements apply to all hardware procedures involving E Series Servers for the Cisco ISR G2 and Cisco ISR 4451 X Translations of these warnings are available in the Cisco Network Modules and Interface Cards Regulatory Compliance and Safety Information document at http www cisco com en US docs routers access interfaces rcsi IOHr...

Page 18: ...connected last Statement 1046 Warning Do not use this product near water for example near a bath tub wash bowl kitchen sink or laundry tub in a wet basement or near a swimming pool Statement 1035 Warning Never install telephone jacks in wet locations unless the jack is specifically designed for wet locations Statement 1036 Warning Never touch uninsulated telephone wires or terminals unless the tel...

Page 19: ... detaching cables detach the end away from the router first Statement 1026 Warning Before opening the chassis disconnect the telephone network cables to avoid contact with telephone network voltages Statement 1041 Warning This equipment must be installed and maintained by service personnel as defined by AS NZS 3260 Incorrectly connecting this equipment to a general purpose outlet could be hazardou...

Page 20: ...lation section on page 20 2 Connect the wrist strap clip to an unpainted portion of the chassis frame to channel unwanted ESD voltages to ground 3 Remove blank faceplates from the slots that you want to use See the Removing the Blank Faceplates section on page 21 4 Prepare the router slot for E Series Server installation See the Preparing the Router Slot for E Series Server Installation section on...

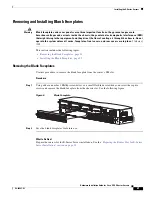
Page 21: ...029 This section includes the following topics Removing the Blank Faceplates page 21 Installing the Blank Faceplates page 22 Removing the Blank Faceplates Use this procedure to remove the blank faceplate from the router s SM slot Procedure Step 1 Using either a number 1 Phillips screwdriver or a small flat blade screwdriver unscrew the captive screws and remove the blank faceplate from the chassis...

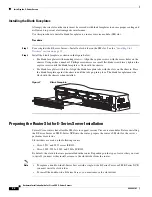
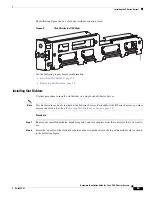
Page 22: ...faceplate tabs with the slots on the chassis Press the blank faceplate against the chassis until the tabs pop into place The blank faceplate must be flush with the chassis when installed Figure 7 Blank Faceplate Preparing the Router Slot for E Series Server Installation Several Cisco routers have flexible SM slots to support various Cisco server modules Before installing the E Series Server or SM ...

Page 23: ... Dividers Use this procedure to install a slot divider in a single wide E Series Server Note Slot dividers are used only in single wide E Series Servers For double wide E Series Servers you must remove the slot divider See Removing Slot Dividers section on page 25 Procedure Step 1 Remove any installed modules blank faceplates and slot adapters from the router slot that you want to use Step 2 Inser...

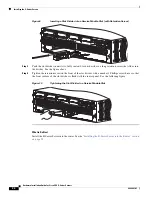
Page 24: ... retention screw on the front of the slot divider with a number 1 Phillips screw driver so that the front surface of the slot divider is flush with the router panel See the following figure Figure 10 Tightening the Slot Divider in a Service Module Slot What to Do Next Install the E Series Server into the router See the Installing the E Series Server into the Router section on page 25 DO NOT REMOVE...

Page 25: ... installed over the slot that you intend to use See the Removing and Installing Blank Faceplates section on page 21 2 Saved the blank faceplates for future use 3 Prepared the slot for the module form factor that you are installing See the Preparing the Router Slot for E Series Server Installation section on page 22 Note For the Cisco 3900 ISR G2 If you are using PoE and you want to install one dou...

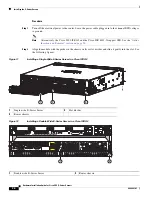
Page 26: ...odule with the guides in the chassis walls or slot divider and slide it gently into the slot See the following figures Figure 11 Installing a Single Wide E Series Server in a Cisco ISR G2 Figure 12 Installing a Double Wide E Series Server in a Cisco ISR G2 1 Single wide E Series Server 2 Slot divider 3 Router chassis 1 Double wide E Series Server 2 Router chassis 302318 1 2 3 284656 CF 0 ISN PVDM ...

Page 27: ...6 Connect the E Series Server to the network and power up the router and E Series Server What to Do Next 1 Load a compatible Cisco IOS image 2 Power on the server 3 Verify that the router recognizes the E Series Server See the Verifying E Series Server Installation section on page 27 Verifying E Series Server Installation Before You Begin Install the E Series Server into the router Load a compatib...

Page 28: ...C and the BIOS firmware images For CIMC firmware installation instructions see the CIMC Firmware Management chapter in the GUI Configuration Guide for Cisco UCS E Series Server Modules Integrated Management Controller on Cisco com If you migrate the E Series Server into the Cisco ISR 4451 X without first updating the CIMC firmware the E Series Server will continuously reset To stop the reset and i...

Page 29: ...ng Down the E Series Server Installed in a Cisco 3900 Series ISR G2 page 30 Restarting the E Series Server Installed in a Cisco 3900 Series ISR G2 page 30 Inserting the E Series Server in a Cisco 3900 Series ISR G2 page 30 Step 3 Server scope cimc From the CIMC CLI enters the CIMC command mode Note Enter the commands in Step 3 through Step 8 from the E Series Server Step 4 Server cimc scope firmwa...

Page 30: ...he E Series Server in a Cisco 3900 Series ISR G2 The Cisco 3900 ISR G2 that is up and running can detect when an E Series Server is inserted in the SM slot and will automatically provide power to the server Command or Action Purpose Step 1 enable Example Router enable Enables privileged EXEC mode Enter your password if prompted Step 2 ucse slot shutdown Example Router ucse 4 shutdown Shuts down th...

Page 31: ...nal issue the hw module subslot slot 0 oir start command The console displays the module s changing state Example Router hw module subslot 1 0 oir start Command or Action Purpose Step 1 enable Example Router enable Enables privileged EXEC mode Enter your password if prompted Step 2 ucse subslot slot 0 shutdown Example Router ucse subslot 1 0 shutdown Shuts down the E Series Server gracefully Note ...

Page 32: ...rd disks and provides limited fault tolerance The double wide E Series Servers support adding a hot spare drive under RAID 1 If one of the disk drives under RAID 1 fails and there is a hot spare drive installed the system automatically rebuilds the disk image onto the hot spare drive The hot spare drive replaces the failed drive as the mirrored drive under RAID 1 To maintain fault tolerance you mu...

Page 33: ...npainted portion of the chassis frame to channel unwanted ESD voltages to ground Step 2 Turn off power to the router Note Alternatively the Cisco 3900 ISR G2 and the Cisco ISR 4451 X support OIR See the Online Insertion and Removal section on page 29 Step 3 Using either a number 1 Phillips screwdriver or a small flat blade screwdriver unscrew the captive screws on the faceplate and remove the cove...

Page 34: ...r Step 4 Optional If the slot is empty use the screwdriver to loosen the screws on the bracket and then remove the bracket see the following figure Go to Step 7 1 Hard disk drive 2 Hard disk drive assembly 3 Cover faceplate 4 Captive screws on hard disk drive assembly 284679 0 1 SERIAL MIC SD1 SD0 VGA UCS EXXX K9 MX PWR RST 1 9 M0 M1 M2 HOT D0F D0A D1F D1A D2F D2A ACT STS GE2 GE3 IMC EN HDD2 HDD1 ...

Page 35: ...lide out the hard disk drive Step 7 Slide the new hard disk drive into the E Series Server until it clicks into place Step 8 Tighten the captive screws on the new hard disk drive assembly Make sure that the HDDs are firmly secure to the carrier to avoid rattling during operation Step 9 Replace the faceplate Step 10 Restart the E Series Server Step 11 Configure the new HDD as the new hotspare disk ...

Page 36: ...d then install the new one See the following topics for more information PCIe Assembly page 36 Removing the PCIe Assembly page 37 Installing the PCIe Assembly page 38 PCIe Assembly The following figure shows the PCIe Assembly which consists of a PCIe card a flex assembly which connects the PCIe slot to the motherboard and a plastic bracket which slides over the end of the PCIe card Figure 16 PCIe ...

Page 37: ...co ISR 4451 X support OIR See the Online Insertion and Removal section on page 29 Step 3 Using either a number 1 Phillips screwdriver or a small flat blade screwdriver unscrew the captive screws on the faceplate Loosen the cover faceplate and remove it see the following figure Save the screws Figure 17 Removing the PCIe Assembly Step 4 Remove the M3 screw holding the flex assembly in place and sav...

Page 38: ...age 37 Step 4 Slide the plastic PCIe support over the end of the PCIe card Step 5 Reconnect the PCIe flex assembly to the motherboard Be careful that you do not stress any connector contacts Step 6 Reinstall the M3 screw securing the PCIe assembly Step 7 Install the screws to secure the plastic PCIe card support Step 8 Tighten the PCIe card faceplate screws Step 9 Secure the PCIe card to the facep...

Page 39: ...ure to hazardous voltages and currents inside the chassis they contain electromagnetic interference EMI that might disrupt other equipment and they direct the flow of cooling air through the chassis Do not operate the system unless all cards faceplates front covers and rear covers are in place Statement 1029 This section includes the following topics Memory DIMM Location page 39 Removing the Memor...

Page 40: ...M Location in a Double Wide E Series Server Removing the Memory DIMM Procedure Step 1 Connect your wrist strap clip to an unpainted portion of the chassis frame to channel unwanted ESD voltages to ground Step 2 Turn off power to the router Note Alternatively the Cisco 3900 ISR G2 and the Cisco ISR 4451 X support OIR See the Online Insertion and Removal section on page 29 Step 3 Locate the DIMM on ...

Page 41: ...istatic bag to protect it from ESD damage Installing the Memory DIMM For information about the memory on the router see the appropriate router documentation For information about the memory on the E Series Server see the requirements of the installed operating system Note The single wide E Series Servers support up to 16 GB of DDR3 memory DIMMs The double wide E Series Servers support up to 48 GB ...

Page 42: ...und Step 2 Turn off power to the router Note Alternatively the Cisco 3900 ISR G2 and the Cisco ISR 4451 X support OIR See the Online Insertion and Removal section on page 29 Step 3 Locate the DIMM connector See the Memory DIMM Location section on page 39 Note The DIMM connectors on the double wide E Series Servers are positioned at an angle therefore make sure that you insert the DIMM at approxima...

Page 43: ...s Server make sure that you retain the original Certificate of Authenticity COA label The COA is the label from Microsoft with the code that enables their windows software After you return the server Cisco Systems cannot retrieve the COA label from the returned server The COA label is attached to the inside half of a plastic pull out label tray To remove the COA label cut away the half of the labe...

Page 44: ...dable Cisco Integrated Management Controller Cisco Integrated Management Controller CIMC is a separate management module built into the motherboard CIMC is the management service for the E Series Servers You can use a web based GUI or SSH based CLI to access configure administer and monitor the server For more information on CIMC see the GUI Configuration Guide for Cisco UCS E Series Server Integr...

Page 45: ...ools For more information about installing and connecting the Cisco 2900 series and Cisco 3900 ISRs see the Cisco 3900 Series and Cisco 2900 Series Hardware Installation Guide For more information about installing and connecting the Cisco ISR 4451 X see the Hardware Installation Guide for Cisco 4451 X Integrated Services Router For regulatory compliance and safety information see the Cisco Network...

Page 46: ...46 Hardware Installation Guide for Cisco UCS E Series Servers OL 26447 03 Related Documentation ...

Reviews: