


See
for more information about the power switch.
b) Follow Steps 4 through 7 to install the new network module.
c) Power on the chassis by moving the power switch to the ON position.
The state for the new network module is
OIR Failed
.
d) To change the status of the network module to
Online
, reboot the chassis. See the "Rebooting the Firepower 4100/9300
Chassis" topic in the System Administration chapter in the
for your software version.
Step 2
To remove and replace an existing network module, do one of the following:
a) Save your configuration.
b) Power down the chassis by moving the power switch to the OFF position (if removing a network module that does
not
support hot swapping).
See
for more information about the power switch.
c) Bring the network module offline using the appropriate CLI command (if removing a network module that
supports
hot swapping). All network module configuration is saved. See the “Taking a Network Module Offline or Online”
topic in the Security Module/Engine Management chapter in the
for your software version.
d) Continue with Step 3.
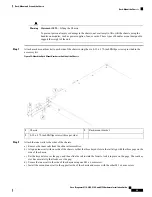
Step 3
To remove a network module from the chassis, loosen the captive screw on the lower left side of the network module
and pull out the handle that is connected to the screw. This mechanically ejects the network module from the slot.
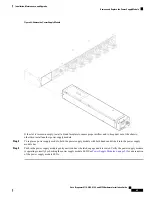
Figure 41: Remove the Network Module
If the slot is to remain empty, install a blank faceplate to ensure proper airflow and to keep dust out of the chassis;
otherwise, install another network module.
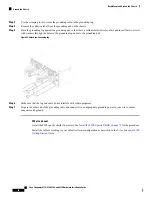
Step 4
To replace a network module, hold the network module in front of the network module slot on the right of the chassis
and pull the network module handle out.
Step 5
Slide the network module into the slot and push it firmly into place until the handle is flush with the front of the network
module.
Cisco Firepower 4110, 4120, 4140, and 4150 Hardware Installation Guide
57
Installation, Maintenance, and Upgrade
Install, Remove, and Replace the Network Module


