background image

4

Assign IP Information to the Hub

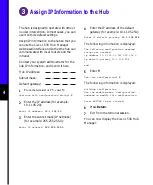
The hub is designed to operate with little or 
no user intervention. In most cases, you can 
use it with its default settings.

Assign IP information to the hub so that you 
can use the Cisco 1538 Hub Manager 
web-based interface and so that the hub can 
communicate with local routers and the 
intranet. 

Contact your system administrator for the 
hub IP information, and record it here.

Hub IP address:

Subnet mask:

Default gateway:

1

From the terminal or PC, enter Y

:

Continue with configuration dialog? 

Y

2

Enter the IP address (for example: 
10.1.105.20):

Enter IP address: 

10.1.105.20

3

Enter the subnet mask (IP netmask) 
(for example: 255.255.255.0):

Enter IP netmask: 

255.255.255.0

4

Enter the IP address of the default 
gateway (for example: 10.1.105.254):

Enter IP default gateway: 

10.1.105.254

The following information is displayed:

The following configuration command 

script was created:

ip address 10.1.105.20 255.255.255.0

ip default-gateway 10.1.105.254

!

end

5

Enter Y:

Use this configuration? 

Y

The following information is displayed:

Building configuration...

Use the enabled mode ‘configuration’ 

command to modify this configuration.

Press RETURN to get started.

6

Press Return.

7

Exit from the terminal session.

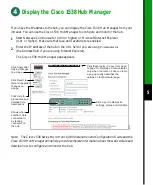
You can now display the Cisco 1538 Hub 
Manager.

Summary of Contents for 1538 series

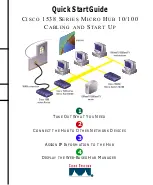
Page 1: ...OUT WHAT YOU NEED CONNECT THE HUB TO OTHER NETWORK DEVICES ASSIGN IP INFORMATION TO THE HUB DISPLAY THE WEB BASED HUB MANAGER 1 2 3 4 Quick Start Guide CISCO 1538 SERIES MICRO HUB 10 100 CABLING AND START UP ...

Page 2: ...1 ...

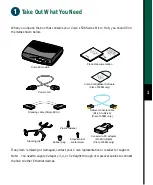
Page 3: ... hub to other Ethernet devices Cisco Micro Hub Stacking clip Rubber plug Product documentation Cisco ConfigMaker Software Cisco 1538M only Stacking cable 50 pin SCSI Rollover console cable RJ 45 to RJ 45 Cisco 1538M only Console to PC adapter RJ 45 to DB 9 Cisco 1538M only Plastic fastener Standard slot metal screw PWR 1 2 3 4 10 MBPS COL A CT 100 MBPS COL A CT 5 8 7 6 Power cord I n s t a l l a t...

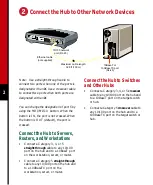
Page 4: ... of port 5 by using the MDI MDI X button When the button is IN the port is not crossed When the button is OUT default the port is crossed Connect the Hub to Servers Routers and Workstations Connect a Category 3 4 or 5 straight through cable to any 10 100 port on the hub and to a 10BaseT port on the workstation server or router Connect a Category 5 straight through cable to any 10 100 port on the h...

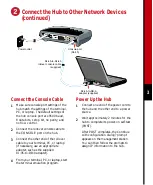
Page 5: ...aud 8 data bits 1 stop bit no parity and no flow control 2 Connect the rollover console cable to the CONSOLE port on the hub 3 Connect the other end of the rollover cable to your terminal PC or laptop if necessary use an appropriate adapter such as the supplied RJ 45 to DB 9 adapter 4 From your terminal PC or laptop start the terminal emulation program Power Up the Hub 1 Connect one end of the pow...

Page 6: ...er the IP address for example 10 1 105 20 Enter IP address 10 1 105 20 3 Enter the subnet mask IP netmask for example 255 255 255 0 Enter IP netmask 255 255 255 0 4 Enter the IP address of the default gateway for example 10 1 105 254 Enter IP default gateway 10 1 105 254 The following information is displayed The following configuration command script was created ip address 10 1 105 20 255 255 255...

Page 7: ...s Note The Cisco 1538 Series Micro Hub 10 100 Installation and Configuration Guide and the Cisco 1538 Hub Manager online help provide complete information about the web console and describe how to configure and monitor the hub Click Apply after making changes on a page Click Revert to discard unapplied changes on a page 15374 Click these topics to move from page to page On Netscape Communicator on...

Page 8: ...audi Arabia Scotland Singapore South Africa Spain Sweden Switzerland Taiwan ROC Thailand Turkey United Arab Emirates United States Venezuela AccessPath Any to Any AtmDirector the CCIE logo CD PAC Centri the Cisco Capital logo CiscoLink the Cisco Management Connection logo the Cisco NetWorks logo the Cisco Powered Network logo the Cisco Press logo the Cisco Technologies logo ClickStart ControlStrea...

Reviews: