2-12
Cisco Aironet 1130AG Series Access Point Hardware Installation Guide
OL-6226-02
Chapter 2 Installing the Access Point
Mounting the Access Point Below a Suspended Ceiling
Mounting the Access Point Below a Suspended Ceiling
before beginning the mounting process.
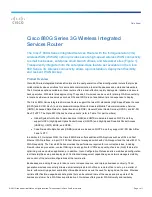
Figure 2-7
Adjustable T-Rail Clips
Follow these steps to mount your access point on a suspended ceiling:
Step 1
Decide where you want to mount the access point on your suspended ceiling.
Step 2
Select the appropriate adjustable T-rail clip for your suspended ceiling and open the clip to the maximum
(see
Step 3
Place the T-rail clip over the T-rail and close it (see
) to the appropriate (A, B, or C) detent.
Step 4
Tighten the two T-rail locking screws to prevent the T-rail clip from sliding along the T-rail.
Step 5
Observe the T-rail width detent letter (A, B, or C) that corresponds to the T-rail width.
Step 6
Align the corresponding (A, B, or C) holes on the mounting plate over the T-rail mounting plate holes.
Step 7
Hold the mounting plate and insert a 6 x 32 x 1/4 in. flat head screw into each of the four corresponding
(A, B, or C) holes and tighten.
1
T-rail locking screws
3
T-rail width detents (A, B, or C)
2
Mounting plate screw holes
121758
3
3
1
1
2
2
2
2
CEILING
GRID
WIDTH
38
24
15
A
B
C
1-1/2
15/16
9/16
MM
INCH
CEILING
GRID
WIDTH
38
24
15
A
B
C
1-1/2
15/16
9/16
MM
INCH