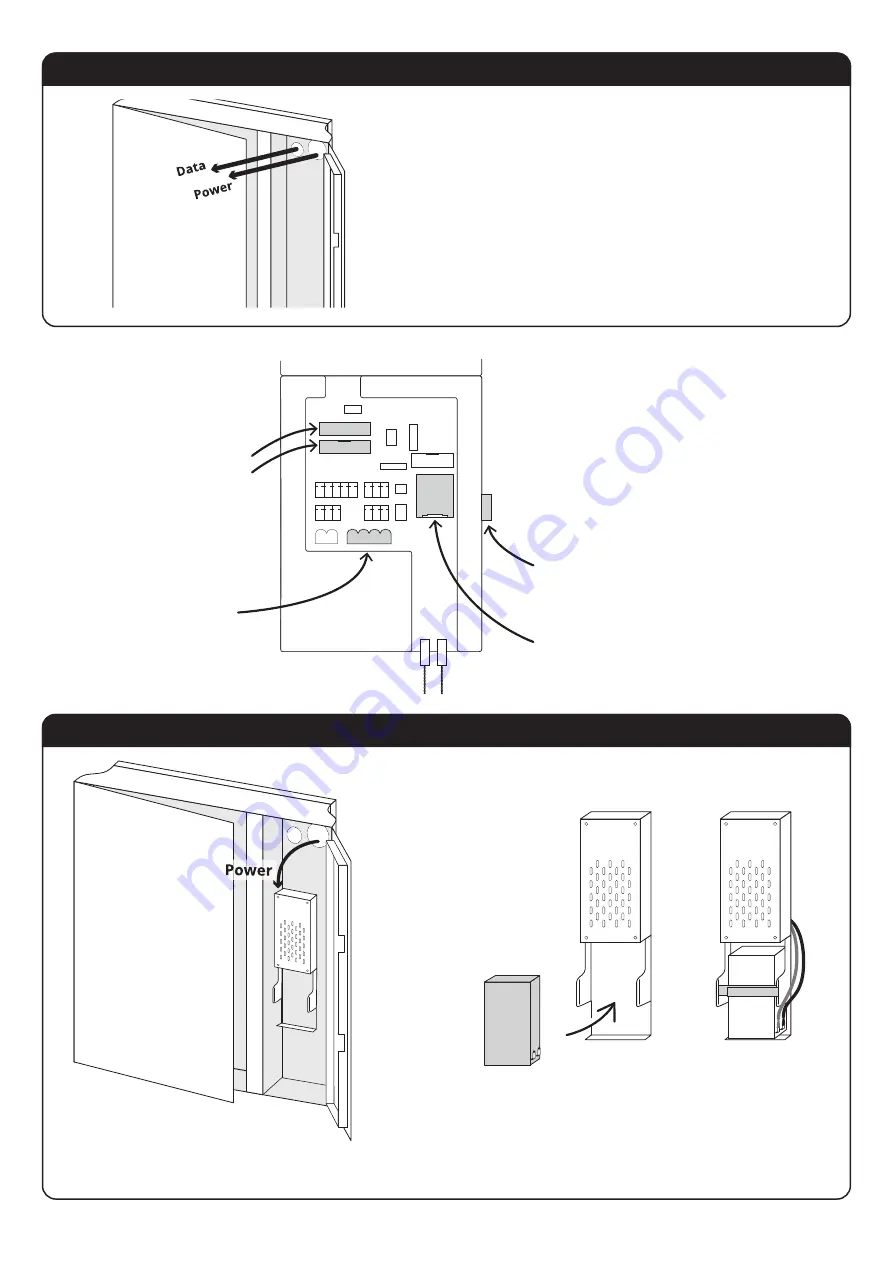
CIC Torus 100 Installation Instructions Manual Download Page 8

Bring in the Cables

Check all Connections

Connect Power and Backup Battery

Now that the cabinet is secured to the 

wall, you can bring the network cable (and 

power if not using POE) into the cabinet. 

Follow this diagram and make sure all of 

the cabling is plugged in securely to the 

back of the control unit. 

KSP Ribbon Cable/s

These ports are interchangeable

Torus 100 will have 2 cables

Power cable

Green Phoenix connector

Ground

This may be on the other side.

Ethernet

Door Solenoid

Door Sensor

If you are not using POE, connect the power cable to the PSU

Retrieve the backup battery from the accessories box and insert 

it beneath the PSU. Attach the red wire to the postive terminal 

and the black wire to the negative terminal.

Secure battery in place with velcro strap. 

TORUS 

Installation Guide          

8

Summary of Contents for Torus 100

Page 1: ...Installation Guide For assistance please email the manufacturer at support torus technology com Diagram above is shown with optional reader attached...

Page 2: ...ner of all Torus and CIC trademarks reproduced in this document Other products brands trademarks referenced are not the property of CIC Technology POWER Cabinet is an electronic device It can be power...

Page 3: ...are not supplied with the Torus cabinet Each fastener must hold at least 50lbs 20kgs and be appropriate for the wall substrate Mounting holes Fasteners 10mm 15mm Tools Required Power Spirit Level wit...

Page 4: ...ncludes an additional strap to support the weight of the keypanel has 2 ribbon cables that connect to the Control Unit Accessories Box Accessories Override Key Backup Battery 12V 7AH Screws Washers 4...

Page 5: ...that are run through the wall can enter the cavity behind the bracket at any point The mounting bracket is connected but not secured to the back of the cabinet Gently and carefully tilt the cabinet fo...

Page 6: ...Use the screws and washers provided to secure the cabinet to the bracket Lift the cabinet onto the mounting bracket There are two pins at the top of the bracket that will locate into keyhole slots in...

Page 7: ...ure the cabinet to the bracket using the screws and washers provided Access is limited around the top left screw so you will need to use the opended spanner wrench With the keypanel lowered check that...

Page 8: ...ol unit KSP Ribbon Cable s These ports are interchangeable Torus 100 will have 2 cables Power cable Green Phoenix connector Ground This may be on the other side Ethernet Door Solenoid Door Sensor If y...

Page 9: ...ave been made If not you will be unable to progress to the next step Enter the provisioning key A secure connection will be made between the cabinet and the customer s software account Congratulations...

Page 10: ...control unit Use the override key to open the right hand door If the cabinet is already in a powered on state make sure you gracefully shut it down rst 1 Login as a cabinet admin 2 Tap settings 3 Tap...

Page 11: ...485 The cabinet is capable of accepting inputs from Wiegand or OSDP devices Every reader is di erent so follow the manufacturer s instructions and connect it to the appropriate point on the control un...

Reviews: