background image

26

6. PCB photo

0151800113A

SW01

SW03

SW07

LED7

LED3

LED4

LED2

LED1

LED5

Summary of Contents for CA43BV-V5J1H Series

Page 1: ...VERSION A DATA Aug 12th 2016 SEVICE MANUAL AHU VALVE BOX ...

Page 2: ...ts 1 General Information 1 2 Specification 4 3 Dimension 5 4 Wiring diagram 7 5 Installation 8 6 PCB photo 26 7 Dip switch setting 27 8 Failure code 29 9 Troubleshooting 30 APPENDIX Sensor resistance table 34 ...

Page 3: ...grated into the valve box 2 Optional insttion location can choose filting or nailed to the wall 3 Control box location changeable Control box can be separately with EXV box 2 meter Control box can be front or back of EXV box easy installation 4 Broad capacity 5 20HP 5 High Compatible Same PCB board with IMVF indoor easy operation and service Same wired controller can be used with IMVF indoor unit ...

Page 4: ... 10HP 28KW 10HP Connected AHU capa 20HP 56kw AH1 560A MRV III C PLUS MRV IV C 1 4 Configuration AH1 280A Different Valve Same Control Parts EXV part Control Part Sensor and wire Controller OR AH1 560A OR Outdoor series Outdoor model IMVFIII C 2200V CA43BV V5J1H IMVFIII C 460V CA43BV V6J1H The AHU valve box can connect with the following outdoor units ...

Page 5: ...e and contents VP 3 pipe valve box 1 1 to 1 Cooling capacity Cooling capacity 99KW Three digits unit 100W A First generation MS IMVF SUPER MATCH valve box 2 1 to 2 Cooling capacity Cooling capacity 99KW Three digits 000 unit HP B Second generation AH IMVF AHU valve box 3 1 to 3 Cooling capacity Cooling capacity is not defined Three digits 000 C Third generation 4 1 to 4 ...

Page 6: ...09 667 365 249 Material Galvanized steel Galvanized steel Color Grey Grey Weight kg 6 9 Shipping Weight kg 8 12 Liquid pipe mm 9 52 Main 12 7 12 7 Main 9 52 15 88 Gas pipe mm 25 4 Main 22 2 19 05 28 58 Main 25 4 22 22 Pipe connection method Flare connection and welding Flare connection and welding Branch box Indoor Max Single pipe length m 5 5 Branch box indoor max drop m 5 5 Height Drop between b...

Page 7: ...5 3 Dimension AH1 280A 240 226 179 166 56 44 13 195 147 12 36 49 82 9 155 476 419 350 15 14 84 86 152 80 195 163 78 ...

Page 8: ...6 AH1 560A 13 59 161 266 296 309 433 501 597 553 14 84 78 87 192 201 99 266 193 12 39 83 9 ...

Page 9: ...C2 TC1 ON SW07 Outdoor unit Controller 1 2 3 4 5 6 7 8 ON SW03 Power Input 220V FAN Speed AC 220V Output DC 12V 1 2 3 4 5 6 7 8 6 3A 250VAC FUSE1 PMV1 M P Q A B C L H M L N V1 V2 D1D2 P1 P2 N CN24 CN22 TA CN31 CN33 CN8 Input ON OFF Output Dry contact Output AC 220V K1 K2 CN13 CN12 PMV2 M ...

Page 10: ...ns in this manual for proper installation The safety considerations stated below is divided into Warning and Attention The matters on severe accidents caused from wrong installation which is likely to lead to death or serious injury are listed in Warning However the matters listed in Attention are also likely causing the severe accidents In general both of them are the important items related to t...

Page 11: ... use the accompanied spare parts or specific parts If not water leakage electric shocks fire accidents or refrigerant leakage might be caused During installation if refrigerant leakage occurs ventilation measures should be taken for the refrigerant gas might generate harmful gases upon contacting the flame After installation check if any refrigerant leakage exists If the refrigerant gas leaks in t...

Page 12: ...ered After installation all cassette concealed connection kites should be trial tested After the proper operation of the machine other fitments can be made When installing the connection kit please fix the box and connecting pipes in an efficient way to avoid shaking when changing connection kit If the ambient humidity bigger than 80 when the water discharge hole be blocked or the filter becomes d...

Page 13: ...5 A place where small animals inhabit whose contacting the inner electrical components may cause faults smoking outbreak of a fire etc 6 A coastal place with high salinity and a place with great variation in voltage such as a factory which may cause faults to vehicles and ships Install after making sure that the type of the refrigerant used is R410A If any other type of refrigerant is used the mac...

Page 14: ...n to the following during installation Check them again after completion 1 Inspection items after installation Inspection item Defect Inspection column If the installation of connection kit is secure Falling off vibration and noise If gas leakage inspection is completed No heating cooling If complete insulation is achieved refrigerant piping and tubing connections Water leakage If the voltage of t...

Page 15: ...be changed as show in 3 connection kit installation When starting up stop defrosting and oil returning in heating mode the 4 way valve will veer and create noise This kind of noise is normal for the running of connection kit A noise may be emitted by the connection kit as a result of control during operation or stopping of an indoor unit If it is installed in the ceiling where it is exposed take a...

Page 16: ...must be arranged on the side of the electrical box 500 500 5 4 2 Preparation before installation 1 Connection kit dimension mm Max 5000 Electrical box Connection kit Dividually mounted mm AH1 280A 147 226 163 195 80 476 419 350 ...

Page 17: ...15 2 Lifting dimension of connection kit mm AH1 280A AH1 560A 37 71 AH1 560A 161 296 201 99 266 597 553 433 385 70 389 467 70 472 Fig 1 ...

Page 18: ...ectrical appliance box Rotate 180 to install the top plate Install the electrical appliance box Install the cover of the electrical appliance box Fig 1 Electrical appliance removal 1 1 3 3 2 2 5 5 7 7 6 6 Thick cement plate Foundation bolt Long nuts or turnbuckle Lifting bolt Connection kit Lifting tools Less than 1m Less than 1m Note All the parts in the figure are purchased locally See the Fig 1...

Page 19: ...hermal insulation material that can sustain temperature over 120 C Enhance the thermal insulation material based on the installation environment The indicators are shown below For RH75 80 at 30 C over 15 mm thick For over 80 at 30 C over 20 mm thick If not reinforced the thermal insulation material surface is prone to condensation Please refer to the equipment design data for further details Fig 2...

Page 20: ...ight drop between indoor units please refer to the installation instructions or technical data attached to the outdoor unit Outdoor Connection Kit Connection Kit Indoor Electrical box Max length 5m Max length 5m The high pressure gas pipe suction gas pipe liquid pipe must be provided with reliable thermal insulation In the absence of thermal insulation liquid leakage may happen The outdoor unit is...

Page 21: ...ut of the flare to a position where the tightening torque sharply increases The tightening angle for the position where the tightening torque sharply increases Table 2 After the work make sure there is no air leakage Tube size Tightening torque N m Machined flare size A mm Flare shape Ø6 35 14 2 17 2 8 7 9 1 R 0 4 A 90 Ø9 52 32 7 39 9 12 8 13 2 Ø12 7 49 5 60 3 16 2 16 6 Ø15 88 61 8 75 4 19 3 19 7 ...

Page 22: ... if it contains fluorine it will even cause detrimental effects to the refrigerant system such as refrigerant oil deterioration Please do not use phosphor copper for welding material BCup 2 Note Excessive tightening will result in cracking at the flare and refrigerant leakage To weld the refrigerant pipe please make nitrogen replacement 1 or send nitrogen 2 into the refrigerant pipe while welding ...

Page 23: ... locally for the upper flare nut connections shall be wrapped upwards 4 Ensure that joints of the insulation materials are installed upwards See Fig 2 Additional refrigerant charging Additional refrigerant charging Charge the additional refrigerant of the liquid pipe between outdoor units and connection kits between connection kits and indoor units according to the Operation Installation Manual of...

Page 24: ...iring should be out of contact with the high temperature sections of tubing as to avoid melting the insulating layer of cables which may cause accidents After connected to the terminal tier the tubing should be curved into be a U type elbow and fastened with the pressing clip Controller wiring and refrigerant tubing can be arranged and fixed together The machine can t be powered on before electric...

Page 25: ...kit mm2 Connection kit connection kit mm2 10 2 20 20 20A 30mA 0 1S or below 2cores 0 75 2 0 mm2 shielded line 10 and 15 3 5 25 30 30A 30mA 0 1S or below 15 and 22 5 5 30 40 40A 30mA 0 1S or below 22 and 27 10 40 50 50A 30mA 0 1S or below Power cable and communication wire must be fixed firmly Each connection kit must be earthed well When power cable exceeds the range thicken it appropriately Shiel...

Page 26: ...essively they may be damaged Refer to the following table for tightening torques of terminal screws 7 Power line is forbidden to the communication terminal block because it will damage the circuit control board 8 Wiring of communication lines shall be within the following scope Exceeding the limit will possibly lead to abnormal communication Dimension of terminal screw Tightening torque N m M3 5 t...

Page 27: ...wer lines with crimping pliers to prevent them from falling off under the effect of external force 1 Don t route communication lines and power lines together Otherwise it may cause malfunction or fault due to electrical disturbance 2 Make sure that ground wires are properly crimped Otherwise grounding may be ineffective 3 Required input and output signals when the field configuration Name Input si...

Page 28: ...26 6 PCB photo 0151800113A SW01 SW03 SW07 LED7 LED3 LED4 LED2 LED1 LED5 ...

Page 29: ...cted indoor unit s cooling capacity 14kW ON ON OFF OFF 14kW connected indoor unit s cooling capacity 16 8kW ON ON OFF ON 16 8kW connected indoor unit s cooling capacity 22 4kW ON ON ON OFF 22 4kW connected indoor unit s cooling capacity 28kW ON ON ON ON 28kW connected indoor unit s cooling capacity 56kW 2 SW03 is used for valve box address setting SW03 Definition Instruction SW03_1 Address setting...

Page 30: ...ication address 64 c In the system when PCB code of indoor unit is 0010451181A you must use dip switch for address setting SW03_1 ON SW03_2 OFF SW03_3 SW03_4 SW03_5 SW03_6 SW03_7 SW03_8 are address No 2 Be sure to close the cover of the electrical cabinet after setting 4 CN41 CN42 CN43 CN44 plug explanation Plug Definition Instruction CN41 Set address by wired controller OFF Set the address with w...

Page 31: ... you can according the flicker times to check the failure reason See the below table Connection kit failure code list Failure code at wired controller PCB LED5 connection kit Fault Descriptions 01 1 Fault of connection kit ambient temp transducer TA 02 2 Fault of connection kit pipe temp transducer TC1 03 3 Fault of connection kit pipe temp transducer TC2 05 5 Fault of connection kit EEPROM 06 6 F...

Page 32: ... deviation Is within 3 Replace sensor No If sensor terminal is fixed well Yes Replace connecting sensor Yes Replace valve box PCB No 1 3 Sensor fault Power off and check if the EEPROM is fixed well Replace connection kit PCB Yes Reconnet No 5 Fault of connection kit EEPROM ...

Page 33: ... of indoor unit is fixed well Reconnect No Check if the communication line is damaged or short circuit Yes Replace communication wire Yes No Replace connection kit PCB 6 Fault of communication between Connection kit outdoor units ...

Page 34: ...ll Reconnect No Check if the communication line is damaged or short circuit Yes Replace communication wire Yes No If it is normal after changed the wired controller 7 Fault of communication between connection kit and wired control No Replace connection kit PCB ...

Page 35: ...3 No 8Fault of connection kit water drainage Check if the valve box address is duplication with indoor units Resetting address Yes 9 Fault of duplicate connection kit address Yes Referring to the outdoor unit troubleshooting methods 20 Outdoor unit fault ...

Page 36: ...escription PCB socket Color Characteristic AH1 280A AH1 560A 0150401850 Ambient temp sensor CN20 Green R25 23KΩ 3 B25 50 4200K 3 0150401849 TC1 sensor CN18 Green R25 10KΩ 3 B25 50 3700K 3 0150401848 TC2 sensor CN19 Black R25 10KΩ 3 B25 50 3700K 3 ...

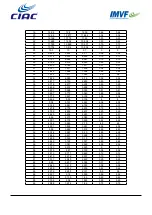
Page 37: ...096 5 62 5 62 10 52 149 49 409 46 669 5 55 5 55 9 49 51 46 941 44 372 5 47 5 47 8 47 016 44 607 42 198 5 4 5 4 7 44 659 42 4 40 141 5 33 5 33 6 42 433 40 315 38 197 5 25 5 25 5 40 332 38 345 36 358 5 18 5 18 4 38 346 36 482 34 618 5 11 5 11 3 36 472 34 723 32 974 5 04 5 04 2 34 7 33 059 31 418 4 96 4 96 1 33 027 31 487 29 947 4 89 4 89 0 31 445 30 28 555 4 82 4 82 1 29 951 28 594 27 237 4 75 4 75 ...

Page 38: ...3 94 41 5 564 5 35 5 136 4 4 42 5 36 5 151 4 942 4 06 4 06 43 5 166 4 961 4 756 4 13 4 13 44 4 978 4 778 4 578 4 19 4 19 45 4 799 4 603 4 407 4 25 4 25 46 4 625 4 434 4 243 4 31 4 31 47 4 46 4 273 4 086 4 38 4 38 48 4 301 4 118 3 935 4 44 4 44 49 4 148 3 969 3 79 4 5 4 5 50 4 001 3 826 3 651 4 56 4 56 51 3 86 3 689 3 518 4 63 4 63 52 3 724 3 557 3 39 4 69 4 69 53 3 594 3 431 3 268 4 75 4 75 54 3 4...

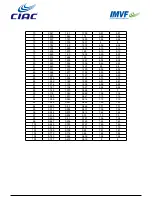
Page 39: ...69 6 69 85 1 285 1 204 1 123 6 75 6 75 86 1 249 1 169 1 089 6 81 6 81 87 1 214 1 136 1 058 6 88 6 88 88 1 181 1 104 1 027 6 94 6 94 89 1 148 1 073 0 998 7 7 90 1 116 1 042 0 968 7 06 7 06 91 1 085 1 013 0 941 7 13 7 13 92 1 056 0 985 0 914 7 19 7 19 93 1 026 0 957 0 888 7 25 7 25 94 0 998 0 93 0 862 7 31 7 31 95 0 971 0 904 0 837 7 38 7 38 96 0 944 0 879 0 814 7 44 7 44 97 0 918 0 854 0 79 7 5 7 5...

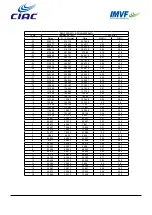
Page 40: ...154 983 148 84 3 96 3 96 10 151 866 146 153 140 44 3 91 3 91 9 143 184 137 87 132 556 3 85 3 85 8 135 04 130 096 125 152 3 8 3 8 7 127 398 122 799 118 2 3 75 3 75 6 120 225 115 946 111 667 3 69 3 69 5 113 492 109 51 105 528 3 64 3 64 4 107 168 103 462 99 756 3 58 3 58 3 101 228 97 779 94 33 3 53 3 53 2 95 647 92 437 89 227 3 47 3 47 1 90 403 87 415 84 427 3 42 3 42 0 85 472 82 691 79 91 3 36 3 36 ...

Page 41: ...736 11 424 2 66 2 66 41 11 548 11 244 10 94 2 7 2 7 42 11 072 10 776 10 48 2 74 2 74 43 10 617 10 329 10 041 2 79 2 79 44 10 184 9 904 9 624 2 83 2 83 45 9 77 9 497 9 224 2 88 2 88 46 9 376 9 11 8 844 2 92 2 92 47 8 999 8 74 8 481 2 96 2 96 48 8 639 8 387 8 135 3 01 3 01 49 8 296 8 05 7 804 3 05 3 05 50 7 967 7 728 7 489 3 09 3 09 51 7 654 7 421 7 188 3 14 3 14 52 7 354 7 127 6 9 3 18 3 18 53 7 06...

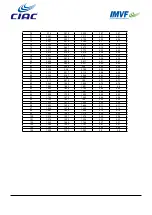
Page 42: ... 4 58 85 2 246 2 147 2 048 4 63 4 63 86 2 177 2 08 1 983 4 67 4 67 87 2 11 2 015 1 92 4 71 4 71 88 2 045 1 952 1 859 4 76 4 76 89 1 983 1 892 1 801 4 8 4 8 90 1 923 1 834 1 745 4 84 4 84 91 1 865 1 778 1 691 4 89 4 89 92 1 809 1 724 1 639 4 93 4 93 93 1 755 1 672 1 589 4 98 4 98 94 1 702 1 621 1 54 5 02 5 02 95 1 652 1 572 1 492 5 06 5 06 96 1 602 1 524 1 446 5 11 5 11 97 1 554 1 478 1 402 5 15 5 ...

Page 43: ...CARRIER INTERAMERICA CORPORATION MIAMI FLORIDA USA C CIAC 2016 ...

Reviews: