background image

INSTALLATION

ELECTRIC SHOCK HAZARD. Disconnect all power
before installing or servicing heater. Failure to do so
could result in personal injury or property damage.
Heater must be installed by a qualified person in accor-
dance with the National Electrical Code, NFPA 70.

1.

Before installing, unpack and check your TM series immersion
heater for any damage that may have occurred during shipment.
Report any claims to you carrier if damage has ocurred in ship-
ment. 

Do not operate damaged equipment. Consult

factory for instructions.

2.

Check to ensure that the line voltage is the same as that stamped 
on the nameplate. Verify wattage and capacity versus the require-
ments at installation site.

3.

Do not bend the heating elements. If bending is necessary, 
consult factory.

4. IMPORTANT:

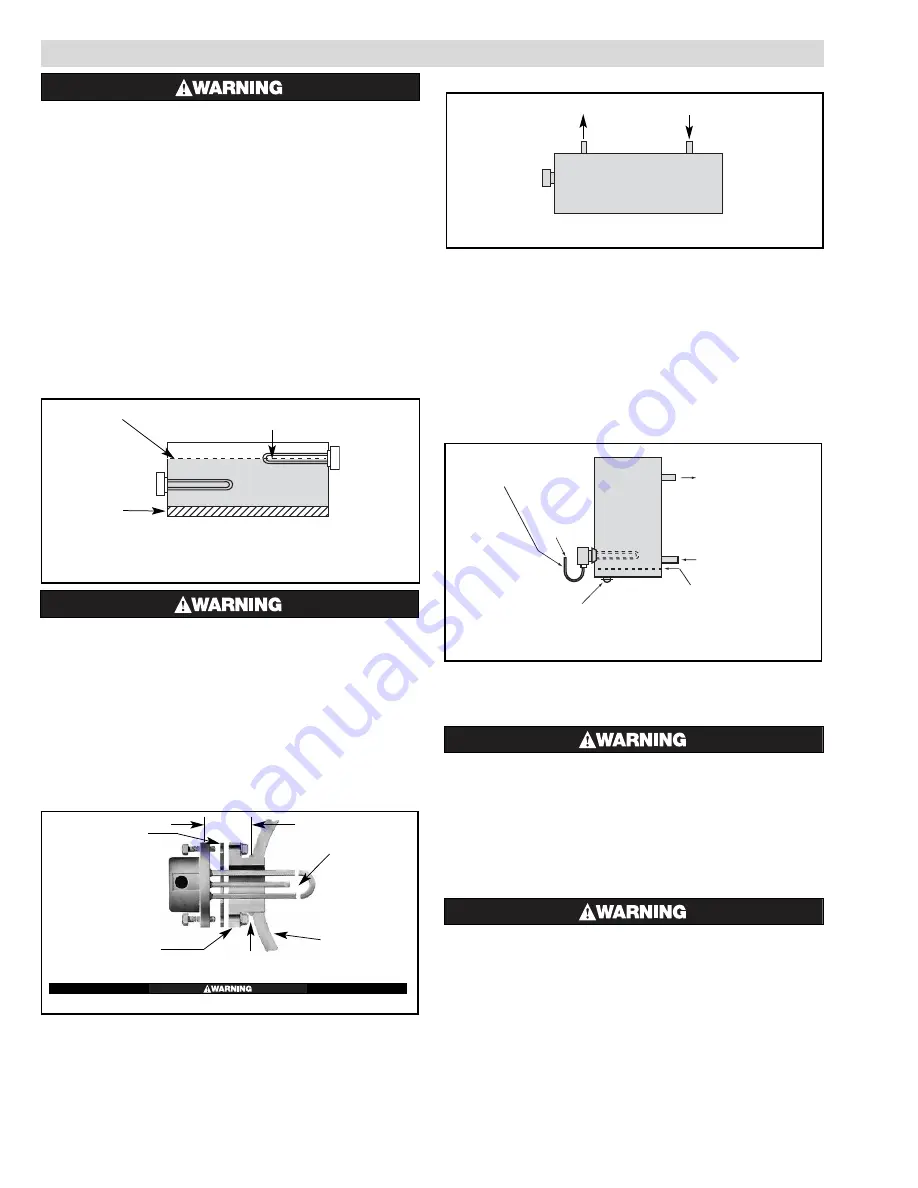
Mount the heater in the tank so that the liquid

level will always be above the effective heated portion of the
heater. If the heater is not properly submerged, it may overheat and
damage the heating elements  (see Figure 1). 

FIRE HAZARD. If the heater is not properly sub-
merged, the heating elements will overheat and could
result in a fire or damaged equipment.

5.

Where work will pass over or near equipment, additional protec-
tion such as a metal guard may be needed.

6.

Heater must not be operated in sludge.

7.

The gasket surface must be clean and dry before the heater is seat-
ed (see Figure 2).

8.

Closed Tank Installation

Note:

When heating in closed vessels, controls and 

back-up controls must be used to prevent buildup of temper-
ature and/or pressure.

A. Horizontal Position (Figure 3)

A1.

Place heater at an elevation so that natural circulation can 

take place.

A2.

Position outlet and inlet in a vertical plane, facing upward 
to prevent air pockets. Be sure all trapped air is removed from
the closed tank. Bleed the air out of the liquid piping system
and heater enclosure prior to operation.

A3. IMPORTANT:

Heater should never be located at the

highest point of the water system. Provide expansion tank
if necessary.

A4.

Heaters shall be supported if the immersion length is greater
than 36”.

B. Vertical Position (Figure 4)

9.

A drip loop is recommended to minimize passage of moisture
from condensation along wiring into terminal box enclosure and
connections.

FIRE HAZARD. Since heaters are capable of developing
high temperatures, extreme care should be taken to:

A.

Use explosion-resistant terminal enclosures in hazardous loca-
tions. See Chromalox catalog for selection of explosion-resis-
tant terminal enclosure for hazardous locations.

B.

Avoid contact between heater and combustible materials.

C.

Keep combustible materials far enough away to be free of the
effects of high temperatures.

FREEZE HAZARD. This unit may be equipped with a
thermowell for process control or over-temperature
control. Do not allow moisture to accumulate in ther-
mowell. Freezing temperatures can cause damage
that may result in the heated medium leaking into ter-
minal enclosure.

Note:

Locate Heater as low as possible for maximum heated liquid storage capac-

ity. Heat does not move downward.

Figure 1 - Open Tank Installation

Expected Low Liquid

Level

This Portion of the Heater Above Liquid Level and

Exposed to Air Will Lead to Premature Failure of Element

Expected Maximum

Sediment Level

Figure 2 - Flanged Mounting

Care must be taken to ensure the heated portion does not extend into the coupling area.

Gasket

Cold End (See Warning)

Element

Tank

Wall

Standard

Pipe Flange

Weld

Locate Drain Pipe at Bottom of Heater,

Sediment Deposits may be

Removed Through Drain Pipe

Maximum Sediment Level.

Install Heater 

Above

This Level But As

Near to it as Possible for Maximum

Heated Liquid Storage Capacity

Suitable

Wiring

Drip Loop Recommended

to Minimize Passage of Moisture

Along Wiring Into Terminal

Wiring and Connections

Outlet

Inlet

Figure 4 - Closed Tank in Vertical Position

Heater

Outlet

Inlet

 Note: In A Forced Circulation System, Use Pump In Inlet Side.

Figure 3 Closed Tank in Horizontal Position

2

Summary of Contents for TM Series

Page 1: ...hich depending upon the solution being heated can cause an explosion or fire D Pipe flange sizes in 3 5 6 8 10 12 and 14 inches are standard Other sizes are also available E Units are available with E1 General Purpose E4 Moisture Resistant and E2 Explosion Moisture Resistant terminal enclo sures FIRE HAZARD An integral thermostat if provided is designed for temperature control service only Because...

Page 2: ...ORTANT Heater should never be located at the highest point of the water system Provide expansion tank if necessary A4 Heaters shall be supported if the immersion length is greater than 36 B Vertical Position Figure 4 9 A drip loop is recommended to minimize passage of moisture from condensation along wiring into terminal box enclosure and connections FIRE HAZARD Since heaters are capable of develo...

Page 3: ...rage by at least 25 Be sure to consider the ambient operating temperature and apply the appropriate cor rection factor to the ampacity rating of the wire Heaters with the same voltage and wattage may be connected in series for operation at a higher voltage INSTALLATION cont d THERMOSTATS 10 To prevent moisture accumulation in cryogenic applications or when heater is exposed to freezing temperature...

Page 4: ...R VOLTAGE L2 L1 L3 TM Series 18 Element All sheath materials 12 ELEMENT 2 CIRCUIT 3 PHASE SEE HEATER NAMEPLATE FOR VOLTAGE AL1 AL2 AL3 BL1 BL2 BL3 L1 L2 L3 12 ELEMENT 1 CIRCUIT 3 PHASE SEE HEATER NAMEPLATE FOR VOLTAGE 18 ELEMENT 3 CIRCUIT 3 PHASE SEE HEATER NAMEPLATE FOR VOLTAGE BL1 AL3 AL1 AL2 BL2 BL3 CL2 CL3 CL1 TM Series 45 Element All sheath materials AL1 27 ELEMENT 3 CIRCUIT 3 PHASE SEE HEATE...

Page 5: ...a and for providing Chromalox with hazardous area specifications and requirements for proper equipment design NEC and IEC provide guidelines for evaluating and classifying hazardous locations Safety Devices Approved pressure and or temperature limiting controls must be used on electric heaters and heating elements to ensure safe opera tion in the event of system malfunctions Note Locations includi...

Page 6: ...1 1 2 5 1 CONDUIT OUTLET E1 GENERAL PURPOSE ENCLOSURE FOR UP TO 5 FLANGE E2 EXPLOSION RESISTANT ENCLOSURE FOR UP TO 5 FLANGE E4 MOISTURE RESISTANT ENCLOSURE WITH GASKET UP TO 5 FLANGE 10 1 2 267 Removable Service Entrance Plate Dimple for locating chassis punched conduit opening s E4 MOISTURE RESISTANT ENCLOSURE WITH GASKET 6 AND LARGER FLANGE E1 GENERAL PURPOSE ENCLOSURE FOR 6 AND LARGER FLANGE E...

Page 7: ...ity thermal conductivity of the material and operating temperature are all factors in deter mining the allowable watt density of the element Consult facto ry if in doubt about the proper watt density for the heater in a par ticular application 14 When heating liquids in a large tank the use of several small heaters will provide more uniform heat distribution than a single large heater OPERATION 1 ...

Page 8: ... Heating Elements 45 Forty Five Heating Elements Code Wattage 004P5 4 5 kW use actual kilowatt in 3 digits Code Terminal Housing Style E1 General Pupose E4 Moisture Resistant E2 Explosion Moisture Resistant E5 Explosion Moisture Resistant addition of Group IIC w Acetylene IEC only Code Non Standard Feature Blank Catalog PCN item XX Custom Feature Code Voltage 208 208V 240 240V 380 380V 415 415V 48...

Page 9: ...2 305810 014 Terminal Housing Cover Gasket E2 132 305967 004 132 305969 005 132 116937 040 132 116937 044 132 116937 047 132 116937 046 132 116937 050 Terminal Housing Cover E2 080 305967 003 080 305969 004 080 306161 021 080 306161 022 080 306161 023 080 306161 024 080 306161 025 1 Set of Cover Enclosure Bolts E2 N A N A 168 306161 010 168 306161 011 168 306161 012 168 306161 013 168 306161 014 T...

Page 10: ...50 N RULON WHITE BLVD OGDEN UT 84404 Phone 1 800 368 2493 www chromalox com Limited Warranty Please refer to the Chromalox limited warranty applicable to this product at http www chromalox com customer service policies termsofsale aspx ...

Reviews: